19 Temporary Backsplash Ideas for Renters That Peel Off Clean
Quick answer: The best temporary backsplash ideas for renters are peel-and-stick tile (vinyl, gel or metal), contact paper, removable panels and freestanding splash guards. Clean and degrease the wall, test a hidden spot, keep any adhesive material well away from the burners, cut around outlets with the power off, and remove with a hair dryer and a slow, low-angle peel. Check the lease and photograph the wall first.
Temporary backsplash ideas are a favorite renter project because a backsplash is small, visible and easy to reverse. Many rental kitchens have bare painted drywall behind the sink and the stove, or a worn, dated tile that you are not allowed to touch. A typical backsplash zone is only 15 to 30 square feet, so a bold pattern is affordable, and you can finish it in an afternoon. The catch is that a kitchen wall gets grease, steam and heat, and the wrong product will peel, stain or damage the paint underneath. This guide covers the lease check, material comparisons, 19 ideas, a table, three example kitchens, a prep and install method, a worked layout for a 30 by 24 inch area, removal, costs, mistakes and a checklist. For the wider kitchen picture, see our guide to renter-friendly kitchen upgrades.
Check the lease and photograph the wall
Read the lease for words such as alterations, adhesives, wall coverings and fixtures. Peel-and-stick products are often fine, because they are removable, but some landlords limit anything stuck to the wall. Ask in writing and keep the reply. Photograph the wall in good light before you start, including the existing paint finish and any marks, and photograph it again after you remove the backsplash.
Test first. Stick a small piece of the product in a hidden spot, such as behind the fridge or at the edge near a cabinet, and leave it for a week. Peel it off slowly. If the paint lifts, flakes or looks chalky, use a freestanding option instead. Flat, matte paint and fresh paint under about four weeks old are the most likely to pull off.

Choose the material: vinyl, gel, metal and more
Vinyl peel-and-stick tile
These are thin, flat sheets with a pattern printed on them. They are the cheapest and the easiest to cut with scissors or a craft knife. The finish is usually glossy or matte, and the look is more convincing from a distance. Vinyl can soften if it sits too near a heat source, so check the product’s temperature rating.
Gel or 3D peel-and-stick tile
Gel tiles have a raised, resin-like surface that looks like glass or ceramic. They add depth and shine, and they feel thicker. They cost more than flat vinyl, and the edges show more at outlets and corners. They can also collect grease in the grooves, so wipe them often.
Metal and stainless peel-and-stick
Thin aluminum or stainless sheets suit a modern or industrial look, and they handle heat better than vinyl. Look for products that state a heat rating, and be careful with sharp cut edges. Fingerprints and water spots show, so use a microfiber cloth.
Contact paper and removable films
Plain adhesive film is the lowest-cost option, and it comes in marble, subway and solid patterns. It is thinner and more likely to bubble, and it is best for low-splash walls, not behind a cooktop.
Removable panels and sheets
Large sheets of lightweight acrylic or PVC panels, hung or stuck with removable adhesive, cover more area with fewer seams. Check the product’s rating for kitchens, and follow the installation guide.
19 temporary backsplash ideas
Peel-and-stick tile looks
1. Classic white subway peel-and-stick
A white subway pattern is the safest choice and suits nearly any kitchen. Choose a version with a slim grout line printed in light gray, and run the tiles in a standard brick pattern, offset by half a tile. Vinyl is cheapest, and gel gives more depth.
2. Gel tile in a glass look
Glass-look gel tiles reflect light, which helps a dark kitchen. Use a neutral color, and check that the surface can be wiped with a mild cleaner.
3. Marble-look sheets
Large marble-look vinyl sheets have fewer seams and look sleek behind a sink. Choose a subtle vein pattern, because strong veins reveal the seams.
4. Terracotta or patterned encaustic look
A bold cement-tile pattern turns a small backsplash into a feature. Keep the rest of the kitchen quiet, and limit the pattern to a single band between the counter and the cabinets.
5. Hexagon or penny-round tile
Hex and penny shapes add texture and are forgiving with uneven walls. Peel-and-stick sheets are often sold as mesh-backed mosaics, which makes them quick to apply.
6. Herringbone peel-and-stick
A herringbone pattern adds movement, though it is harder to align. Mark a center line first and work outward.
7. Stainless or copper-look metal tiles
Metal tiles look sharp behind a range and are easier to wipe, though they show fingerprints. Look for a rated heat tolerance if you will use it near the stove.
Film and paper options
8. Contact paper subway pattern
A roll of printed adhesive film is the cheapest way to try a pattern. Use a squeegee or a credit card to push out air, and cut seams on a clean line.
9. Solid-color contact paper
A solid color or a glossy white film behind the sink brightens the area and hides worn paint. Choose a film rated for kitchen use.
10. Peel-and-stick wallpaper with a wipeable finish
Some peel-and-stick wallpapers have a wipeable vinyl surface. Use them only in low-heat, low-splash areas, and see our guide to removable wallpaper ideas.
11. Chalkboard or whiteboard film
A film that you can write on gives you a note wall and a backsplash in one. Keep it away from heat, and use it behind the prep area.
Panels and sheets
12. Clear acrylic or polycarbonate sheet over the existing wall
A clear sheet protects dated paint or tile from splatter while leaving it visible. Fix it with removable adhesive tape rated for the weight, and leave a small gap at the cooktop. Use a heat-rated material near burners.
13. Beadboard-style PVC panels
Thin, lightweight panels in a beadboard pattern add a cottage look. Stick or hang them with removable adhesive, and check that the product is rated for kitchens.
14. Tin-look ceiling tiles
Lightweight faux tin tiles can be stuck to a wall as a backsplash. Choose a type that is rated for walls and heat, and look at the sheet’s thickness.
15. Stainless steel sheet behind the range
A stainless sheet behind a stove is a common solution because metal withstands heat and wipes clean. Fasten with removable adhesive tape, and leave a gap along the countertop if the manufacturer recommends it.
Freestanding options
16. A freestanding splash guard
A tempered glass or stainless splash guard that stands on the counter protects the wall behind a stove or a sink with no adhesive. It is the lowest-risk option for a landlord who bans anything on the wall.
17. A magnetic stove-back panel
A magnetic panel can attach to a steel range back, and holds utensils. Check the fit, and the heat rating.
18. A lean-on tile board
A large board covered with tile or a pattern, leaned or placed behind a counter item, works as a movable backsplash. This is best along a short run, such as a coffee station.
19. Open-shelf or cart wall
A cart or a shelf that stands against the wall covers a section of wall and adds storage. See our guide to small kitchen cart ideas.
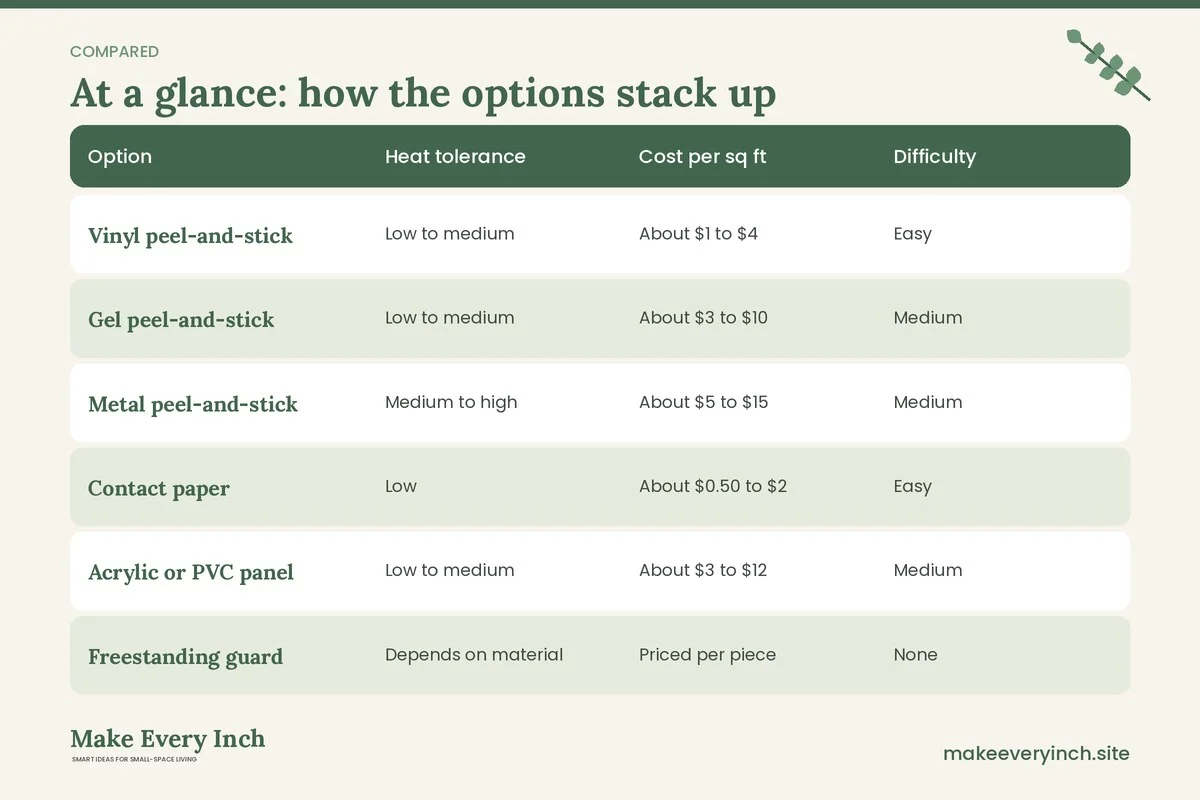
How the main options compare
| Option | Heat tolerance | Cost per sq ft | Difficulty | Removal |
|---|---|---|---|---|
| Vinyl peel-and-stick | Low to medium | About $1 to $4 | Easy | Easy with heat |
| Gel peel-and-stick | Low to medium | About $3 to $10 | Medium | Easy with heat |
| Metal peel-and-stick | Medium to high | About $5 to $15 | Medium | Careful |
| Contact paper | Low | About $0.50 to $2 | Easy | Easy |
| Acrylic or PVC panel | Low to medium | About $3 to $12 | Medium | Easy |
| Freestanding guard | Depends on material | Priced per piece | None | None |
Costs are hedged ranges that vary by brand, retailer and sale, and the heat tolerance depends on the specific product, so read the label.
Heat and grease safety behind the stove
The area behind a stove is not like the rest of the backsplash. Burners, oven vents and splattering oil put a lot of stress on adhesive and on plastic.
- Check the product’s stated heat rating, and follow the manufacturer’s clearance guidance.
- Keep vinyl, gel, contact paper and wallpaper well clear of the burners. If the product has no heat rating, do not use it in the zone directly behind a cooktop.
- A metal sheet or a tempered glass freestanding guard is safer in that zone.
- Do not cover vents, outlets or the manufacturer’s labels on the range.
- Wipe splatter promptly, because grease softens adhesive over time.
- Do not use an open flame or a heat gun on a bare plastic backsplash.
- Check your range’s manual for clearance to combustible surfaces.
A common compromise is to use the peel-and-stick product along the sink and the counter run, and a metal sheet or a freestanding guard directly behind the burners.
Prep the wall properly
Clean and degrease
Wash the wall with warm water and a mild dish soap, then wipe with a cloth dampened with a degreaser or a mix of water and a small amount of rubbing alcohol. Rinse with clean water, and let it dry for several hours. Adhesive does not stick to grease, dust or soap film, and most failures begin here.
Check the surface
Run your hand over the wall. Fill any dents with spackle if the lease allows, or leave them and choose a thicker product. Heavy texture is a problem, because adhesive will not hold well and the pattern will telegraph through thin vinyl.
Fix loose paint
If the paint is flaking, do not put adhesive over it. Use a freestanding option.
Warm the room
Many adhesives work best between about 65 and 80 degrees Fahrenheit, so check the label. A cold wall reduces tack.
Install method: step by step
Step 1. Measure and plan
Measure the width and the height of the area, and subtract any outlets. Add 5 to 10 percent for waste and pattern matching.
Step 2. Turn off the power
Switch off the circuit for any outlet you will work around. Remove the outlet cover by unscrewing it, and keep the screws. Do not touch wiring. If the outlet is loose or damaged, tell your landlord.
Step 3. Mark a level line
Draw a level line a tile height above the counter, or use the counter edge if it is straight. Many counters are not level, so use a level and a pencil.
Step 4. Start at the center or at a visible corner
Start where the pattern matters most, usually the center of the sink or the stove, and work outward. This keeps cut pieces at the edges where they show less.
Step 5. Peel and press
Peel back a few inches of the backing, align the tile and press from the center outward. Smooth with a squeegee or a credit card. Peel more backing as you go.
Step 6. Cut around outlets
Hold the tile over the outlet and mark the opening with a pencil, or trace the outlet plate. Cut with a sharp craft knife on a cutting mat, leaving about 1/8 inch of room. The cover plate will hide the edge, and you may need slightly longer screws to replace it. Use only the power-off method.
Step 7. Trim at the edges
At the corners and under the cabinet, cut each tile to fit with a knife and a straightedge. Replace blades often, since dull blades tear vinyl.
Step 8. Finish and wait
Press the whole surface once more and wait the manufacturer’s recommended time before cleaning, often 24 hours. Restore the outlet covers, then turn the power back on.
A worked layout for a 30 by 24 inch area
A typical small backsplash behind a counter or a stove top is 30 inches wide and 24 inches high, which is 5 square feet. Here is how to plan it with 3 by 6 inch subway tiles in a brick pattern.
- Tiles per row: 30 inches divided by 6 inches is 5 tiles.
- Rows: 24 inches divided by 3 inches is 8 rows.
- Full tiles: 5 by 8 is 40, so with a half-tile offset on every second row you need about 44 tiles to cover waste at the ends.
- If you are using 12 by 12 inch sheets, you need 2.5 sheets across and 2 sheets high, which is 5 sheets. Buy 6 to leave room for cuts and mistakes.
- Keep the center line of the pattern at 15 inches from the left edge, so the pattern is symmetrical.
- If there is an outlet, mark it before you cut, and aim to place a seam at its edge.
The same method works for any area. Multiply the width by the height in inches, divide by 144 and add 10 percent.
Three example kitchens
The rental with a bare wall behind the sink
A kitchen has a plain painted wall and no splash protection. Clean the wall, then apply white subway vinyl from the counter to 18 inches above, wrapping a little way past the sink on each side. It costs about $30 to $60 for the whole zone and takes an afternoon.
The galley with a stove against the wall
A narrow galley kitchen has the range against the back wall. Use stainless steel or a freestanding tempered glass guard directly behind the burners, and the same vinyl pattern along the counters on each side. The material changes at the stove, but the color stays consistent, which looks planned.
The kitchen with dated tile
A kitchen has worn, yellowed tile that you cannot remove. Use a clear acrylic sheet or a thick peel-and-stick tile that covers the grout lines. Test on a small area first, because grout lines are uneven and thin vinyl will show them. A thicker gel tile hides them better. If the lease bans anything on the tile, use freestanding guards.
Removing a temporary backsplash without damage
Warm the surface with a hair dryer on medium heat, moving it slowly for 30 to 60 seconds. Starting at a corner, peel the tile back on itself at a low angle, almost parallel to the wall, and keep the dryer moving. Do not yank, because fast pulls take paint with them. Clean any residue with a cloth dampened with a little rubbing alcohol or a gentle adhesive remover, and test it on a hidden spot first. Wash the wall with warm soapy water, and let it dry. If paint lifts, stop, tell your landlord and offer to touch it up. Photograph the wall afterward.
Budget guide
Under $40
Contact paper or a pack of vinyl peel-and-stick tiles for a small sink area.
About $100
Gel peel-and-stick tiles for a full 20 square foot run, plus a squeegee and a craft knife.
$200 and up
A stainless or tempered glass splash guard behind the range, plus premium tiles along the counters.
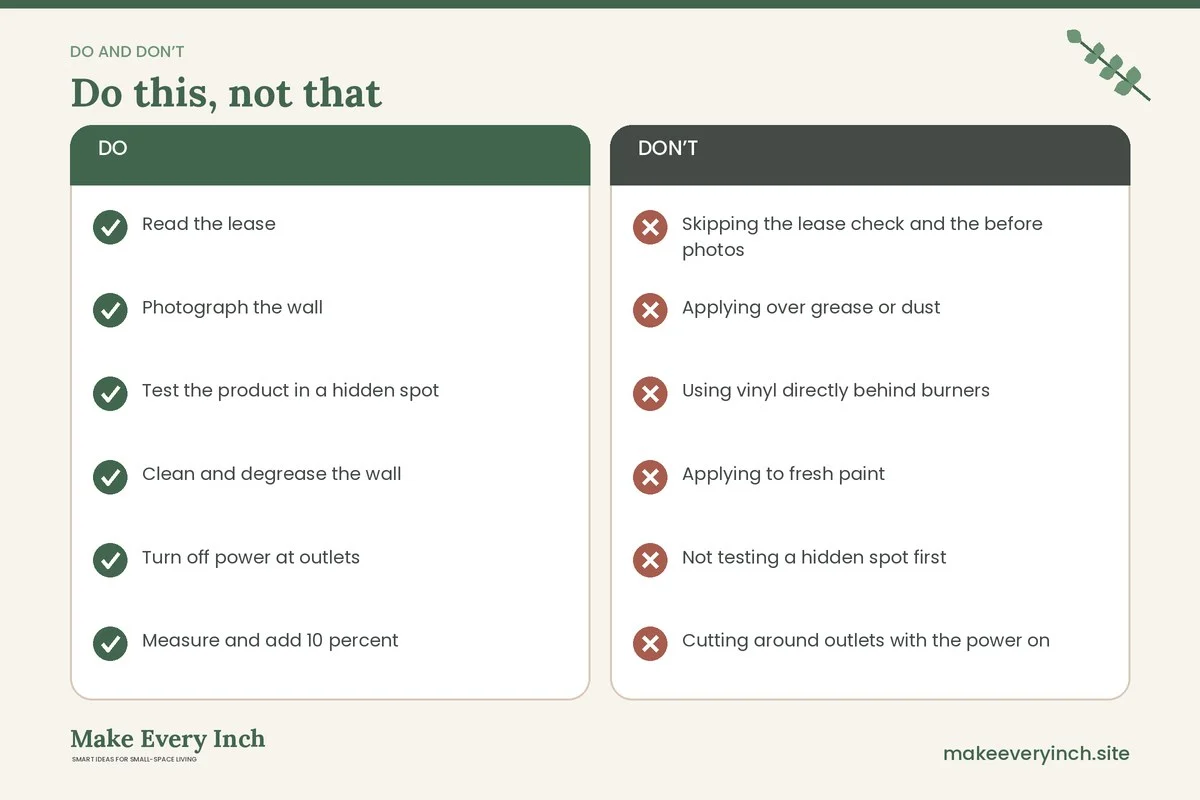
Mistakes to avoid
- Skipping the lease check and the before photos
- Applying over grease or dust
- Using vinyl directly behind burners
- Applying to fresh paint
- Not testing a hidden spot first
- Cutting around outlets with the power on
- Pulling the tile off fast
- Using a cold wall or a cold room
- Buying exactly the area measured, with no waste allowance
Backsplash checklist
- Read the lease
- Photograph the wall
- Test the product in a hidden spot
- Clean and degrease the wall
- Turn off power at outlets
- Measure and add 10 percent
- Plan the layout from a center line
- Check heat ratings behind the stove
- Press out air as you go
- Warm with a hair dryer to remove
- Photograph at move-out
FAQ
What is the best temporary backsplash for renters?
Peel-and-stick tile is the most popular, and a freestanding glass or stainless guard is the safest where the lease bans adhesive.
Will peel-and-stick tile damage my walls?
It can if the paint is fresh, flat or flaking, or if you pull the tile off fast. Test first and remove it with heat.
Can I use peel-and-stick tile behind a stove?
Only if the product states it is rated for that heat, and keep it clear of the burners. Metal or tempered glass is safer.
How long does it last?
It varies by brand and conditions. Steam and grease shorten it, so wipe the area often.
How do I cut around outlets?
Turn off the power, take off the cover, trace the opening and cut with a sharp craft knife, leaving a small gap. The cover plate hides the edge.
How do I remove it?
Warm it with a hair dryer, peel slowly at a low angle and clean the residue with a little rubbing alcohol.
How much does it cost?
Roughly $0.50 to $15 per square foot, depending on the material, so a small backsplash can cost under $50.
Can I put it over existing tile?
Often yes, but grout lines may show through thin products, and the tile must be clean. Use a thicker gel tile, or a clear sheet, for better coverage.
Keep going: Explore our renter-friendly kitchen upgrades, security deposit safe apartment upgrades and small kitchen makeover ideas.
Save this guide for later
Pin the ideas you like to Pinterest so you can come back to them when you plan your space.