Small Bathroom Tile Ideas
Quick answer: The best small bathroom tile ideas keep the surface calm: choose one or two tile types, match grout to tile so lines fade, run wall tile floor to ceiling or at least above eye level, consider large format tile on walls where fewer joints help, and pick a floor tile with a slip rating suited to wet areas. Renters can try peel-and-stick tile on floors or backsplash areas, within the lease and with realistic expectations.
Small bathroom tile ideas matter more than most decorating choices, because tile covers the largest, hardest and most permanent surfaces in the room. In a bathroom of 35 to 50 square feet, the floor, the shower or tub wall and the sink wall can be almost all tile, so the size, pattern, grout and finish you pick shape how the whole room feels. They also shape how safe the room is, since the wrong floor tile turns a wet bathroom into a slide. This guide covers how tile size and layout change the feel of a small space, how to choose grout color, when floor-to-ceiling tile helps, how large format tile works and where it does not, how to read slip resistance, what a hedged cost and effort picture looks like, which renter-safe options exist, three example bathrooms, a comparison table and a checklist. For the wider topic, see our pillar guide to small bathroom ideas, and read the companion guide on small bathroom color schemes that open up the room.
Start with what the tile has to do
Before looking at patterns, list what each tiled surface must do. A bathroom has four zones that ask different things of tile.
- The floor: it must be flat, durable and slip resistant when wet. It sees water, soap, bare feet and dropped items.
- The wet wall (tub or shower): it must be waterproof behind the tile, with a reliable system of backer, membrane or approved panels. The tile is the finish, not the barrier. Grout and tile edges are not waterproof on their own.
- The splash zone (behind the sink and toilet): it faces splashes and cleaning. A short run of tile, around 4 to 6 inches above the vanity, protects the wall, while a taller run adds drama.
- The dry wall: it needs no tile. Paint, panels or wallpaper in a moisture-suitable finish can do the job. See our guide to small bathroom color schemes that open up the room.
Spending tile where it works hardest, on the floor and the wet wall, and saving it elsewhere, is a common way to control effort and cost while keeping the room consistent.
How tile size changes a small room
There is a long-standing belief that small rooms need small tile. In practice, the answer depends on how many lines you create and where they fall.
Small tile (mosaics, 1 to 3 inches)
Mosaic sheets have many joints, which gives grip underfoot and lets the tile follow curves, such as a sloped shower floor. On a wall, the lines multiply, and the surface can look busy. Small tile is often a good choice for shower floors, where the slope to the drain demands flexibility, and where the extra grout lines add traction. A mosaic in a pale tone with matching grout can look soft.
Medium tile (4 to 12 inches)
Square and subway-style tile at 3 by 6 or 4 by 12 inches are classic wall choices. They are easy to handle, forgiving of slightly uneven walls and available in many finishes. Layout decides the effect: a vertical stack draws the eye up, a horizontal run widens the room, and a brick offset feels traditional. A 12 by 12 inch floor tile is common in small bathrooms and has a moderate number of joints.
Large format tile (roughly 12 by 24 inches and up)
Large format tile reduces the number of grout lines, which makes a surface look more continuous. On a small floor, a few large tiles can feel calm. However, large tile needs a flat substrate, because any dip shows as lippage (uneven tile edges) or hollow spots. In a bathroom with a sloped shower floor, a very large tile cannot follow the slope easily. In a tiny room, the layout can also leave awkward thin cuts along the walls if the tile does not divide evenly into the room.
A quick measuring test
Measure the room’s width and length, and divide by your tile size plus the grout joint. Aim for cuts at the walls that are at least half a tile wide, not thin slivers. If your layout ends in a 1 inch sliver on one side, shift the start line so that both edges get a wider cut. A tile setter can mark a layout before any adhesive goes down, and doing this dry layout is worth the time.
Pattern: what opens the room and what does not
Pattern changes where the eye goes. You can choose a pattern to push the room wider, draw it taller or keep it quiet.
Straight lay (grid)
Tiles aligned in a grid look orderly and simple. A grid of large tile on a floor looks tidy, and a grid of vertical-oriented tile on a wall lifts the eye.
Offset or brick bond
A half offset hides small differences in tile length and suits rectangular tile. On a wall, a horizontal brick pattern widens a narrow room. Offsetting by a third is often recommended for long, large tiles, because a half offset can exaggerate any bow in the tile. Check the manufacturer’s guidance for your tile.
Stacked vertical
Subway tile turned vertical, with joints lined up, emphasizes height. It suits a low ceiling or a shower that needs to feel tall.
Herringbone and chevron
These patterns add movement and interest. In a very small room they can feel busy, but with low-contrast tile and matching grout they read as texture. They also require more cuts, more waste and more skill.
Diagonal
Laying a square floor tile on the diagonal can make the floor appear larger by leading the eye across the corners. It creates more cuts at the edges and uses more tile. In a narrow room, it can feel like a visual trick that works if the tile is pale and the grout blends.
Patterned or encaustic-style tile
Bold patterned tile works well in small areas such as a floor in a powder room, because the effect has limited surface. In a larger bathroom it can compete with everything else. A good rule is to use pattern in one place and keep the others plain. If the floor is patterned, keep the walls plain, and the other way around.
Grout color: the quiet decision that matters most
Grout makes up a grid across your tile, and its color decides whether the grid fades or shows.
Matching grout
Grout that matches the tile, or sits one step darker, makes the surface look like one plane. This is the safest choice for opening up a small space, and it hides some dirt. It also makes the tile pattern less visible, so a plain tile can look flat if you want shape.
Contrasting grout
Dark grout with white tile shows every line and creates a graphic grid, which can look striking and also busy. It tends to make a small room feel smaller, because the grid advertises the room’s size. Light tile with light gray grout is a middle option.
Practical grout notes
- Joint width: narrower joints, often 1/16 to 1/8 inch for rectified tile, make lines less visible. Wider joints suit rustic or uneven tile. Follow the tile maker’s guidance.
- Material: cement-based grout is common and usually needs sealing in wet areas. Epoxy grout is more stain resistant but harder to work with. Ask the maker or an installer which suits your tile and your area.
- Maintenance: light grout shows stains in a floor that gets traffic and spills, while mid-tone grout hides them. Choose a tone that suits your cleaning habits.
- Mildew: grout in a poorly ventilated bathroom can darken with mildew. Run the exhaust fan, wipe water from walls after showers and clean on a regular schedule. Persistent growth is a sign of a ventilation or leak problem.
Floor-to-ceiling tile: when it works
Running tile from floor to ceiling in a shower or around the whole room makes a continuous envelope with few breaks. In a small bathroom it can feel like one surface, which is calming. It also protects walls from steam and splashes.
Where floor-to-ceiling helps
- In the shower or tub wall: running to the ceiling avoids a hard stop line at shoulder height, which is where the eye would pause in a small space. The tile height signals a taller room.
- On the feature wall: one wall in tile from floor to ceiling, with the other walls painted, gives interest without a heavy look.
- In a wet room: where the entire room is a wet area, full-height tile is practical.
Where to be careful
- Cost and effort: more tile means more labor, adhesive, grout and time. Plan your effort realistically.
- Echo and hardness: a room fully covered with hard surfaces can sound echoey. Textiles, a rug and a shower curtain help.
- Lighting: a glossy tile reflects light, which can be helpful, but strong glare from a single bulb can feel harsh. Use soft, layered lighting.
- Ceiling moisture: a ceiling above a shower needs paint suitable for damp rooms, or tile, and good ventilation.
A middle option: tile to above eye level
If full height is too much, run the tile to about 60 to 72 inches in the shower and finish with a trim. Painting the wall above in the same tone as the tile makes the stop less obvious. Some people tile to a standard height and then paint above in a moisture-suited paint, continuing the same color.
Large format on walls: fewer lines, more care
Large panels or tiles on walls have a clean, modern look. They suit small bathrooms where you want less visual noise.
- Flat substrate: the wall must be flat, and this often requires skim coating or leveling in older houses. Ask a qualified installer.
- Weight: large tiles are heavy, so adhesive coverage and a suitable substrate matter. Follow the maker’s instructions.
- Waterproofing: the tile is not the waterproof layer. The wall behind it needs a suitable waterproofing system. If you are unsure, consult a qualified installer, because failures behind tile are costly.
- Transport and cutting: big tiles break easily in narrow hallways and stairwells. Plan the route into the bathroom.
- Panels as an alternative: large solid panels, such as cement-based or sintered options, have few joints. Check their suitability for wet areas with the supplier.
Slip resistance and floor safety
A bathroom floor sees water, soap and bare feet. The right tile choice is a safety decision, not just an aesthetic one.
Reading the ratings
Different regions use different tests and labels. In many places, you will see a dynamic coefficient of friction (DCOF) value on a tile’s specifications, and some codes and guides suggest that tiles for wet areas should meet a higher value than a basic floor tile. In other regions, ramp tests produce R ratings (R9 to R13) or similar. Because standards differ, ask the seller which test applies to your area, read the product data sheet and ask the installer or a qualified professional what is appropriate for a wet bathroom floor.
Practical traction tips
- Choose a textured or matte surface for floors: polished or glossy tile gets slippery when wet. A matte, honed or lightly textured finish gives more grip.
- Use smaller tile or more joints in the shower: more grout lines give more traction, which is why mosaics are common for shower floors.
- Avoid glossy floor tile in a wet zone: gloss is lovely on walls, but a risk on floors.
- Add a mat: a non-slip bath mat with a backing that does not slide, and a mat that can dry between uses, adds grip. Check that it has drainage holes or can be lifted to dry, to avoid mildew.
- Keep the floor dry and clear: wipe up spills, keep cords and clutter off the floor, and use night lighting for late trips.
- Think about the people who use the room: children, older adults and anyone with mobility concerns need extra traction and may need grab bars. Grab bars must be anchored into solid backing, not just into tile. This is work for a qualified installer, and a suction grab bar is not a substitute for a fixed one in a place where someone may depend on it.
Plan the waterproofing and the basics
Tile looks like the waterproof surface, but it is not. Water passes through grout and sometimes through tile. Behind the surface, a waterproof system keeps the framing and the floor dry.
- Wet walls: use a backer or a membrane approved for wet areas, with sealed seams and corners, following the product instructions.
- Floors: a membrane or a suitable underlayment is often recommended under tile in a bathroom, depending on the subfloor.
- Movement joints and silicone: use flexible sealant (not grout) at corners, where the tile meets the tub, and at changes of plane. These joints need maintenance, and cracked sealant should be replaced.
- Ventilation: a working exhaust fan ducted outdoors, run during and after showers, protects tile, grout and walls. If the fan is weak or noisy, a qualified person can advise.
- Electrical: bathroom outlets and circuits near water should be protected by a ground fault circuit interrupter (GFCI). Tile work often involves moving boxes and fixtures, so turn off power at the breaker first and use a qualified electrician for any wiring.
- Permission: do not drill into tile, the tub surround or the walls of a rental without written permission. Drilling through tile can break it and puncture the waterproof layer behind it. If you own the home and must drill, use the correct masonry or diamond bit, mark the studs, and seal the hole against water with a suitable product.
- Dust and tools: cutting tile produces fine dust. Wear eye and respiratory protection suited to the task, and ventilate the area.
Most of these items come down to one idea: tile is the finish, and the system behind it keeps the house sound.
Renter-safe tile ideas
If you rent, permanent tile is usually off the table. Several removable options can change the look, though results vary and none are as durable as real tile.
Peel-and-stick tile on the floor
Self-adhesive vinyl tiles can cover a worn floor in a small bathroom. Practical points:
- Check the lease first. Some leases allow temporary floor coverings, others do not.
- Prepare the surface. The floor should be clean, dry, flat and free of wax and soap film. Textured or uneven floors can show through, and adhesives may not bond well to some surfaces.
- Moisture caution. Edges and seams can let water in, and water under the tile can loosen the adhesive and trap moisture. Use them with care in a bathroom with a splash-prone floor, and seal edges where the manufacturer allows.
- Removal. Some leave adhesive residue or lift the finish of the floor below. Test a small hidden area if you can, and read the maker’s removal guidance.
- Slip risk. Some vinyl surfaces are slick when wet. Look for a textured finish and add a non-slip mat.
Peel-and-stick tiles for the wall or backsplash
Adhesive wall tiles can be used behind the sink or on a small section of wall, away from direct shower spray. Test on a hidden spot, check the lease, and avoid areas with constant water. In the shower, results are less reliable, so many people avoid them there.
Removable wallpaper and panels
Water-resistant removable wallpaper can add pattern to dry or splash-free walls. Read more in our guide to removable wallpaper ideas.
Rugs, mats and runners
A bath mat is the simplest way to cover a tired floor. Choose a quick-drying one with a non-slip backing, and wash it often. A runner is not suitable in a wet zone if it slides.
Tile decals and stickers
Decals can cover a dated tile pattern. They can peel at edges in a steamy room, and may leave marks. Test one before you commit.
For more ideas in this area, see our guides to renter-friendly bathroom upgrades and renter-friendly bathroom ideas.
Hedged cost and effort picture
Prices vary widely by region, so this section compares effort and relative cost, not figures.
- Peel-and-stick tile: low cost, low skill, short time. Results and durability vary.
- Ceramic wall tile: low to medium material cost, medium to high labor. Widely available and easy to clean.
- Porcelain floor tile: medium cost, medium to high labor. Durable and available with traction ratings.
- Large format or panels: often higher material and labor cost because of flatness and handling demands.
- Natural stone: generally the highest cost and maintenance, because it needs sealing and can stain.
- Mosaics: the material can be pricier per square foot, and labor is higher because of the many joints.
A rough rule of thumb is that labor often matches or exceeds material cost, but local conditions differ. Get several written quotes, ask what is included (demolition, waterproofing, disposal) and add a margin for surprises, such as rot or uneven floors found after the old tile comes out.
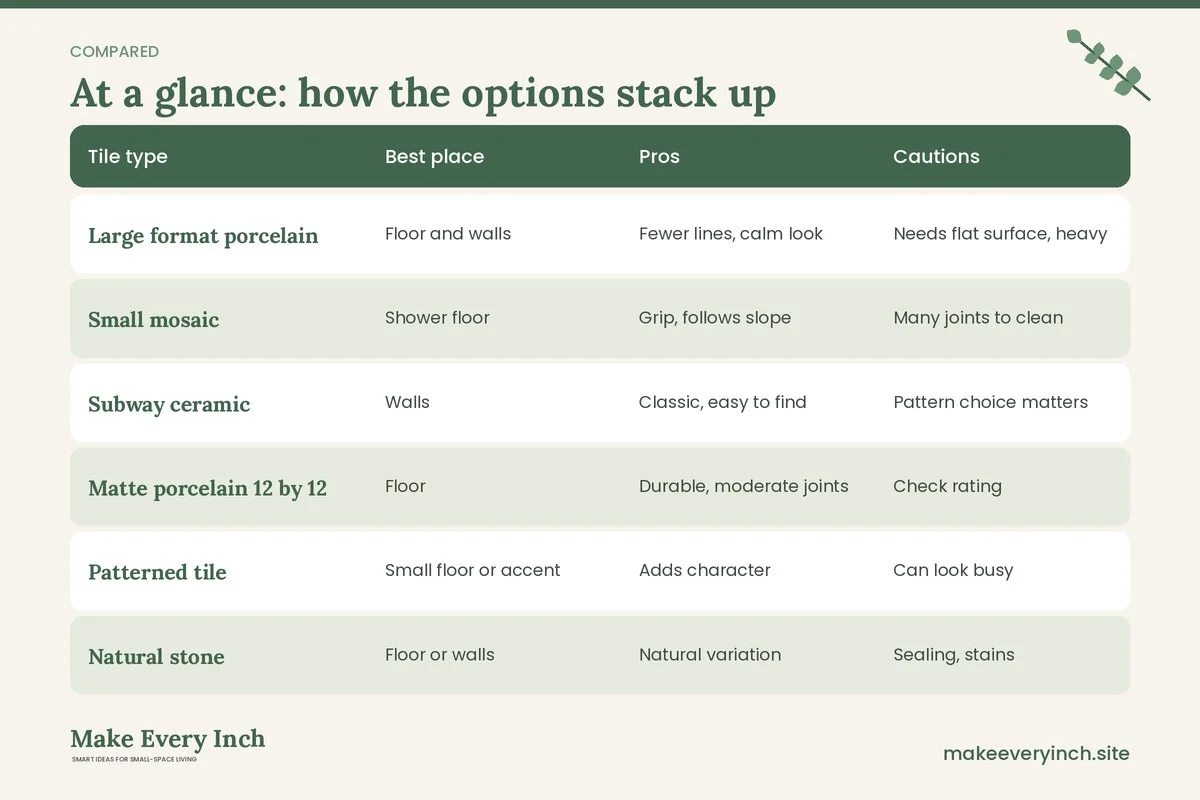
Tile comparison table
| Tile type | Best place | Pros | Cautions | Slip notes |
|---|---|---|---|---|
| Large format porcelain | Floor and walls | Fewer lines, calm look | Needs flat surface, heavy | Choose a matte, rated surface |
| Small mosaic | Shower floor | Grip, follows slope | Many joints to clean | Good traction |
| Subway ceramic | Walls | Classic, easy to find | Pattern choice matters | Glossy, wall only |
| Matte porcelain 12 by 12 | Floor | Durable, moderate joints | Check rating | Often a good choice |
| Patterned tile | Small floor or accent | Adds character | Can look busy | Check finish |
| Natural stone | Floor or walls | Natural variation | Sealing, stains | Polished can be slick |
| Peel-and-stick vinyl | Rental floor or splash | Removable, low effort | Moisture and edges | Add a non-slip mat |
Three example bathrooms
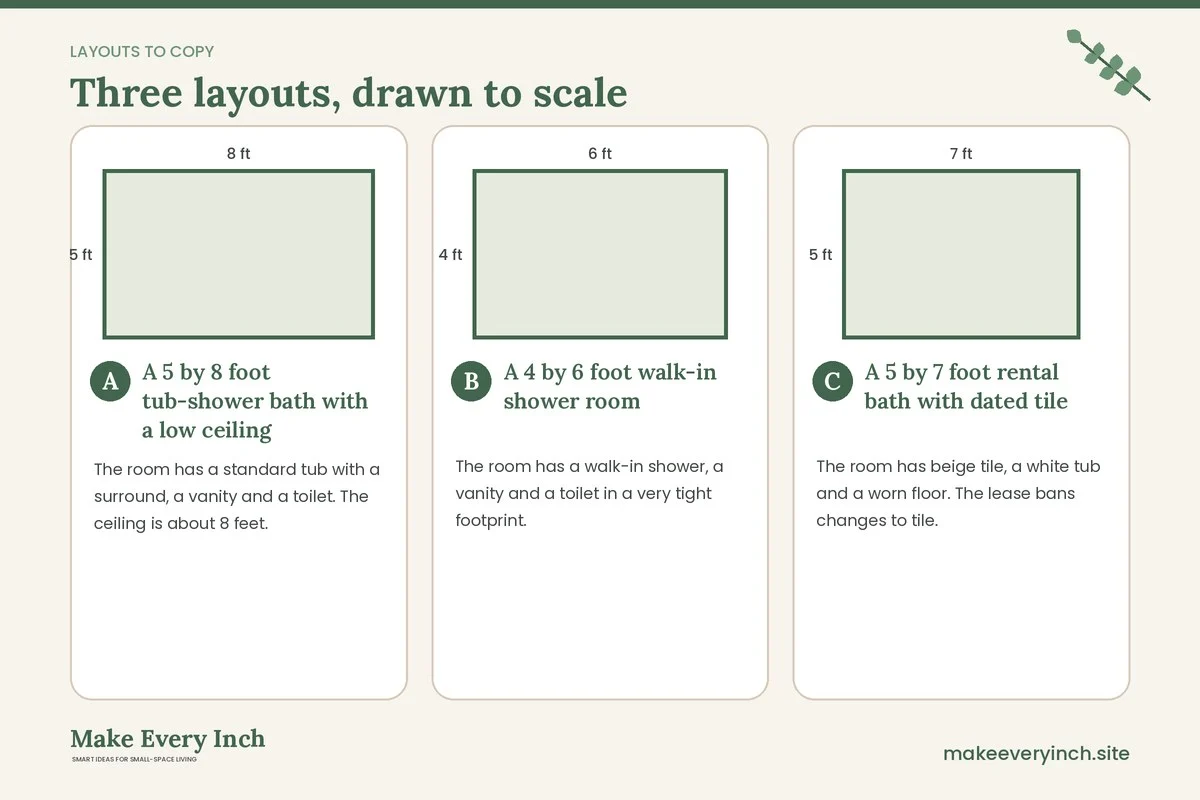
A 5 by 8 foot tub-shower bath with a low ceiling
The room has a standard tub with a surround, a vanity and a toilet. The ceiling is about 8 feet.
Tile the tub wall floor to ceiling in a pale 3 by 12 inch ceramic, laid vertically in a straight stack, with matching light grout, so the eye runs upward. On the floor, use a matte 12 by 12 inch porcelain in a light warm gray, with a grout one step darker that hides footprints. Paint the walls and ceiling in a pale tone close to the tile, so the lines fade. Check the floor’s slip rating and add a non-slip mat at the tub. Keep a working exhaust fan, and turn on the fan during showers.
A 4 by 6 foot walk-in shower room
The room has a walk-in shower, a vanity and a toilet in a very tight footprint.
Use the same large format tile on the floor and the walls to create a single, continuous surface, with a mosaic only inside the shower where the floor slopes. Match the grout carefully. Keep the tile pale and matte. Add a frameless glass panel or a simple curtain, and put a narrow niche in the shower wall for bottles, built during tiling with proper waterproofing. Plan the layout dry first, to avoid thin cuts at the walls. A fixed grab bar anchored into backing, installed by a qualified person, is a worthwhile addition for many households.
A 5 by 7 foot rental bath with dated tile
The room has beige tile, a white tub and a worn floor. The lease bans changes to tile.
Work with what is there. Choose a cream, sand and warm white palette that harmonizes with the beige. Place a peel-and-stick tile in a matte finish on the floor if the lease allows, testing a hidden corner first, and add a non-slip mat. Use a washable rug-style bath mat, a linen-look shower curtain and a wood stool. Add removable wallpaper to a splash-free wall only if allowed. Use tension-based or adhesive storage rated for damp conditions rather than drilling. For storage ideas, see our guides on small bathroom organization ideas and tiny bathroom storage ideas.
Common mistakes
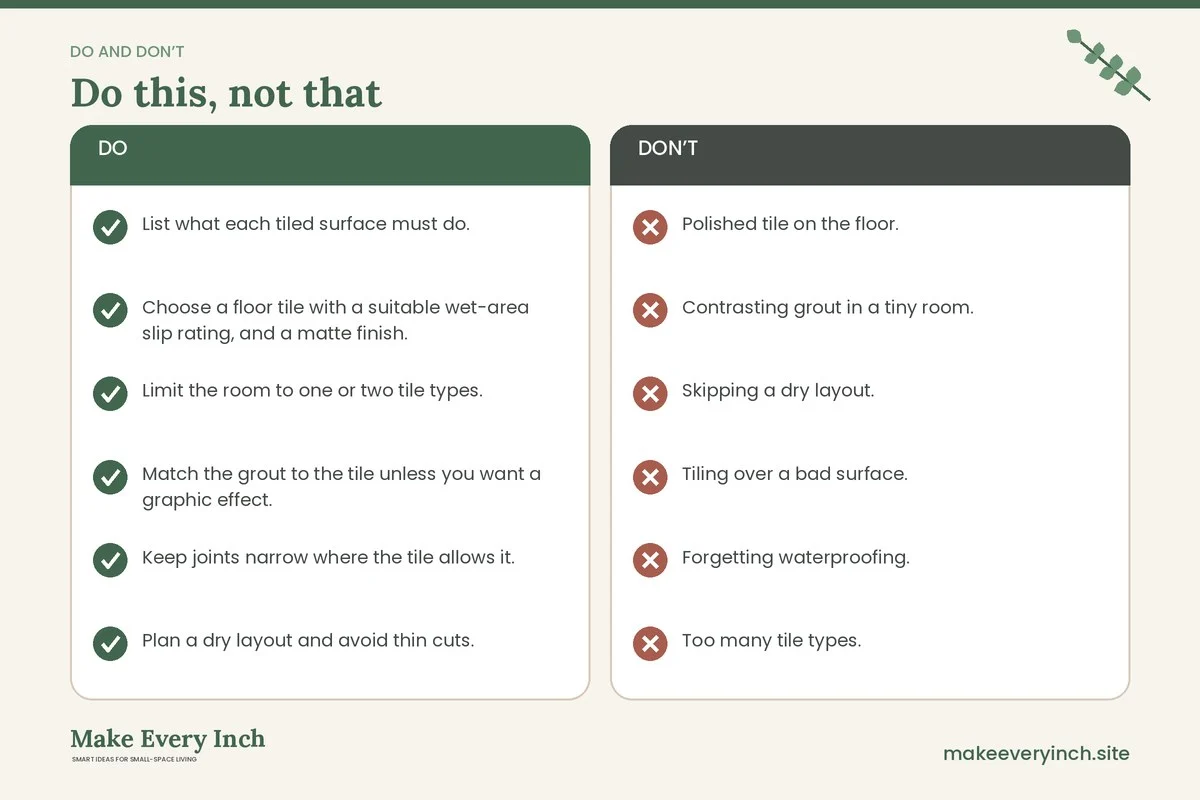
- Polished tile on the floor. It looks great and slips when wet. Choose a matte or textured finish with a suitable rating.
- Contrasting grout in a tiny room. A dark grid can make the space feel smaller. Match the grout, unless you want the graphic effect.
- Skipping a dry layout. Thin cuts at the walls look awkward. Plan the layout before you start.
- Tiling over a bad surface. Uneven, damp or soft substrates cause cracked tile. Fix the base first.
- Forgetting waterproofing. Tile and grout are not waterproof. Use a proper system.
- Too many tile types. More than two or three in a small room feels cluttered.
- Hanging heavy items on tile without backing. Towel bars, grab bars and shelves need solid anchoring.
- Ignoring ventilation. Without it, grout darkens and surfaces stay wet.
- Ordering exactly the amount you need. Order extra for cuts and future repairs, with the same batch number where possible.
A simple planning sequence
1. Measure the room and each tiled surface, and draw a simple plan.
2. Decide which zones get tile and which get paint or panels.
3. Choose the floor tile first, based on slip resistance and size.
4. Choose the wall tile and pattern, to fit the room’s shape.
5. Choose the grout color to match or to contrast, depending on the effect you want.
6. Order samples and view them in your bathroom’s light.
7. Plan a dry layout and mark the center lines.
8. Confirm the waterproofing, the substrate and the ventilation.
9. Check electrical needs, and book a qualified electrician if you are moving fixtures.
10. Order extra tile, and keep leftovers for repairs.
Checklist
- List what each tiled surface must do.
- Choose a floor tile with a suitable wet-area slip rating, and a matte finish.
- Limit the room to one or two tile types.
- Match the grout to the tile unless you want a graphic effect.
- Keep joints narrow where the tile allows it.
- Plan a dry layout and avoid thin cuts.
- Consider floor-to-ceiling tile in the shower, or tile to above eye level.
- Check that walls are flat before choosing large format tile.
- Confirm a proper waterproofing system behind wet-area tile.
- Use flexible sealant at corners and changes of plane.
- Turn off power before working near fixtures, and use GFCI protection.
- Anchor grab bars and heavy fixtures into solid backing, not just into tile.
- In a rental, get written permission before drilling, and use removable options.
- Run the exhaust fan during and after showers.
- Buy 10 to 15 percent extra tile for cuts and repairs, or more for complex patterns.
- Add a non-slip bath mat.
FAQ
Do small tiles make a small bathroom look bigger?
Not necessarily. Small tiles create more lines, which can look busy on walls. Larger tiles reduce lines and can feel calmer, although they need a flat surface. Small tiles are practical on shower floors, where they follow the slope and add traction.
What grout color is best in a small bathroom?
Grout that matches or sits one step darker than the tile usually makes the surface look continuous, which suits small rooms. Dark grout with light tile creates a bold grid that can make the room feel smaller.
Should I tile floor to ceiling in a small bathroom?
It can make the room feel taller and more continuous, especially in the shower. It adds effort and cost, so many people tile the wet walls fully and paint the others. Tiling to above eye level is a middle path.
Is large format tile good for a small bathroom?
It can be, because there are fewer grout lines. It needs a flat surface and careful layout, and it is harder to use on sloped shower floors. Ask a qualified installer if your walls and floor are uneven.
What tile is least slippery for a bathroom floor?
Matte or textured porcelain with a slip rating suited to wet areas is a common choice, and small mosaics add grip because of the joints. Check the product data sheet and ask which test applies in your area. Polished tile is usually slippery when wet.
Can renters change bathroom tile?
Not permanently without permission. Peel-and-stick floor and wall tile, removable wallpaper, bath mats and decals are temporary options. Check the lease, test in a hidden spot and expect that results and removal vary.
Is peel-and-stick tile safe in a bathroom?
It is used in bathrooms, but moisture can seep under edges and loosen it, and some surfaces are slippery when wet. Use it away from direct water if possible, choose a textured finish, and follow the maker’s guidance.
Can I drill into bathroom tile to hang shelves?
Only with permission if you rent, and with care if you own. Use the correct bit, avoid cracking the tile, locate studs or solid backing, and seal the hole against water. When in doubt, choose no-drill options or ask a professional.
How much extra tile should I buy?
Many installers suggest roughly 10 to 15 percent extra for cuts and breakage, with more for diagonal or complex patterns. Keep a few spare tiles for future repairs.
Keep going: Keep planning with our small bathroom color schemes that open up the room, small bathroom shelving ideas and small bathroom makeover ideas.
Save this guide for later
Pin the ideas you like to Pinterest so you can come back to them when you plan your space.