Budget Small Space Makeovers, Before and After: Six Scenarios
Quick answer: The best before after budget small space makeovers start with a clear problem, not a style. Photograph the room, list what annoys you, change the layout first, then light, then storage, then surface finishes. Most small rooms improve with a few inches of clearance, one better light source and less visible clutter. Keep changes reversible in a rental, and never skip safety steps such as anchoring tall furniture.
Before after budget small space makeovers are popular because they promise a dramatic change with few resources, yet the photos rarely show the reasoning behind the change. A cleaner room in the second picture is the result of decisions: what moved, what left, what stayed and why. This guide shows that reasoning. It explains how to document your starting point, how to diagnose what is really wrong, and how to plan changes in the right order. It then walks through six example scenarios, described as illustrations with approximate measurements, so you can borrow the logic for your own space. You will also find a change table, a photo method, safety notes, mistakes and a checklist. For the larger collection of ideas, read our pillar on budget small space ideas, and for a plan that begins with an empty apartment, see the sibling guide on how to furnish a small apartment on a budget.
What a good before and after really shows
A strong makeover is not a prettier room. It is a room that works better. When you compare two photos, look for four kinds of change.
- Flow: can you walk through without turning sideways, and do doors and drawers open fully
- Light: does the room feel brighter in the evening and in the morning, and are there fewer harsh spots and dark corners
- Order: are the surfaces clear, and does everything have a home
- Calm: do the colors and shapes agree, or does the eye jump from one thing to the next
If a makeover improves only the fourth, it is a styling change. If it improves the first three, it is a real change. Style then makes the real change enjoyable to look at. Aim for both, but fix function first, since a room that looks good and works badly will frustrate you within a week.
Step one: document the before
The before photo is the most valuable thing in the process, and many people skip it. Without it, you cannot see how much has changed, and you lose a record for the lease.
How to take useful photos
- Stand in the same spot in each corner of the room, with the camera at about chest height
- Take wide photos of each wall, including the floor and ceiling lines
- Take close photos of problem spots, such as a cluttered shelf, a dark corner or a door that bumps furniture
- Photograph at two times of day, such as morning and evening, to see how light changes
- Note the date, and keep the photos in one album
Measure and sketch
Record the room size, ceiling height, door and window sizes and the footprint of each large piece. A simple sketch with measurements shows what you cannot see in a photo, like a 22 inch gap that should be 30. Keep the sketch with the photos.
Write the annoyance list
Walk through a normal day, and write down every moment where the room annoys you. Examples are a bag with no hook, a lamp too far from the sofa, a chair that blocks the closet, a table that wobbles or a window that lets in glare. Rank the list from most to least irritating. The top three become the brief for the makeover. A budget stretches much further when it solves three clear problems than when it chases an overall style.
Step two: decide the order of changes
Order matters because early changes make later ones cheaper or unnecessary. Use this sequence.
1. Remove and sort: take out what you do not use, and what is broken
2. Rearrange: change the layout with the furniture you already own
3. Fix light: move or add lamps, change bulbs, hang curtains correctly
4. Add storage: only for what remains after the sort
5. Change surfaces: textiles, removable finishes and, with permission, paint
6. Finish: art, plants and small items
Skipping from step one to step six is how people end up with a new pillow in a cluttered room. In many cases, the first three steps cost very little, and they deliver most of the visible difference.
The change table
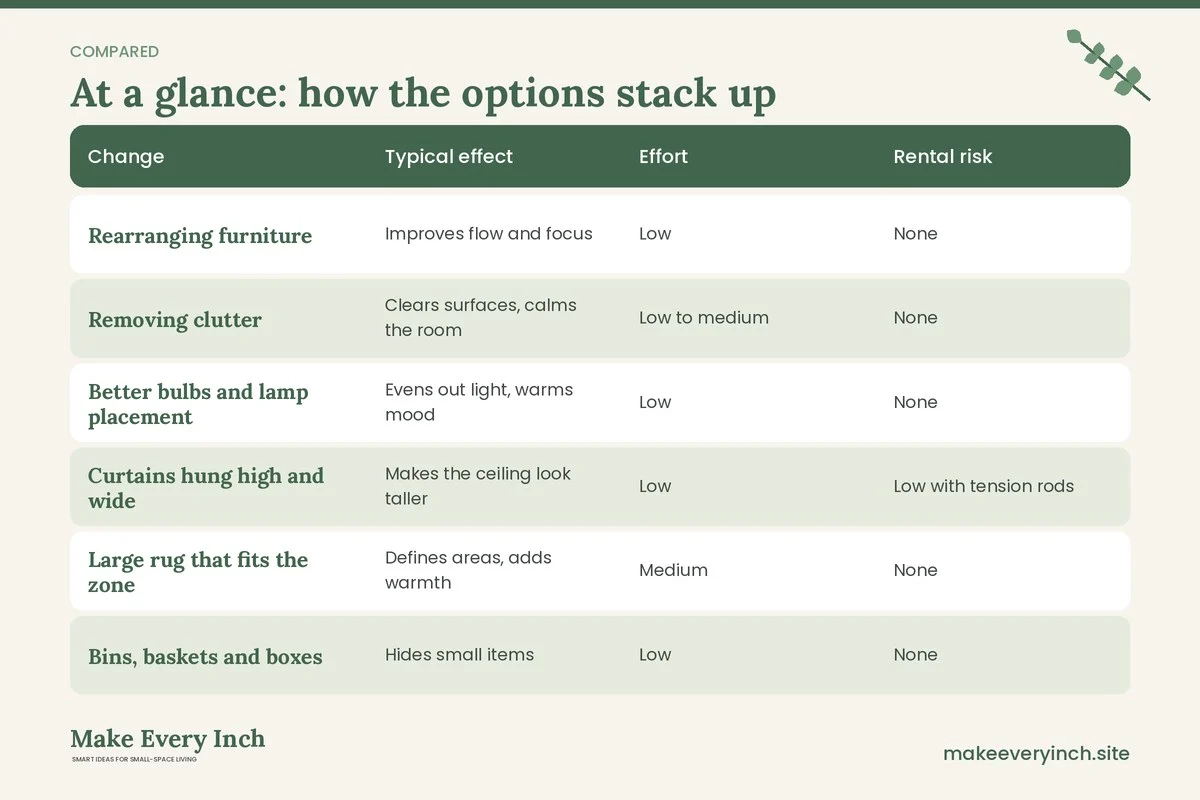
The table summarizes typical changes, their effect and their risk. Effort is relative, and results depend on the room.
| Change | Typical effect | Effort | Rental risk |
|---|---|---|---|
| Rearranging furniture | Improves flow and focus | Low | None |
| Removing clutter | Clears surfaces, calms the room | Low to medium | None |
| Better bulbs and lamp placement | Evens out light, warms mood | Low | None |
| Curtains hung high and wide | Makes the ceiling look taller | Low | Low with tension rods |
| Large rug that fits the zone | Defines areas, adds warmth | Medium | None |
| Bins, baskets and boxes | Hides small items | Low | None |
| Freestanding shelving | Adds storage without drilling | Medium | Low if anchored with permission |
| Removable wallpaper or decals | Changes the feel of a wall | Medium | Medium on delicate paint |
| Painting walls or furniture | Large visual change | Medium to high | High on walls without permission |
| New knobs or pulls | Refreshes old furniture | Low | Low if you keep the originals |
Six scenarios, from problem to result
Each scenario below is an illustration based on common situations. The measurements are approximate, the changes are suggestions, and the results will vary with your space. They are not claims about tests or specific products.
Scenario 1: the studio entry that swallowed everything
Before. A studio opens straight into the main room. Shoes sit on the floor, a bag hangs on the door handle, and a small table near the door has become a pile of mail and keys. The walkway from the door to the window is about 24 inches wide because a chair juts out.
Diagnosis. The entry has no job assigned to it. The chair is there because the owner had nowhere else to put it, and the table collects things because it is the first flat surface.
Changes.
- Move the chair to the window wall, which widens the walkway to about 34 inches
- Replace the table with a narrow shelf or bench, about 10 to 12 inches deep, so shoes fit under it
- Add over-the-door hooks or adhesive hooks within their weight limit for bags and coats
- Place a small mat and a tray for keys, and a basket for mail
After. The entry becomes a landing zone. Everything arrives in the same place, and the main room is clear. The change costs very little, because most of it is repositioning. For more on this, see studio apartment entryway ideas and apartment entryway decorating.
Scenario 2: the living room with a sofa that was too big
Before. A living room of about 11 by 12 feet has a deep sofa along the long wall, a coffee table and a TV stand. The path past the sofa is about 20 inches, the room feels crowded, and nobody uses the second chair.
Diagnosis. The sofa is about 38 inches deep and 88 inches wide. It dominates, and the coffee table has no room to breathe.
Changes.
- Swap the large sofa for a smaller one, perhaps 68 to 76 inches wide, through a resale listing or a trade with a friend, if the budget allows. If not, remove the bulky back cushions and use slimmer ones to reclaim a few inches
- Replace the coffee table with a pair of nesting tables or a tray on an ottoman, so the middle opens up
- Float the sofa a few inches from the wall, only if it does not block a path, and place a lamp behind it
- Hang curtains high and wide to lift the eye
After. The path widens to about 30 inches, the room feels deeper, and the second chair finds a use as an occasional seat beside a table. Our guide on small living room makeover ideas on a budget offers further layout options.
Scenario 3: the bedroom with no bedside space
Before. A bedroom of about 9 by 10 feet holds a double bed pushed into a corner, a dresser against the opposite wall and a stack of boxes. The sleeper climbs over the foot of the bed, because one side is against the wall. The only light is a ceiling fixture.
Diagnosis. The layout wastes the bed’s potential, and the room has no ambient or task light.
Changes.
- Center the bed on the short wall, if the room allows it, with about 24 inches on both sides
- Use a wall-hugging shelf or a narrow stool on each side as a nightstand, small enough for the gap
- Add a small lamp on each side, or one lamp with a plug-in clip, with warm light
- Put the boxes under the bed in labeled bins, ventilated and kept dry
- Replace the ceiling bulb with one that suits the fixture, and add a dimmer only if the landlord allows it
After. Getting into bed is easier, the room has a symmetrical focal point, and the light at night is softer. See also small bedroom makeover under 200.
Scenario 4: the kitchen with no counter
Before. A galley kitchen has about 3 feet of counter. The toaster, a dish rack, a bag of potatoes and a pile of mail share the same space. Cooking means moving everything twice.
Diagnosis. Items that do not need to live on the counter live there, because storage is out of reach or poorly arranged.
Changes.
- Remove everything that is not used daily, and store it in a nearby cabinet or box
- Hang a tension rod under a cabinet or inside a cabinet door for utensils and cleaning supplies
- Add a rolling cart about 14 to 18 inches wide in the gap by the fridge, with locking wheels
- Use a drawer organizer to separate tools, and risers to double shelf space
- Place heavy items low, and keep the cart away from the stove, oven and hot surfaces
After. The counter has room for chopping and one small appliance. The cart handles overflow. Electrical appliances stay away from the sink, and outlets near water should be protected by GFCI, so if the outlet is not, ask the landlord to check it. For further ideas, see small kitchen before and after ideas and budget small kitchen makeover.
Scenario 5: the bathroom that felt like a closet
Before. A small bathroom of about 5 by 7 feet has a pedestal sink, a tub with a curtain, and a basket on the floor for towels. Products clutter the sink edge, and the room feels damp and dim.
Diagnosis. There is no vertical storage, and the dark curtain and low light make the room feel smaller.
Changes.
- Replace the curtain with a light, mold-resistant one, and hang it close to the ceiling
- Add an over-the-toilet unit or a freestanding rack, anchored properly with permission, and rated for the weight
- Use adhesive hooks designed for damp rooms for towels, within their limits
- Swap the bulbs for a warm, bright option that is suitable for damp locations
- Run the exhaust fan during and after showers, and leave the door open to dry the room
After. The room feels brighter, and the sink is clear. Ventilation keeps moisture down. Do not place electrical items near the tub or sink, and never use a regular extension cord in a bathroom. For related plans, see small bathroom ideas before and after and small bathroom makeover ideas.
Scenario 6: the corner desk that was a dumping ground
Before. A desk sits in a corner of the living room with a monitor, loose papers, cables and a chair that blocks the walkway. Working hours blur into relaxing hours.
Diagnosis. There is no boundary between work and leisure, and the setup is uncomfortable.
Changes.
- Shift the desk so the user faces the room or the window, rather than a blank wall
- Add a shelf above, and a basket for papers, and a cable tray or clips to tidy cords, without covering outlets or vents
- Use a folding screen, a curtain or a bookcase back to separate the desk from the sofa, and anchor the bookcase
- Set the screen so the top is about at eye level, and raise the seat so your forearms rest level with the desk
- Put a lamp on the side opposite your writing hand to reduce shadow
After. The desk reads as a defined zone, and shutting down for the day means closing a lid and drawing a curtain. See how to create a work zone in a small apartment for more.
How to compare your own before and after
When the makeover is done, use a repeatable method to see whether it worked.
Match the photos
Take the new photos from the same spots as the old ones, with the same camera height and time of day. Place them side by side. If you cannot tell what is different, the changes were too subtle, or the camera angle moved.
Score it
Give the room a score from one to five for flow, light, order and calm before and after. Honest numbers show where to focus the next round. A room that jumps in flow but not in light needs a lamp, not another shelf.
Live in it for two weeks
A room may look good on day one and annoy you by day ten. Keep notes on what you still trip over, reach for or ignore. Small adjustments in week two often matter more than the first changes.
Keep the receipts and the measurements
Write down what you spent and what you moved. Over time, this record shows which choices paid off, and it helps you plan the next room.
Budget tiers without prices
Specific costs depend on where you live, so think in tiers of effort and spending instead.
Tier one: free
Rearranging, decluttering, borrowing, swapping items between rooms, cleaning windows, washing curtains and removing everything from surfaces. This tier does the most for the least.
Tier two: low
Bulbs, a lamp, bins, hooks, a tension rod, a mat, a second-hand chair or table, a bottle of low-VOC paint for a small piece. Choose items that work in more than one room.
Tier three: moderate
A rug that fits, curtains and a rod, a small sofa or a console, shelving that you anchor, and a quality mattress topper. Save these purchases until the earlier tiers have shown you what you need.
Our guides on small space decorating ideas on a tight budget and budget friendly furniture ideas for small apartments can help you rank options.
Safety notes for every makeover
Anchor tall furniture
Bookcases, shelving units, dressers and wardrobes should be anchored to the wall with suitable hardware, particularly where children or pets live. In a rental, ask permission, and discuss alternatives. Never drill into a wall without approval. If you cannot anchor, choose a low piece instead and place heavy items on the bottom shelf.
Electrical and ventilation
Do not overload outlets or daisy-chain strips. Keep cords out of walkways, and do not run them under rugs. Keep heaters and vents clear. If a lamp bulb is hot, keep it away from fabric.
Wet areas
Bathrooms, kitchens and laundry rooms need moisture-resistant materials and GFCI protected outlets. Keep electrical items away from water.
Paint and adhesives
Use low-VOC paint, open windows and give surfaces time to cure. Test adhesives and removable wallpaper in a hidden spot, and read the lease. Older paint may contain lead, so do not sand it without advice.
Weight limits
Adhesive hooks, shelves and rods all have limits. Read labels and stay well below them. Do not hang heavy mirrors with adhesive strips over a bed or a sofa.
Child and pet safety
Keep cords, small objects and plants out of reach, and check that new furniture has no gaps that can trap a limb. Pets may chew cords, so use covers.
Lease permission
If a change is not clearly allowed, ask in writing. Keep the original hardware, restore any changes before moving out and keep your before photos. See security deposit safe apartment upgrades and budget renter upgrades for lease-safe options.
Mistakes that spoil a makeover
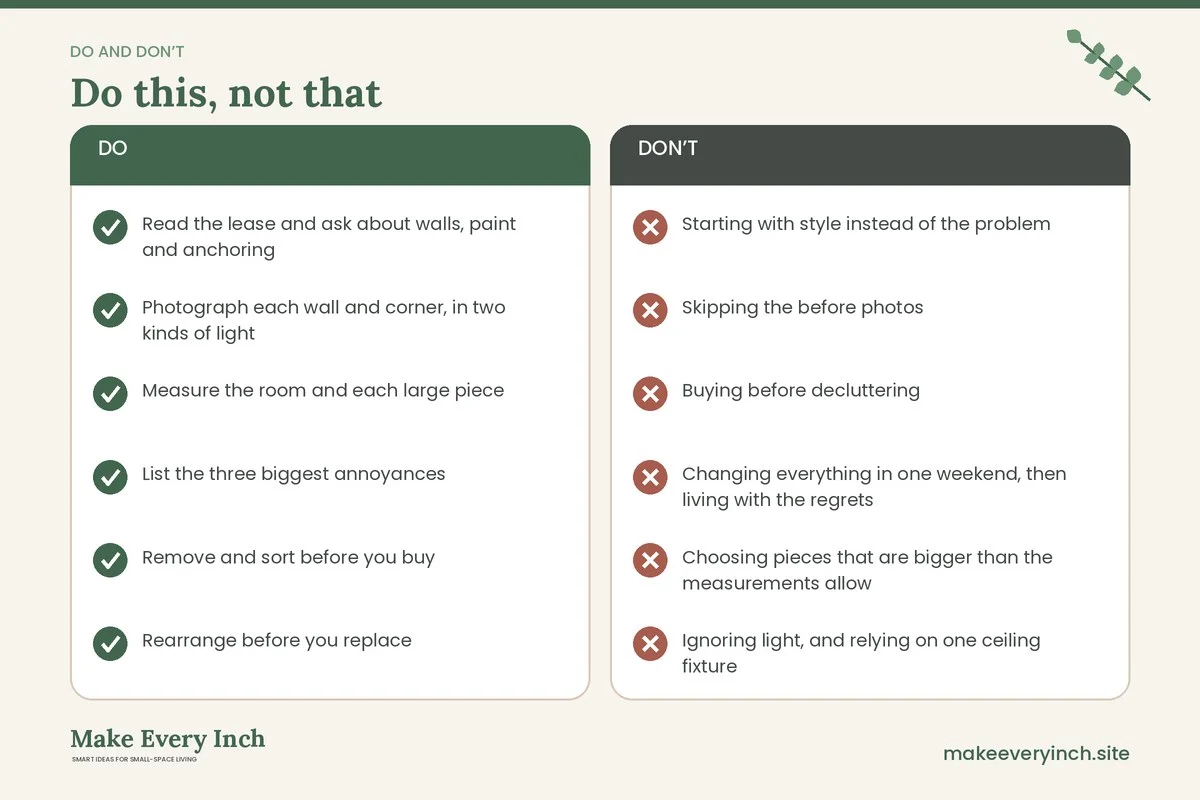
- Starting with style instead of the problem
- Skipping the before photos
- Buying before decluttering
- Changing everything in one weekend, then living with the regrets
- Choosing pieces that are bigger than the measurements allow
- Ignoring light, and relying on one ceiling fixture
- Using too many small items that look like clutter
- Hiding clutter in unventilated places or behind heaters
- Painting or drilling without permission
- Comparing your room to a staged photo
A two weekend plan
Weekend one: edit and rearrange
Photograph and measure on Friday evening. On Saturday, remove everything you do not use and move furniture into the new layout. Live with the layout on Sunday, and note issues. Do not buy anything yet.
Weekend two: light, storage and finish
Add light first, then storage that fits the stuff you kept. Hang curtains, lay a rug and place art. Retake the photos. Score the room, and note one thing to improve next.
Checklist for your own makeover
- Read the lease and ask about walls, paint and anchoring
- Photograph each wall and corner, in two kinds of light
- Measure the room and each large piece
- List the three biggest annoyances
- Remove and sort before you buy
- Rearrange before you replace
- Fix light before decor
- Anchor tall furniture
- Keep cords, vents and heaters clear
- Use low-VOC products and ventilate
- Retake photos from the same spots
- Score the room before and after
- Keep original hardware for move-out
FAQ
How do I plan before after budget small space makeovers?
Photograph the room, list the three biggest annoyances, and change layout, light and storage in that order. Decor comes last. Take after photos from the same spots.
What should I change first in a small room?
Start with decluttering and layout, since both cost little and affect flow. Light comes next, then storage, then surface finishes.
How can I take good before and after photos?
Use the same spots, height and time of day. Take wide shots of each wall and close photos of problem areas. Keep them in one album.
Can I do a makeover in a rental?
Yes, with reversible changes: rearranging, lamps, curtains on tension rods, rugs, bins and removable finishes. Ask permission for anything that touches walls, and never drill without it.
Which changes make the biggest difference for the least effort?
Removing clutter, moving furniture to open walkways, and improving light. These three often change a room more than new decor.
How long does a small space makeover take?
Many can be done over one or two weekends. Living with the changes for a couple of weeks helps you spot adjustments.
Is it safe to move furniture around alone?
Move heavy pieces with help, empty drawers first and use sliders on hard floors. Do not lift pieces that could tip or that exceed your strength.
How do I make a makeover last?
Give each item a home, keep surfaces clear and review the room each season. Small, regular edits keep the result from slipping.
Keep going: Keep going with our pillar on budget small space ideas, the sibling guide on how to furnish a small apartment on a budget and our ideas for a small apartment makeover on a budget.
Save this guide for later
Pin the ideas you like to Pinterest so you can come back to them when you plan your space.