Small Living Room Makeover Ideas IKEA Shoppers Can Plan in 4 Weeks
Quick answer: The best small living room makeover ideas IKEA shoppers can use follow one order: declutter, measure, fix the layout, paint, build the flat-pack furniture, add lighting, then textiles and styling. Choose modular pieces that you can rearrange, anchor every tall unit to the wall studs, keep a 30 to 36 inch walkway, and spread the work across four weeks so each step is finished before the next begins.
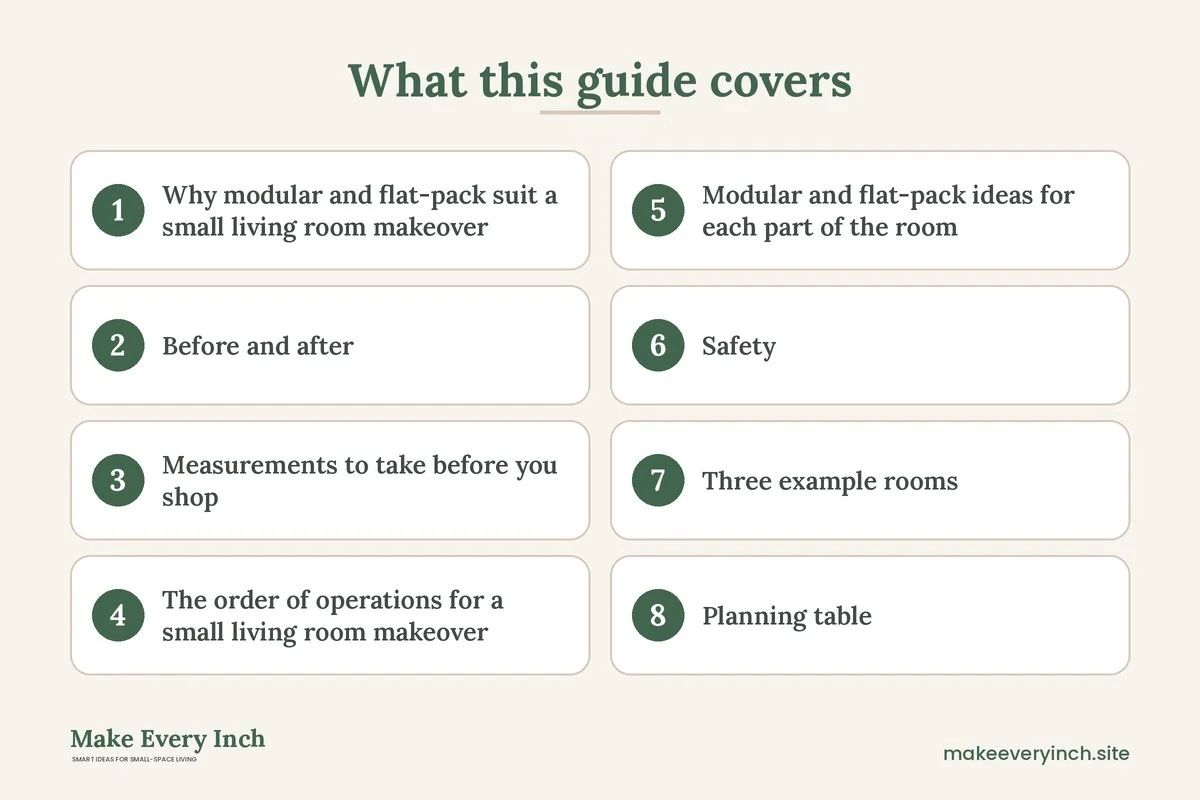
Small living room makeover ideas IKEA fans love tend to share one feature: the furniture is modular, flat-packed and designed to be reconfigured. That makes a makeover easier than it sounds, because you can build the room in stages, move pieces when the plan changes and replace one module instead of the whole set. This guide is a step-by-step plan rather than a list of products. It explains how to think about before and after, how to measure, what order to work in, how to use modular and flat-pack furniture safely, how to build a room around three example layouts, and how to finish the project in a weekend or in four weeks. It sits alongside our main guide to small living room makeover ideas, the wider small living room ideas pillar and the lower-cost small living room makeover under 500 post. No product names appear here, because the method matters more than the catalog. Any flat-pack range with standard-sized modules will work.
Why modular and flat-pack suit a small living room makeover
A small room punishes mistakes. A sofa that is six inches too deep or a shelving unit that blocks a window can ruin an otherwise good plan, and big furniture is hard to return. Modular and flat-pack furniture reduces that risk in four ways.
- Standard dimensions. Most ranges use repeating widths, depths and heights. If a unit is a given width, you can plan a wall of them on paper and know that they will line up.
- Small boxes. Flat-pack arrives in boxes that fit through narrow doors, stairwells and elevators. A fully assembled version of the same item may not.
- Rearranging later. A wall of cubes can become a room divider, a media console or a low bench. The same parts can follow you to the next home.
- Staged spending. You can buy the base first and add doors, drawers, legs or lighting once you know how you live in the room.
There are trade-offs. Flat-pack needs assembly time, patience and a careful read of the instructions. Some boards scratch and dent more easily than solid wood. Tall units need anchoring. And a room made entirely from one range can look flat, so mix in a vintage piece, a woven basket or a plant. The aim is a room that looks collected, not catalog-staged.
Before and after: define the makeover first
A makeover without a goal drifts. Before you buy anything, write a short before and after statement. It takes ten minutes and saves weeks of second-guessing.
- Before: describe what is wrong in plain words. For example, “The sofa blocks the window, there is nowhere to put a drink, the room is dark in the evening and the shelves are overflowing.”
- After: describe the room you want to walk into. For example, “A clear path from the door to the window, a light-filled sofa wall, storage that closes, and two places to sit with a drink.”
Take photos of the room from each corner and from the doorway. Photos show clutter you have stopped seeing. Keep them to compare once the project is done. Then pick no more than three priorities. Every extra priority adds cost and delay, so a makeover with three clear goals usually beats one with ten.
Measurements to take before you shop
Flat-pack plans fail on a few inches. Measure twice and write the numbers on a sketch of the room.
- Room width and length: wall to wall, at floor level and at shoulder height, since walls are not always square.
- Ceiling height: to check whether tall units will fit, including any crown molding or sloped edge.
- Window and door positions: measure the distance from the corner to the edge of each, the sill height and the door swing.
- Radiators, vents and outlets: note where they are, because furniture should not block them.
- Baseboard depth: typically a half inch or more. Tall units may need a spacer or a notch to sit flush with the wall.
- Path from the front door to the room: measure doorways, turns and stair widths so that boxes and assembled pieces can pass.
Then use these rules of thumb.
- Walkways: 30 to 36 inches for the main path, 24 inches for a side path used occasionally.
- Sofa to coffee table: 14 to 18 inches.
- Seating to screen: about 7 to 9 feet for a typical wall-mounted screen in a small room.
- Rug size: a 5 by 8 foot rug suits most small rooms, with at least the front legs of the sofa on it.
- Shelf depth: 10 to 12 inches for books and decor, 14 to 16 inches for baskets and media gear.
- Storage height: keep the top of a freestanding unit below the ceiling by at least a few inches, so it can be tilted into place.
Tape the footprint of every planned unit on the floor with painter’s tape. Live with the tape for a day. If you keep stubbing your toe on a taped corner, the real unit will do the same.
The order of operations for a small living room makeover
The sequence matters, because later steps undo or damage earlier ones. Paint before you build furniture. Lay out the room before you buy lighting. Add textiles last. Here is the order that works for most rooms.
Step 1: Declutter
Empty one category at a time: books, media, papers, decor, blankets, toys. Keep, donate, recycle or store. A small room cannot hold things that you do not use, and the best storage is the storage you do not need to buy. For a deeper method, read our guide to small apartment decluttering ideas. Do this step first, because the amount of stuff you keep decides how much storage you actually need.
Step 2: Fix the layout
Decide where the sofa goes, where the main path runs and which wall carries the focal point. In a small room, the focal point is usually a window, a media wall or a shelving wall. Use tape and paper templates to test two or three arrangements. Our guide to small living room layout ideas walks through common options.
Step 3: Prepare and paint
Clear the walls, fill small holes, clean the surfaces and paint before any new furniture arrives. Choose a light, low-sheen finish in a color you can live with for years. Safety notes: open windows and run a fan for ventilation, choose a low-VOC paint where you can, and keep pets and children out of the room until the paint is dry to the touch. If your home is old, ask a professional about lead paint before sanding anything. Let the paint cure fully before you push furniture against it, since it can stay soft for days.
Step 4: Build and place the furniture
Now bring in the flat-pack. Build one unit at a time in the room where it will live. This avoids dragging a heavy assembled unit through a narrow door. Follow the instructions in order, use the correct hardware for your wall type, and ask a second person to help with tall or heavy pieces.
Step 5: Add lighting
A small room often has a single ceiling fixture and a dark corner. Add layers: a floor lamp, a table lamp and, if the lease allows, a wall light or a plug-in sconce. Electrical safety: use bulbs that match the lamp’s maximum wattage, do not run cords under rugs, do not overload a power strip, and have a qualified electrician handle any hardwired work. See our guide to small living room lighting ideas for layouts.
Step 6: Add textiles
Rug, curtains, cushions and a throw. These soften hard surfaces, absorb sound and set the color palette. Hang curtains high and wide to make a window look larger.
Step 7: Style and edit
Add art, plants and a few objects. Then remove one item. The last edit is often what makes a small room look finished.
Modular and flat-pack ideas for each part of the room
Seating
1. A modular sofa with movable chaise
A sofa built from separate modules lets you change the shape. Place the chaise on the side that opens up the walkway, and move it if you rearrange. Check that each module can pass through your door. Our guide to best sofas for small apartments lists features worth looking for.
2. A loveseat with slim arms
Slim arms add several inches of seat width in the same footprint. Combine the loveseat with a lightweight chair that can move to the dining table.
3. Storage benches and ottomans
A bench with a lid doubles as seating and a place for blankets. Use two at the sofa for flexible seating and a hidden stash.
Storage
4. A cube wall with mixed inserts
A grid of cubes becomes a bookshelf, a display and a closed cabinet when you mix open cubes with doors and boxes. Put the closed cubes at eye level and below, where clutter lives, and the open ones above. Anchor the unit to the wall.
5. A low media unit with doors
A low unit under the screen keeps cables and gaming gear out of sight. Pick a model with a back panel that has cable holes.
6. A tall, narrow bookcase
A tall bookcase 10 to 12 inches deep uses wall height instead of floor space. It is the best way to add storage in a room with no closet, as long as it is anchored. For more ideas, see our post on vertical storage ideas.
7. Wall-mounted shelves
A row of wall shelves holds books and plants and leaves the floor clear. Use hardware rated for your wall type, and find studs before drilling. If you rent, our guide to no-drill storage ideas for renters shows what to use instead.
8. A sideboard as a console
A low sideboard behind the sofa holds a lamp and baskets and doubles as a room divider in a studio or open plan.
Tables and surfaces
9. Nesting tables
A set of two or three nesting tables comes apart when guests arrive and stacks when they leave.
10. A drop-leaf or wall-mounted table
A table that folds flat against the wall serves as a desk, a dining table or a console. It saves floor space when closed.
11. A narrow console as a desk
A console 12 to 16 inches deep fits behind a sofa or under a window and becomes a laptop spot for a few hours a day.
Hidden and flexible storage
12. Baskets and boxes inside open shelving
Shelves look tidy when most contents are in matching baskets. Label them, so that the room stays organized after the novelty fades. For more, read about hidden storage ideas.
13. Under-sofa and under-bench drawers
Drawers on wheels slide under a sofa or a bench. They hold blankets, board games and seasonal items.
14. A shoe or entry unit near the door
If the living room opens straight from the entrance, a narrow unit by the door keeps shoes and bags out of the main room.
Wall and TV
15. A TV wall with shelves around it
Frame the screen with modular shelves so it looks built in. Keep the cables behind a cover. See small living room TV wall ideas.
Safety: anchoring tall flat-pack furniture
Any tall, narrow piece can tip, especially with heavy items on the top shelf or with a child climbing the drawers. Anchoring is not optional. Follow these rules for every bookcase, cube tower, cabinet and tall unit.
- Use the anti-tip hardware that comes with the unit, or buy a proper strap or bracket sized for it.
- Fix the bracket to a wall stud where possible. If you must use an anchor in drywall, choose one rated for the load, and follow the manufacturer’s instructions.
- Put heavy items low. Store books, appliances and boxes on the lower shelves, and keep the top shelf for light decor.
- Do not let children climb on shelves or drawers, and do not place a TV on a unit that was not built to hold one.
- Check the anchors twice a year. Walls and fittings loosen over time.
- If you rent, ask your landlord before drilling. Some landlords allow small anchor holes for safety. If not, choose lower units that do not need anchoring, or use furniture that locks together into a stable base.
Assembly safety matters too. Work on a rug or a blanket to avoid scratching the floor, wear gloves if the boards have sharp edges, keep small hardware away from pets and children, and do not overtighten cam locks, since they can crack the board. Take your time, and keep the instruction sheet until the unit is finished.
Three example rooms
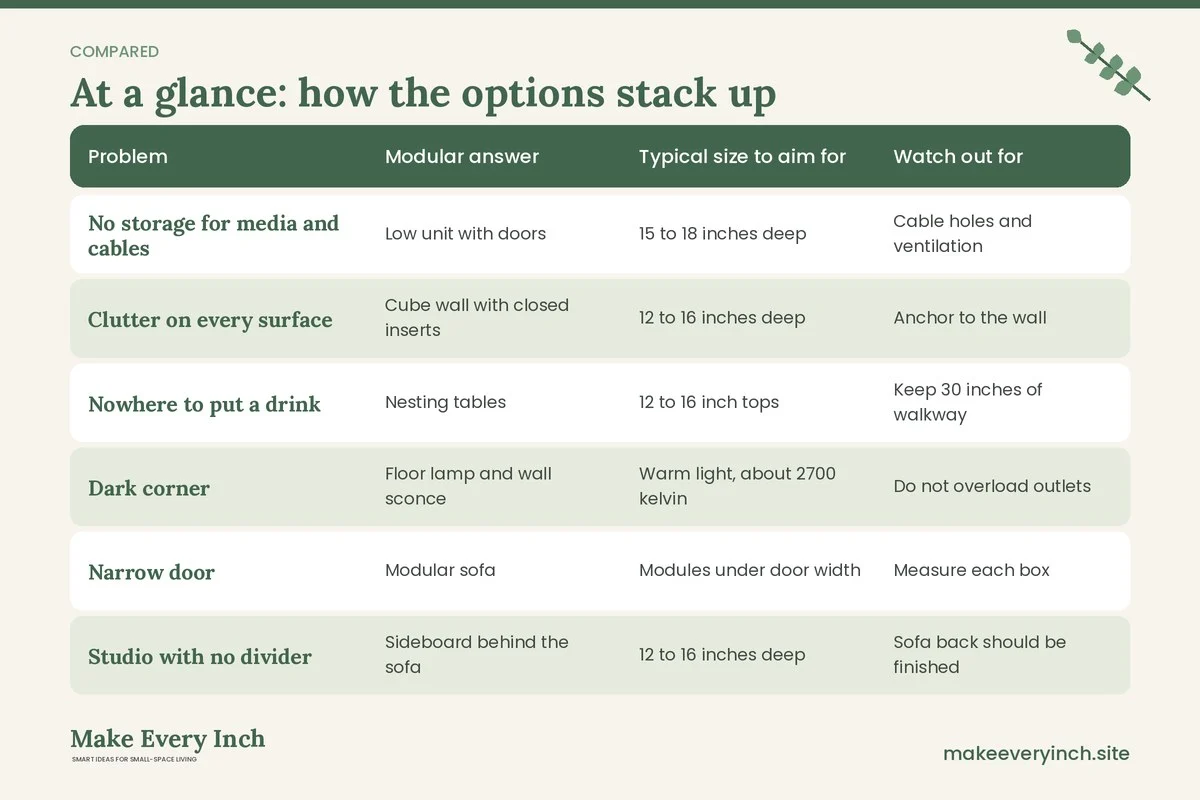
A 10 by 11 foot room with one window
The sofa goes on the long wall, facing a low media unit with a pair of tall narrow bookcases on either side of the screen. The bookcases are anchored to the wall studs, and the floor space between them stays open. A 5 by 8 foot rug sits under the front legs of the sofa. A nesting table stands at one end of the sofa and a floor lamp at the other. The window wall holds curtains hung high. The walkway runs from the door to the window and is a clear 34 inches wide. This layout suits a renter who wants simple, symmetrical storage.
An 11 by 13 foot room with a corner window
A modular sofa with a chaise sits in the corner away from the window, so the light falls across the seats. The chaise points toward the door side, which opens up the walkway. A cube wall with mixed inserts runs along the short wall, with closed cubes at the bottom and open cubes above. A small round table sits by the window as a desk and an extra seat. Plug-in sconces over the sofa free up the side tables. This layout suits a household of two or three that needs lots of storage.
A 9 by 15 foot narrow room
In a long, narrow room, put the sofa on the long wall and keep the opposite wall light. A sideboard behind the sofa divides the sitting area from the entry. Wall shelves above the sofa hold books, and a pair of slim stools tuck under a console. A runner or a long rug emphasizes the length, and a round mirror at the far end draws the eye. Keep the path along the opposite wall at least 30 inches wide. This layout suits studios and railroad-style apartments. For more, see our guide to narrow living room ideas.
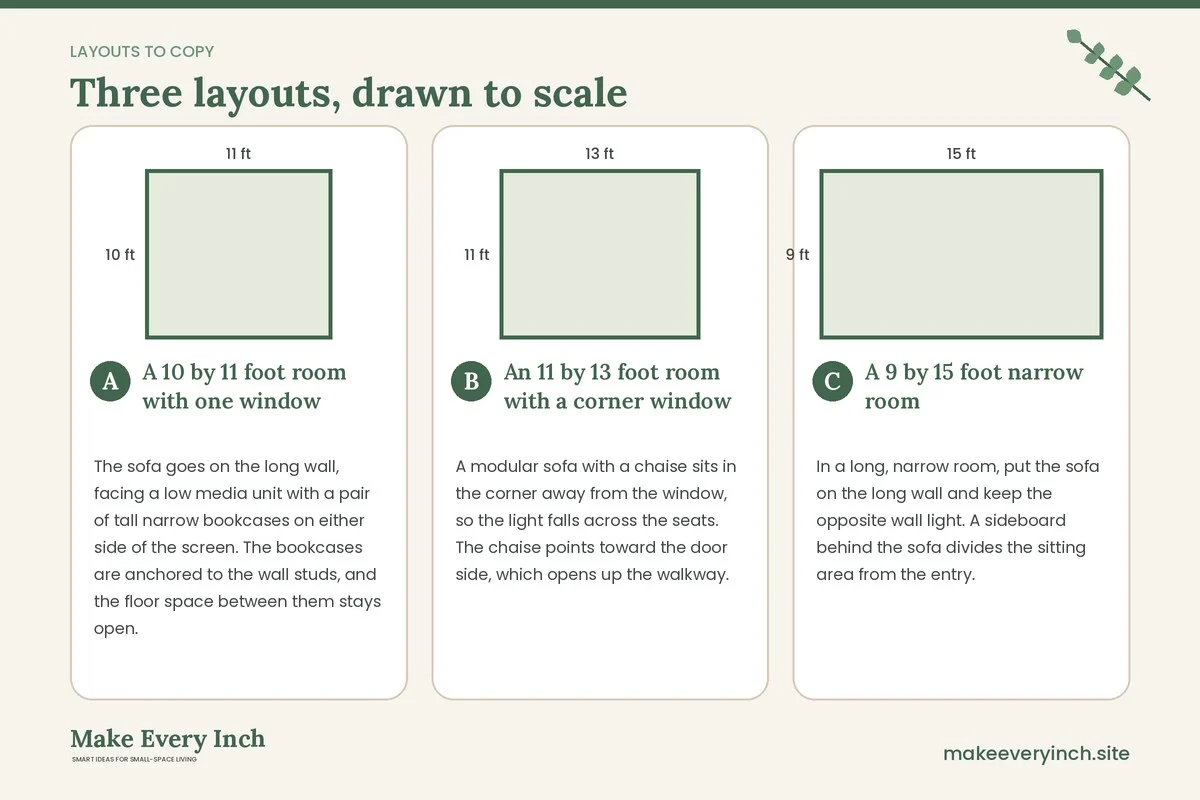
Planning table: choose the right module for the job
Use this table to match a problem with a modular answer. Sizes are approximate, so check against your own room.
| Problem | Modular answer | Typical size to aim for | Watch out for |
|---|---|---|---|
| No storage for media and cables | Low unit with doors | 15 to 18 inches deep | Cable holes and ventilation |
| Clutter on every surface | Cube wall with closed inserts | 12 to 16 inches deep | Anchor to the wall |
| Nowhere to put a drink | Nesting tables | 12 to 16 inch tops | Keep 30 inches of walkway |
| Dark corner | Floor lamp and wall sconce | Warm light, about 2700 kelvin | Do not overload outlets |
| Narrow door | Modular sofa | Modules under door width | Measure each box |
| Studio with no divider | Sideboard behind the sofa | 12 to 16 inches deep | Sofa back should be finished |
| Guests who stay over | Storage bench and floor cushions | 14 to 18 inches high | Lid must close safely |
| Renter with no drilling | Freestanding bookcase and baskets | Under 6 feet tall | Anchor if the lease allows |
A weekend makeover plan
If you have only one weekend, focus on the changes that make the biggest difference.
- Friday evening: photograph the room, write the before and after, measure, and tape the layout on the floor.
- Saturday morning: declutter and donate. Clear the walls and fill any small holes.
- Saturday afternoon: paint one wall or the whole room with the windows open and a fan running. Let it dry.
- Sunday morning: move furniture to the new layout. Build one flat-pack unit, anchor it and load it.
- Sunday afternoon: add the rug, lamps and cushions. Style the shelves, then remove one item. Take your after photos.
A weekend plan works best when the furniture is already in the house. If you still need to buy items, use the four-week schedule below.
A 4-week makeover plan
Week 1: Plan and clear
Write the before and after statement. Measure the room, the doors and the path. Declutter in categories. Sketch two layouts. Decide on a paint color, and buy a sample to test on the wall for a few days in different light.
Week 2: Paint and prepare
Fill and sand any wall damage. Paint with ventilation, using a low-VOC product when possible. Let the paint cure. Order the flat-pack furniture, and check the delivery date against your plan. Measure the doorways again before the boxes arrive.
Week 3: Build and place
Build the furniture one unit at a time. Anchor tall pieces. Move the sofa and the rug. Test the walkways with the real furniture in place. Return anything that does not fit, and keep the packaging until you are sure.
Week 4: Light, soften and style
Add lighting in layers. Hang curtains, lay the rug and place cushions and a throw. Style the shelves and walls. Take after photos from the same corners as the before photos. Write a short list of what you would change next, and leave it for a month before acting.
Common mistakes in flat-pack makeovers
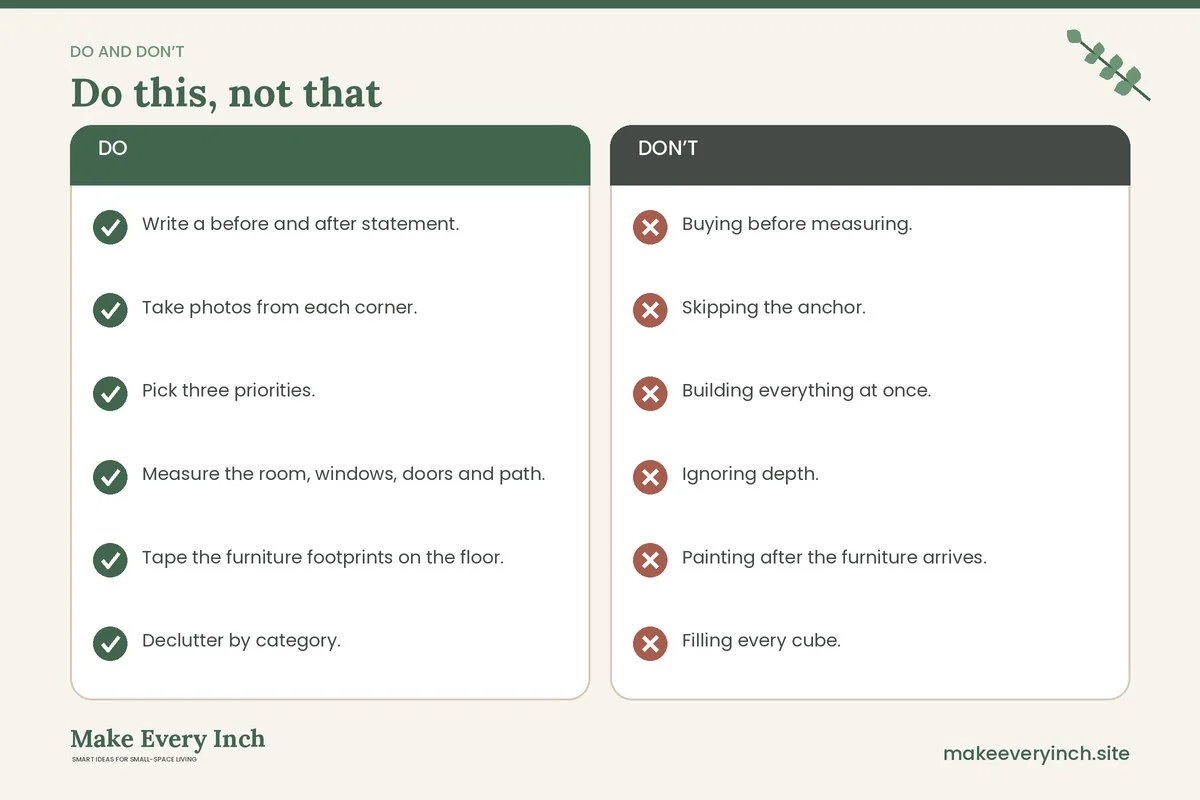
- Buying before measuring. Check the room, the door and the path to the room.
- Skipping the anchor. A tall unit that tips is dangerous.
- Building everything at once. Build and test one unit at a time.
- Ignoring depth. A unit that is 4 inches too deep can narrow the walkway below 30 inches.
- Painting after the furniture arrives. You will have to move everything and may mark the new paint.
- Filling every cube. Leave at least a third of the open shelving empty so the room can breathe.
- Using one finish everywhere. Mix wood, metal, fabric and plants to avoid a showroom look.
- Forgetting light. A good room with poor lighting still feels small.
- Ignoring returns. Keep receipts and boxes until the room is finished.
Makeover checklist
- Write a before and after statement.
- Take photos from each corner.
- Pick three priorities.
- Measure the room, windows, doors and path.
- Tape the furniture footprints on the floor.
- Declutter by category.
- Choose a layout and a walkway of 30 to 36 inches.
- Patch, clean and paint with ventilation.
- Build the furniture one unit at a time.
- Anchor every tall unit.
- Add lamps in layers and check wattage.
- Lay the rug, hang the curtains and add textiles.
- Style, edit and take after photos.
FAQ
What is the best order for a small living room makeover?
Declutter, plan the layout, paint, build and place furniture, add lighting, add textiles and style. Painting before furniture protects both.
Are flat-pack pieces strong enough for a living room?
Many are, when assembled correctly and used within their limits. Follow the weight guidance, tighten the hardware properly and anchor tall units.
How do I make flat-pack furniture look less generic?
Mix in older pieces, natural materials, plants and art. Change the knobs or legs, if the design allows. Paint the wall behind the unit in a deeper color.
How long does a small living room makeover take?
A focused weekend can transform a room that already has most of its furniture. A full makeover with painting, new furniture and lighting is more realistic over about four weeks.
Do I need to anchor furniture if I rent?
Anchoring is a safety step, so ask your landlord if small holes are allowed. If not, choose lower units, put heavy items low and avoid climbable shelves around children.
Is it safe to paint a small room myself?
Yes, with precautions. Ventilate, use a low-VOC product where possible, wear a mask when sanding, and check for lead if your building is old.
Keep going: Keep going with our small living room storage ideas, small living room furniture ideas and small apartment makeover on a budget.
Save this guide for later
Pin the ideas you like to Pinterest so you can come back to them when you plan your space.