Small Kitchen Drawer Organization Ideas: Zones, Dividers and Junk Drawer Rules
Quick answer: The best small kitchen drawer organization ideas start with zones. Put the shallowest drawer near the stove for everyday utensils, the widest drawer for cutlery or knives in a safe block or tray, and the deepest drawer for pots, lids or bulky tools. Use adjustable dividers sized to your measurements, keep only what you use weekly in the front, and give the junk drawer a strict list of what is allowed and a limit on how full it gets.
Small kitchen drawer organization ideas matter more than most people expect, because drawers are the part of a kitchen you open the most. A small kitchen might have only four to six of them, so each one has to do a precise job. When a drawer is a jumble, you dig for the whisk, the can opener hides under the tape, and a loose knife blade waits for a finger. This guide shows how to plan drawers the way a professional organizer might: measure, divide by depth and width, assign zones, then build each drawer for its task. It covers dividers, utensil layouts, cutlery, knife safety, food-prep drawers, the junk drawer rules, a comparison table, three example kitchens, safety notes, a checklist and an FAQ. For the wider plan, read our pillar guide on small kitchen ideas, plus the related guides to small kitchen organization ideas and small kitchen storage ideas.
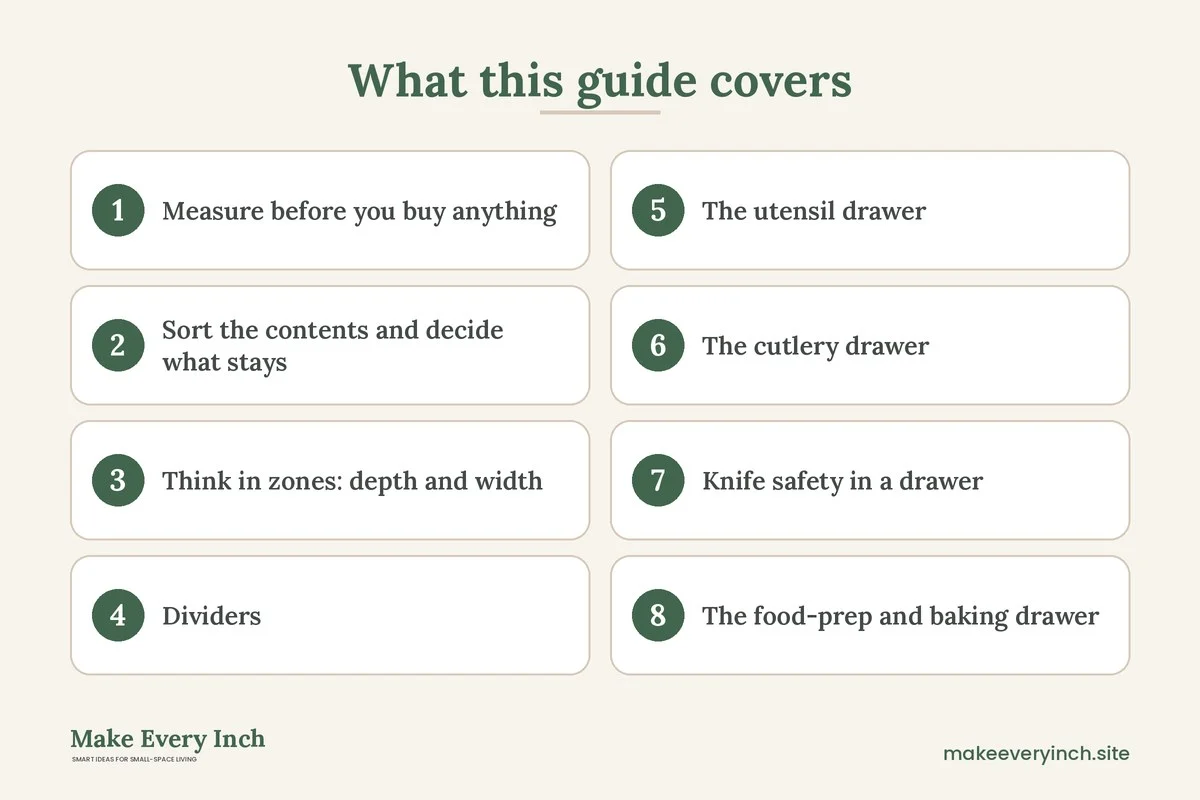
Measure before you buy anything
Drawer organizers are sold in many sizes, and the most expensive mistake is buying a set that almost fits. Take everything out of one drawer, wipe it clean and measure the interior at three points.
- Width, from the left inside wall to the right inside wall. Measure at the front and the back, because drawers are not always perfectly square.
- Depth, from the inside of the front panel to the back wall. In a small kitchen, a standard drawer is often about 18 to 22 inches deep, but older kitchens vary.
- Height, from the drawer floor to the underside of whatever sits above it, with the drawer closed. A shallow drawer might offer only 2 to 3 inches, while a deep one might offer 8 inches or more.
Write the three numbers on a sticky note and keep it in your phone. Then check the slide. Some drawer runners take up an inch on each side, and some drawers cannot open fully, which limits the length of what you can slide out. Measure twice and round down. A tray that is a quarter inch too wide will jam and tear at the drawer edge, whereas one that is a quarter inch narrow can be wedged in place with a thin strip of non-slip liner.
Sort the contents and decide what stays
Empty one drawer at a time, and sort the contents into three piles: used weekly, used a few times a year, and not used. The first pile earns the drawer. The second pile moves to a higher shelf, a box in a closet or the back of a deep cabinet. The third pile leaves the kitchen.
Duplicates are the most common space eaters. Most small households need only one or two of each tool: a spatula, a ladle, a whisk, a peeler, a can opener, a pair of tongs and a wooden spoon or two. Keeping five whisks does not help when you only wash one. Be honest about gadgets that do one task, such as an avocado slicer or an egg separator, and keep only those you use. A good target is to leave about a quarter of each drawer empty. That breathing room is what keeps the drawer working when you add a new item.
Think in zones: depth and width
A small kitchen cannot have a drawer for everything, so every drawer needs a clear role. The simplest way to assign roles is to think about depth and width.
Depth zones
- Shallow drawer, up to about 3 inches. Best for flat or slim items: cutlery, small utensils, measuring spoons, chopsticks, a rolling pin if it fits, and knives in a tray. Place it nearest the dishwasher or the table.
- Medium drawer, about 4 to 6 inches. Best for bigger utensils, such as ladles, spatulas, whisks and tongs, placed upright or on their sides. Position it near the stove.
- Deep drawer, about 7 inches or more. Best for pots, pans, mixing bowls, lids, food storage containers and small appliances. Put it below the counter, close to the cooking station.
Width zones
Each wide drawer can be split into columns. A 24-inch-wide drawer might hold a cutlery tray of about 12 inches on one side, with the other half used for serving utensils and bigger tools. A narrow 12-inch drawer might hold only knives and a peeler. When you decide on columns, keep like with like and place the most-used items closest to your dominant hand.
The reach rule
Anything you use daily should be in the top drawer or in the drawer nearest the work area. Anything you use weekly goes in the middle. Anything used once a month or less goes at the bottom or in another room. If the top drawer is full of rarely used items, swap it with a lower drawer.
Dividers: the tool that does the most work
Dividers turn a drawer from a pile into a grid. They come in several types, and choosing the right type depends on what you store.
- Expandable dividers. Spring-loaded or sliding bars that press against the drawer sides. They suit odd widths and are easy to reposition. Use a non-slip strip at the contact points so they do not slide when you open the drawer.
- Modular trays. A set of interlocking boxes of different sizes. They work well in standard-sized drawers, and you can swap one for another when your needs change.
- Bamboo or wooden organizers. Sturdy and good-looking, but less adjustable, so they work best once you know the exact dimensions.
- Fabric-lined inserts. Soft and quiet, good for fragile items like glass or some cutlery.
- DIY dividers from small boxes. Clean shoe boxes, matchboxes or cardboard dividers cost nothing and let you test a layout before buying anything.
Test your layout with paper templates. Draw the drawer outline on a sheet of paper, cut shapes to match your tools, and move them around until the arrangement works. This takes ten minutes and prevents buying the wrong set. Where possible, buy dividers a few at a time rather than a whole set, so you can adjust after a week of use.
Put a sheet of non-slip liner under the dividers, which stops them sliding and protects the drawer from scratches. Choose a liner that is easy to wipe, and replace it if it becomes stained.
The utensil drawer
A utensil drawer is the one that suffers most from tangle. Handles catch on each other, spoon heads lock together, and the drawer jams. The fix is to separate by shape and give each group its own lane.
1. Long and flat items such as spatulas, spoons and ladles lie in one long compartment, with the heads facing the same way.
2. Wide-headed items such as whisks, tongs and a potato masher go in a wider compartment on their sides, so they do not stand and catch.
3. Small tools such as a peeler, a can opener, a bottle opener and a garlic press go into a shallow tray at the front.
4. Measuring tools such as spoons and cups nest in a small compartment, or hang together on a ring.
If the drawer is too shallow for tall tools, move them upright into a crock on the counter, or hang them from a rail. Keep the crock near the stove, but not so close that heat or splatter reaches it. A rail with hooks, attached with adhesive or a tension fitting, works in a rental where drilling is not allowed. Always ask your landlord before drilling, and never drill without permission. Our guide to no-drill storage ideas for renters covers more options.
The cutlery drawer
Cutlery is simple in principle: forks, knives and spoons in separate lanes. In a small kitchen, a few extra rules help.
- Choose a tray that matches the drawer width as closely as possible, with a small gap at the sides so it slides out for cleaning.
- Keep the number of place settings equal to the number of people who live there, plus a few extra for guests.
- Put teaspoons and soup spoons in a lane at the front, because they are used most often.
- Use the back lanes for serving spoons and rarely used items.
- A removable tray can be taken to the table to set it, which cuts down on trips.
If a drawer is too shallow for a tray, a flat roll-up mat or a set of narrow dividers can hold cutlery in a single layer. If your cutlery is a mismatched collection, sorting by type rather than by set makes the tray look tidy even when the pieces differ.
Knife safety in a drawer
Knives are the one category where organization is a safety issue. A loose blade in a mixed drawer can cut a hand that is searching for something else, and a dull blade can slip. The aim is to keep each blade covered, separate and easy to grab by the handle.
- In-drawer knife block. A tray with angled slots holds knives with the blades down and the handles up or at the front. It keeps blades from touching each other and from touching hands.
- Blade guards. Individual sleeves cover each blade, and let you store the knife in a flat compartment. Keep the sleeves clean and dry.
- Dedicated shallow drawer. If you have a spare shallow drawer, give the knives their own, and do not mix other items in.
- Magnetic strip. If drawers are scarce, a strip on the wall keeps knives out of the drawer. Mount it only with the landlord’s permission, or use a freestanding magnetic block on the counter.
Whichever you use, keep these rules in mind. Always store knives clean and dry. Never put a loose knife into a utensil drawer. Keep knives out of reach of children, or use a drawer with a child lock. Reach for the handle, not the blade, and teach everyone in the household the same. Sharpen knives regularly or have them sharpened, because a sharp knife is generally easier to control than a dull one. When a knife is damaged or loose in the handle, replace it.
The food-prep and baking drawer
A deep drawer near the main counter can hold the supplies you need for prep, which saves steps between the cutting board and the stove.
- Store mixing bowls by nesting them, with the smallest inside the largest.
- Stand baking sheets and cutting boards on edge in a divided slot, so you can slide one out without removing the rest.
- Keep measuring cups and spoons on a ring or in a small tray near the front.
- Use a shallow tray for rolling pins, pastry cutters and a pastry brush.
- Group food storage containers with their lids matched. A tall, narrow bin holds lids on edge, and containers nest in the rest of the drawer.
If you have a lid problem, one rule works well: keep only containers whose lids you can find, and recycle the rest. Matching containers to lids now saves a long search every week.
The junk drawer, with rules
If your kitchen is very compact, our guide to tiny kitchen ideas and the vertical storage ideas post show where overflow can go instead, and hidden storage ideas covers unexpected spots.
Almost every kitchen has a junk drawer. In a small kitchen it can be the most valuable drawer of all, because it takes on the small odds and ends that would otherwise land on the counter. The problem is that it fills up and loses its purpose. The answer is not to eliminate it, but to give it rules.
Rule 1: Give it a short list
Write a list of what is allowed, and tape it inside the drawer for the first month. A typical list includes: tape, scissors, a pen and a notepad, batteries, takeout menus you actually use, spare keys, a flashlight, rubber bands, twist ties, birthday candles, a tape measure and a small screwdriver. Anything not on the list belongs somewhere else.
Rule 2: Use dividers
Even a junk drawer needs compartments. Small bins or boxes keep batteries from rolling, pens from scattering and tape from vanishing. A drawer that is divided into six or eight cells stays tidy for much longer than one that is a single open space.
Rule 3: Set a limit
Decide how full the drawer can get. A good limit is about three quarters full. When it hits the limit, you sort it, and no new item goes in until something goes out. This rule is what separates a useful junk drawer from a landfill.
Rule 4: Do a monthly reset
Set a reminder on your phone to empty the drawer once a month. This takes five minutes. Throw out dead batteries, dry pens, expired coupons and anything that has no home. Put items that belong elsewhere in their proper place.
Rule 5: Keep dangerous items safe
Do not store loose batteries with metal items, because contact can cause sparks or heat. Keep button batteries away from children and pets, since they are dangerous if swallowed. Keep matches and lighters out of reach of children, and keep sharp items, such as craft knives, in a sleeve or a box.
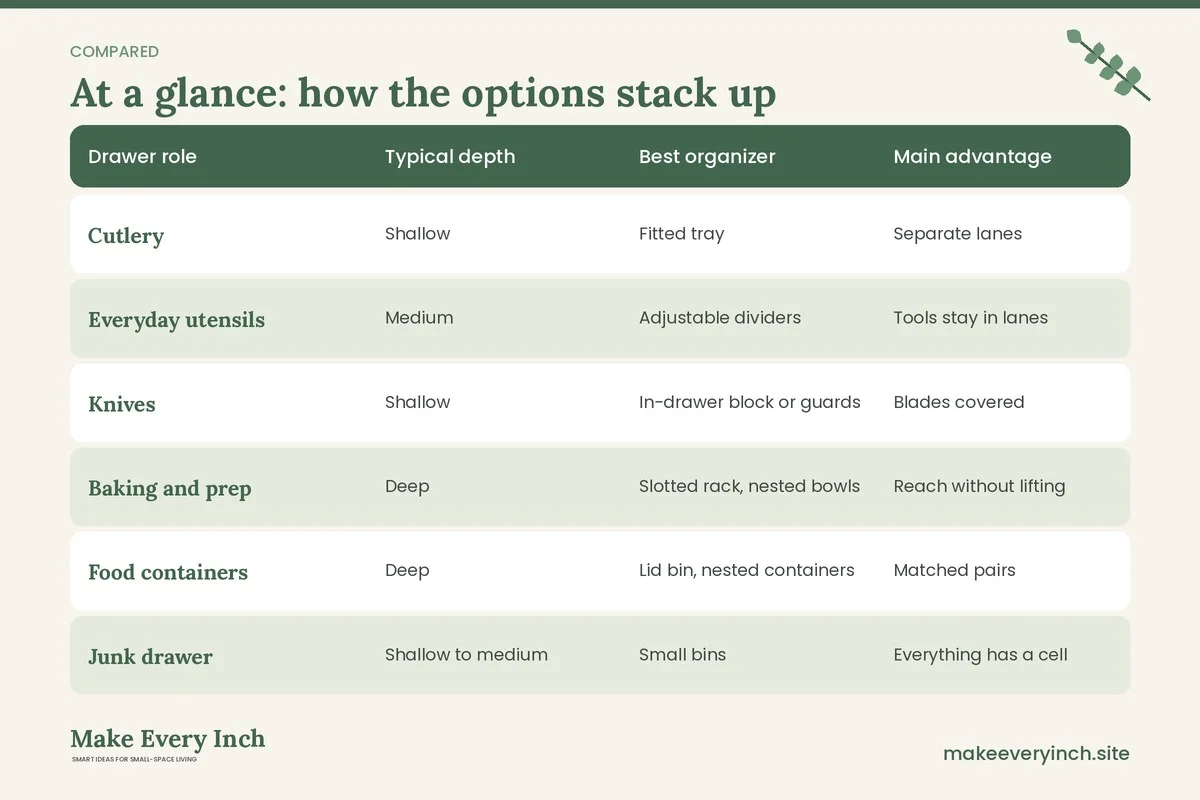
Comparison table: dividers and drawer types
| Drawer role | Typical depth | Best organizer | Main advantage | Watch out for | |
|---|---|---|---|---|---|
| Cutlery | Shallow | Fitted tray | Separate lanes | Tray must slide out for cleaning | |
| Everyday utensils | Medium | Adjustable dividers | Tools stay in lanes | Tall tools may not clear the top | |
| Knives | Shallow | In-drawer block or guards | Blades covered | Never mix with loose items | |
| Baking and prep | Deep | Slotted rack, nested bowls | Reach without lifting | Weight on the runners | |
| Food containers | Deep | Lid bin, nested containers | Matched pairs | Lids and containers must be matched | |
| Junk drawer | Shallow to medium | Small bins | Everything has a cell | Fills up without limits | |
| Pots and lids | Deep | Peg organizer or rack | Visible, accessible | Check the weight rating |
Three example small kitchens
Example 1: The four-drawer rental
Priya has four drawers in a rental kitchen. The top one is shallow and holds cutlery in a tray, with a small compartment for chopsticks. The second drawer is medium and holds spatulas, a ladle, whisks and tongs in lanes. The third drawer, a deep one, holds nested mixing bowls and baking sheets standing on edge. The fourth is the junk drawer, with a short written list taped inside and a monthly reminder. All the organizers are loose pieces with non-slip liner, so nothing is fixed to the drawers and everything can come with her when she moves.
Example 2: The one-drawer studio kitchen
Tom has one drawer, and it must do almost everything. He splits it into three columns. On the left, a cutlery tray with two lanes. In the center, a long compartment for the utensils he uses every day, which are just five. On the right, a small tray with a peeler, can opener and scissors. His knives live in a small freestanding block on the counter, and the rest of his tools hang from an adhesive rail. A crock holds a spatula and a wooden spoon, so the drawer does not get crowded. He keeps the drawer about three quarters full.
Example 3: The family kitchen with a child lock
A family of four has six drawers, including one deep one at the base. They give the knives their own shallow drawer with a lock and a fitted block. A second shallow drawer holds the cutlery, with a child-height drawer below for plastic cups and plates. The deep drawer holds the pots, with a peg organizer to keep the lids in place. The junk drawer sits above the fridge, out of reach of the younger children, with button batteries in a closed box. The family sets a reset on the first Sunday of the month.
Safety notes
- Store knives with blades covered or in a fitted slot, and never leave a loose blade in a mixed drawer.
- Keep button batteries, matches, lighters and craft knives out of the reach of children and pets.
- Do not overload drawers beyond their weight rating, because heavy items can damage the slides and may cause the drawer to fall.
- Do not drill into drawers, cabinets or walls in a rental without permission, and choose freestanding or adhesive organizers first.
- If you use adhesive hooks or rails, check the weight limit and test on a hidden spot.
- Keep drawers closed when not in use, because an open drawer is a trip and bump hazard in a small kitchen.
- Keep paper, cloth and plastic items away from the stove and other heat sources.
- If a drawer has a child lock, make sure everyone knows how to open it quickly in an emergency.
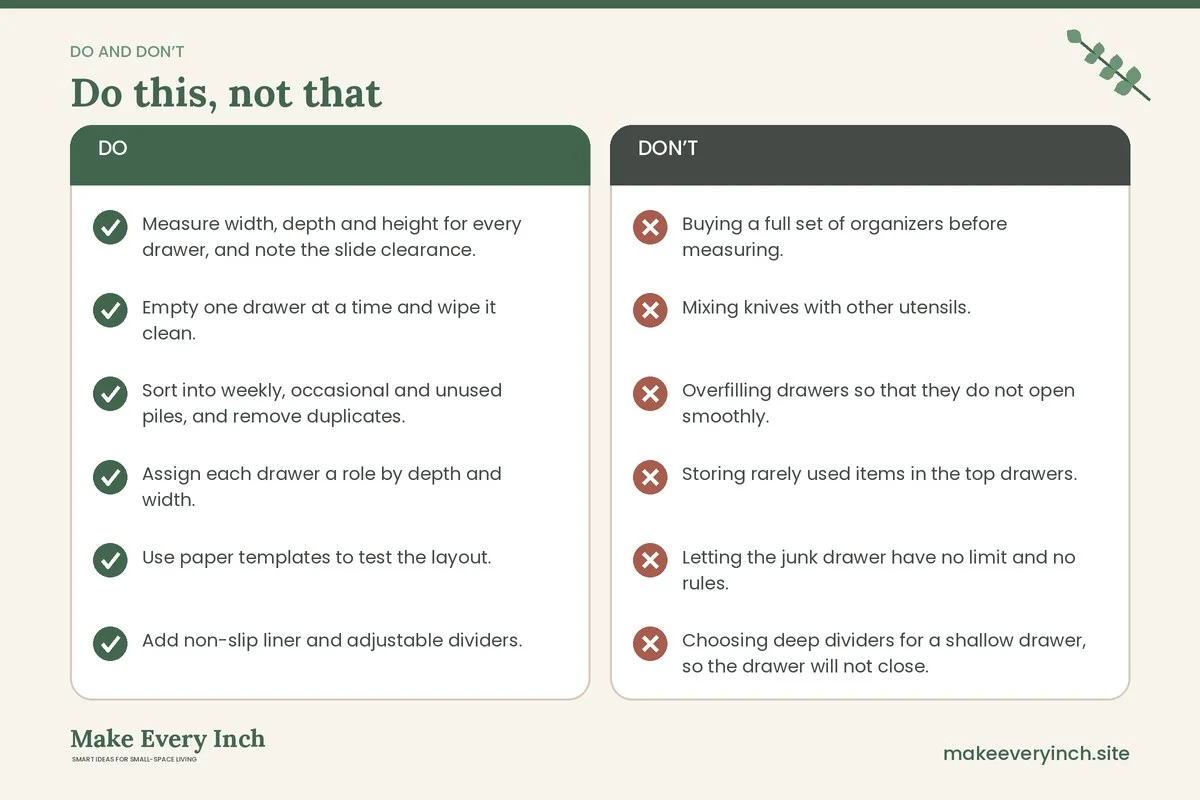
Common mistakes to avoid
- Buying a full set of organizers before measuring.
- Mixing knives with other utensils.
- Overfilling drawers so that they do not open smoothly.
- Storing rarely used items in the top drawers.
- Letting the junk drawer have no limit and no rules.
- Choosing deep dividers for a shallow drawer, so the drawer will not close.
- Storing long tools sideways in a drawer that is too narrow.
- Skipping non-slip liner, so everything slides every time the drawer opens.
Drawer organization checklist
- Measure width, depth and height for every drawer, and note the slide clearance.
- Empty one drawer at a time and wipe it clean.
- Sort into weekly, occasional and unused piles, and remove duplicates.
- Assign each drawer a role by depth and width.
- Use paper templates to test the layout.
- Add non-slip liner and adjustable dividers.
- Give cutlery, utensils, knives, prep tools and the junk drawer their own spaces.
- Cover or secure every knife blade.
- Write a short allowed list for the junk drawer and set a fill limit.
- Keep about a quarter of each drawer empty.
- Make sure each drawer opens and closes smoothly with the contents in place.
- Set a monthly reminder to reset the junk drawer.
- Review after two weeks and adjust any lane you keep ignoring.
Frequently asked questions
How do I organize kitchen drawers when I have only a few?
Give each drawer a single role, such as cutlery, utensils, prep and the junk drawer. Use adjustable dividers to separate items into lanes, and store tall or bulky tools in a crock or on a rail instead.
What is the best way to store knives in a drawer?
Use a fitted in-drawer block or individual blade guards so that every blade is covered and separate. Do not mix knives with other tools, and keep them out of reach of children.
Are adjustable dividers better than fixed trays?
Adjustable dividers are more flexible, which helps if your drawer has an unusual size or your needs change. Fixed trays look neat and fit well when you know the exact measurement. Many people use both.
How do I stop my junk drawer from filling up?
Write a short list of what is allowed, divide the drawer into cells, set a fill limit and empty it once a month. When the drawer reaches the limit, something has to go before anything new goes in.
How full should a kitchen drawer be?
Aim for about three quarters full. A little empty space makes it easier to see and reach things, and it leaves room for new items without a full reorganization.
Can I organize drawers in a rental without damaging them?
Yes. Loose trays, expandable dividers and non-slip liners need no fixing. If you want to add anything that requires screws or drilling, ask your landlord for permission first.
How do I keep a drawer from sliding items around?
Use a non-slip liner under the organizers, choose dividers that press snugly against the sides, and avoid overfilling. Wiping the drawer and liner regularly also keeps the grip effective.
Putting it all together
A well-organized drawer is a set of small decisions: measure, sort, zone, divide and set rules. In a small kitchen, each drawer carries a lot of weight, so a clear role for each one makes the whole room easier to use. Start with the drawer that frustrates you most, finish it, and then repeat. Within an afternoon you can transform the part of the kitchen you touch the most, and the habits you build, such as the monthly junk drawer reset, keep it working long after the novelty fades.
Keep going: Keep going with our guides to small kitchen cabinet organization ideas, small kitchen counter organization and small kitchen pantry ideas, then explore the small kitchen ideas pillar for the full plan.
Save this guide for later
Pin the ideas you like to Pinterest so you can come back to them when you plan your space.