Small Home Office Cable Management Ideas
Quick answer: The best small home office cable management ideas start with an audit, not a purchase. Unplug and list every cable, remove what you do not use, then route the rest along one path: a raceway on the wall or desk leg, a tray under the desktop, and labels at both ends. Keep power strips lightly loaded, give them airflow, and never run cords where you walk.
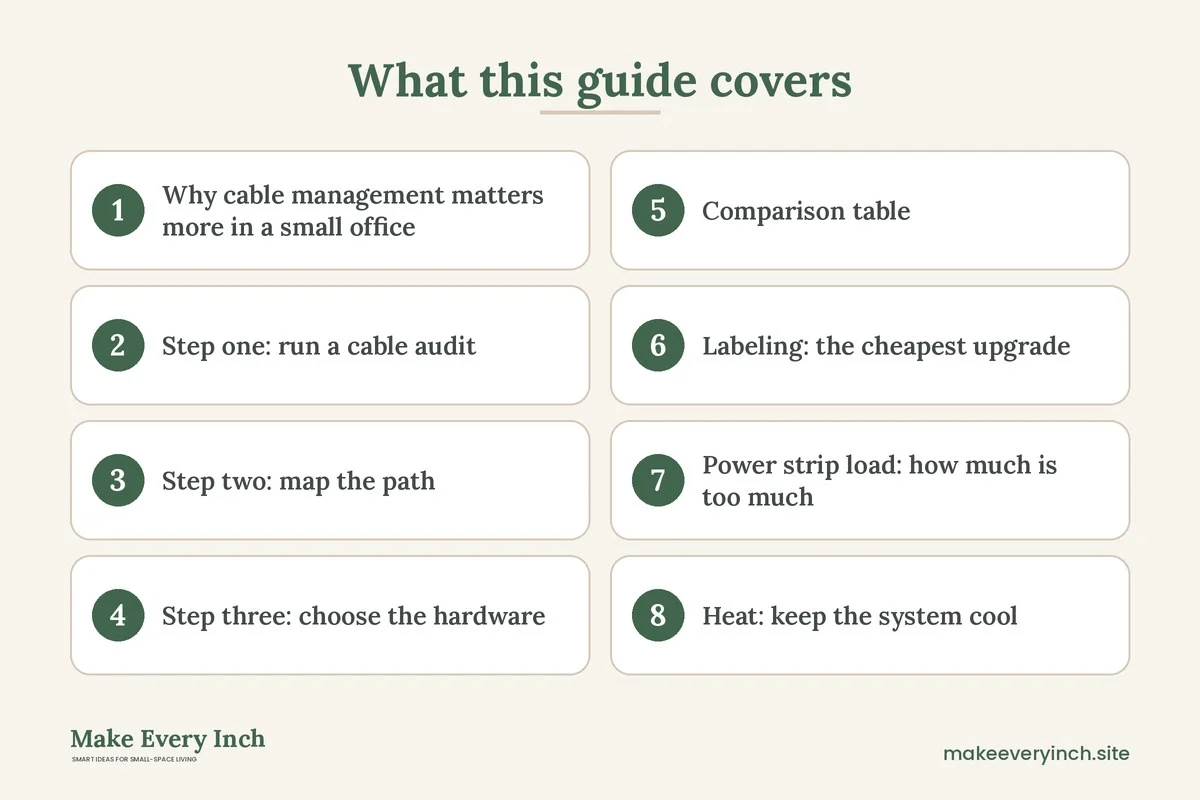
Small home office cable management ideas are about more than looks. In a small workspace, a nest of cords behind the desk collects dust, hides which plug does what, creates a heat pocket around the power strip and puts a trip hazard right where your feet go. This guide takes a process approach. It starts with a cable audit, then covers raceways, under-desk trays, labeling, power strip load, heat and tripping, with a comparison table, three example desks, a maintenance routine and a checklist. For the full picture of planning the room, start with our pillar guide on small home office ideas. If you rent, our post on renter-friendly ways to hide cords covers decor-led cord hiding for the whole home, while this guide stays at the desk and focuses on safety and long-term order. To plan the work area itself, see the companion post on how to create a work zone in a small apartment.
Why cable management matters more in a small office
In a large office a messy cable run is an eyesore. In a small one it is a functional problem. The desk sits close to the wall, so cords bunch in a space only a few inches deep. The chair rolls over them, the vacuum cannot reach, and every device change turns into a hunt behind the furniture. Because the work area is often shared with a bedroom or a living room, the cords also cross walkways, which raises the chance of a trip.
There are three practical reasons to take this seriously:
- Safety. Loose cords can be pulled, snagged or stepped on. Bundles of cords packed tightly against a warm power strip are harder to monitor. Good routing keeps cords out of the foot path and keeps the power strip visible.
- Function. When every cable is labeled and has a known path, you can swap a monitor, a charger or a lamp in a minute instead of twenty.
- Calm. A desk with clean lines feels bigger and is easier to clear at the end of the day.
None of this requires special tools. It requires an order of operations, which is the subject of the next section.
Step one: run a cable audit
Do not buy a single clip, sleeve or tray until you know what you have. A cable audit takes about 30 to 45 minutes and usually removes a surprising number of cords from the picture.
The audit steps
1. Shut down and unplug. Turn off the computer and any devices you can, then unplug everything at the wall or strip. Take a photo of the back of the desk first, so you can remember what went where.
2. Pull everything out. Lay all the cords on the floor or on the bed. Seeing them together is the point.
3. Sort into three piles. Keep (used weekly or more), maybe (used rarely, such as a spare charger) and retire (broken, duplicate or no device attached).
4. Match each cord to a device. Plug a cord into its device, check the label or the end shape, and write a tag. If you cannot identify a cord, set it aside in a bag for a month. If nothing misses it, it can go.
5. Check for damage. Look for frayed jackets, bent plugs, exposed wire, warm spots and loose connectors. Do not reuse a damaged power cord. Recycle it through an electronics recycling point.
6. Measure the length you need. Note how far each cord really has to reach. A cord that is 6 feet when the device is 2 feet from the strip makes a loop you have to hide.
What the audit usually reveals
Most small offices end up with a few clear problems. There are duplicate chargers for the same phone, a cable that is too long for its path, a power adapter that blocks two sockets on a strip, and one or two devices that could be wireless or powered from a monitor or dock. Replace or retire these before you build the layout. The fewer cords you keep, the less hardware you need to manage them.
Step two: map the path
Once you know what you keep, draw a simple map. On paper, sketch the desk from above and mark the wall outlet, the power strip, each device and the direction each cord must go. A good cable plan has one trunk path, which is the main route to the outlet, and short branches to each device. Aim for these rules:
- One trunk. Run all cords that go to the wall along a single route, down one leg or along one wall edge.
- Cross at right angles. If a cord must cross another, do it at 90 degrees. It keeps bundles neat and avoids interference where it matters.
- Separate power from data where you can. Keep power cords and signal cables on different paths when practical, and cross them at right angles. It also makes troubleshooting easier.
- Leave slack at the moving points. A monitor arm, a sit-stand desk or a laptop that you carry away needs a loop of spare cord, so nothing is pulled tight.
- Keep it out of the foot zone. Under a desk, the area about 12 inches back from the front edge is where feet and chair wheels live. Run cords toward the back and sides.
Step three: choose the hardware
With a plan in hand, pick the hardware that suits your desk and your lease. Here are the main options, with the situations in which each works best.
Wall and desk raceways
A raceway is a slim channel that covers cords along a wall, baseboard or desk leg. It is useful when a cord must cross a visible span, such as from the outlet down to the floor. Choose a size that holds the cords with space left over, usually with 25 to 40 percent of the channel free. Peel-and-stick versions suit renters, and you should test a small piece on the wall first and check the lease. If the adhesive could pull paint, use a freestanding option or route the cords along the furniture instead. Do not use a raceway to hide an extension cord run along a wall for a long distance. Extension cords are not a permanent wiring replacement, and covering them can hide wear or heat.
Under-desk trays and baskets
A tray or a basket mounted under the desktop holds the power strip and the extra length of each cord. This gets the clutter off the floor and keeps the cords off your feet. Before you mount one, check what the desktop is made of. Thin particleboard, glass and some folding tops hold screws poorly. If you cannot drill, use a tray that hooks over the back edge, a clamp-on version or a freestanding shelf. Leave space around the power strip for air, which the heat section explains. Mount the tray toward the back of the desk, not over the knee area.
Cable clips, ties and sleeves
Clips hold single cords at the desk edge or the back of a monitor, so they do not slide to the floor. Hook-and-loop ties bundle cords and can be reopened, which makes them better than single-use ties for a desk where devices change. A sleeve gathers a group of cords into one tube, which looks neat on a trunk route. Do not pull ties tight enough to squeeze the cord jacket, and do not bundle power cords tightly for long runs where heat could build up.
Cord covers for the floor
If a cord must cross a walkway, a flat floor cover reduces the trip risk. It is a last resort, not a first choice. Re-route the desk or the cord to avoid crossing the foot path if you can. If you must use a cover, choose one with sloped edges, tape down the ends and check it often.
Furniture with built-in routing
Some desks have a back panel, a grommet hole or a hollow leg for cords. When you can choose, that is a good feature in a small office. Our guide to the best desks for small apartments lists the features worth checking, and the DIY desk ideas for small spaces post shows how to add routing to a home-built top.
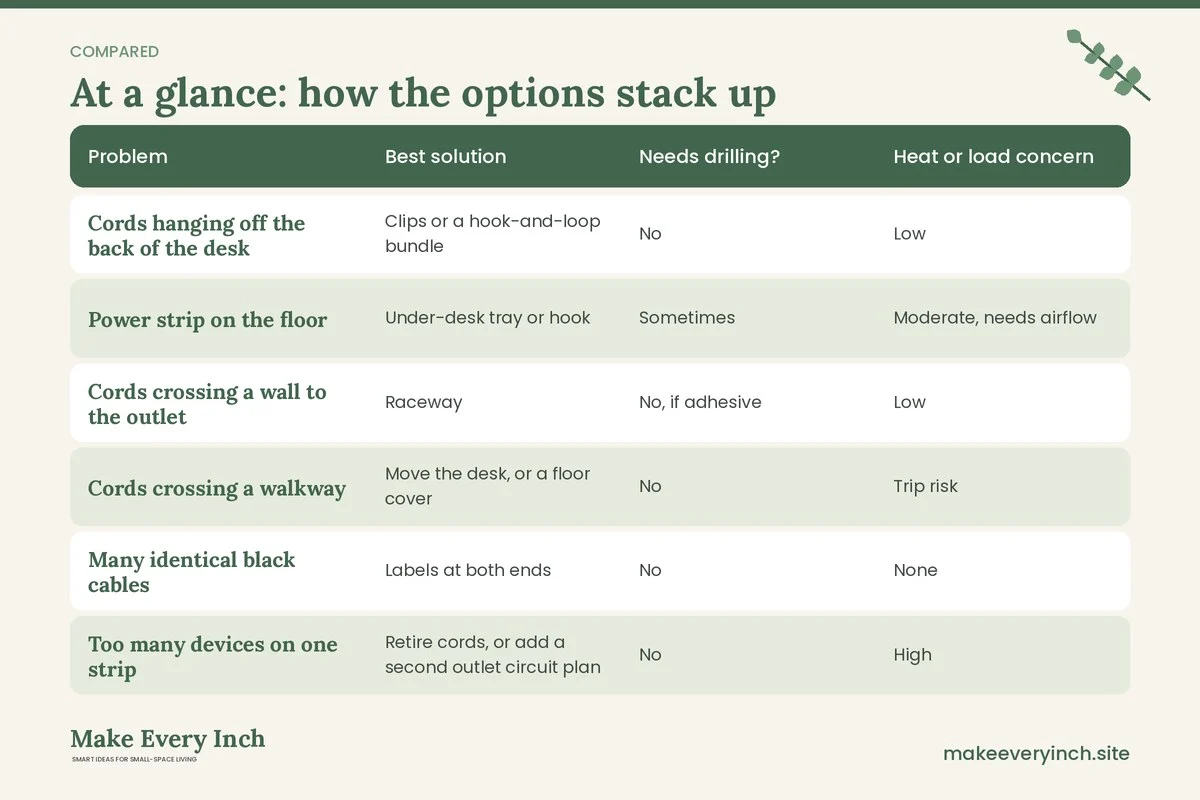
Comparison table: which solution fits which problem
| Problem | Best solution | Needs drilling? | Heat or load concern | Notes |
|---|---|---|---|---|
| Cords hanging off the back of the desk | Clips or a hook-and-loop bundle | No | Low | Easy to change |
| Power strip on the floor | Under-desk tray or hook | Sometimes | Moderate, needs airflow | Keep the strip visible |
| Cords crossing a wall to the outlet | Raceway | No, if adhesive | Low | Do not hide long extension runs |
| Cords crossing a walkway | Move the desk, or a floor cover | No | Trip risk | Use only as a last resort |
| Many identical black cables | Labels at both ends | No | None | Fixes the confusion |
| Too many devices on one strip | Retire cords, or add a second outlet circuit plan | No | High | See the load section |
| Standing desk movement | Slack loop with a cord chain or sleeve | No | Low | Test full height range |
| Laptop carried back and forth | One dock or hub with a single cable | No | Low | Reduces plug and unplug wear |
Labeling: the cheapest upgrade
Labels cost almost nothing and solve more problems than any hardware. When a cable fails, a device changes or you move, the label tells you what to unplug.
Where to put labels
- At both ends. Label the plug end and the device end of each cable. A cord that is labeled only at one end is only half as useful.
- Near the plug. Put the label 1 to 2 inches from the connector so you can read it when the cords are bundled.
- On the strip. Mark each socket on the power strip with the device name, such as “lamp” or “monitor.” This stops you from unplugging the wrong thing.
What to write
Use short, consistent words: “laptop charger,” “monitor,” “router,” “lamp,” “printer.” If you use color, give each device group its own color, such as blue for computer and green for lighting, and write the key on a card inside the desk drawer. A label maker, a strip of masking tape and a marker, or small tags on a loop all work. Avoid labels that rely on color alone if you or others have trouble telling colors apart.
Power adapters and chargers
Black power bricks look identical. Label each brick with the device name and, if you like, the output rating printed on it, so you do not plug the wrong adapter into a device. A mismatch can damage electronics. If the rating is unclear, check the device manual.
Power strip load: how much is too much
The strip is the heart of the system and the part most worth thinking about. A power strip or surge protector has a rating, which is the maximum total load it should carry. In many homes the wall circuit supplies a limited amount of power for the whole room, and space heaters, hair dryers and kettles on the same circuit can use most of it.
Principles for safe loading
- Read the rating. Look at the label on the strip and on the wall circuit information where you can find it. The strip’s rating is a limit for the whole strip, not per socket.
- Add up the loads. A laptop, monitor, lamp and phone charger together use a modest amount of power. Heating devices are the exception. A space heater, a toaster or a kettle draws a lot, and should not share a strip with your desk setup.
- Plug high-draw devices into the wall. If you use a space heater or a similar device in your home office, plug it directly into a wall outlet, not into a strip or an extension cord, and follow its instructions.
- Do not daisy-chain. Never plug one power strip into another. Use one strip per outlet, and if you need more sockets, replace the strip with one that has more outlets and a suitable rating.
- Check for damage. If the strip is hot to the touch, smells of burning, has a loose plug or shows scorch marks, unplug it and replace it.
- Use a surge protector for electronics, with care. A surge protector reduces the risk to electronics from voltage spikes, but it has a limited life and a rating that should match your needs.
If you are not sure about your home’s wiring or the number of devices you can safely run, ask a qualified electrician, or your landlord if you rent. This guide is general information, not electrical advice.
Heat: keep the system cool
Electronics make heat, and cables and strips can warm up under load. A tidy system should still breathe.
- Leave air around the strip. Do not bury it under bundles of cords, fabric or a foam cushion. A gap of at least a few inches around it helps.
- Do not coil a power cord tightly under load. A long power cord wound in a tight coil while a high-draw device runs can heat up. Unroll it, or use a shorter cord.
- Keep adapters off the carpet. Power bricks warm up. Place them on a hard surface or hang them on a hook, and keep papers away from them.
- Do not cover laptop or console vents. If you hide a laptop in a drawer shelf, check that the vents are clear.
- Check by hand now and then. Once a month, touch the strip and the adapters at the end of a work session. Warm is normal. Hot enough that you pull your hand away is not, and you should unplug and investigate.
- Mind direct sun and radiators. Cables and boxes near a heater or a sunny window age faster.
Cable trays that enclose the strip can trap heat. Choose an open-style tray or basket and mount it with space around the strip. If the strip is out of sight, add a monthly reminder to look at it.
Trip and tangle safety
A small home office is often a walk-through space. Treat the floor like a path.
- Keep cords out of the main foot path. The area from the door to the desk, and from the desk to the window, should have no loose cords.
- Never run a cord across a doorway. A cord pinched under a door can be damaged, and anyone entering could trip on it.
- Do not run cords under rugs. A rug hides wear and can trap heat, and the bump is a trip hazard.
- Keep chair wheels off the cords. Roll the chair in and out to check. Wheels crush cables over time. A chair mat helps, but cords should not run under it.
- Plan for children and pets. If kids or pets share the space, hide or enclose the strip and use covers for any cords within reach. Cords can be chewed or pulled.
- Mind the standing desk. When a desk goes up and down, check that no cord stretches or pinches. Leave slack, and test a full cycle slowly before you rely on it.
- Secure the end of the line. A short cord that dangles at the wall can be tugged. Use a clip to hold it.
Cable management for a wall-mounted or shelf desk
Floating desks and shelf desks have no legs to hide cords along. Run the cords along the wall behind the desk and into a slim raceway to the outlet. If you cannot attach anything to the wall, use a freestanding bookcase beside the desk as the cable column. Anchor tall bookcases to the wall as the maker advises, if the lease allows, and do not load them with heavy equipment at the top. Our guide to the small bedroom ideas with a desk and the small bedroom desk ideas both cover shelf and wall-desk layouts where this matters.
Three example desks
A 40-inch desk in a bedroom corner
A narrow desk sits against the wall under a window. It holds a laptop, one external monitor, a lamp and a phone charger. Plan: replace three chargers with two, label the cords, and run the monitor and laptop cords through one clip set along the back edge. Mount a small open tray on the underside near the back to hold the strip, with a few inches of space around it. A sleeve gathers the trunk down the rear leg to the outlet, with a short slack loop. The floor in front of the desk is clear, and the chair rolls without touching a cord.
A fold-down desk in a studio
A wall desk folds away and must be cleared each evening. Plan: keep only the laptop charger, a lamp and a phone charger on the desk. Put a small strip with an on-off switch on the wall, away from the fold zone. Use a single dock cable for the laptop, so you can plug in and unplug one connector at the start and end of the day. Store the extras, such as the mouse and headphones, in a lidded box on a shelf. The desk folds flat and no cord is pinched. For more studio ideas, read our post on studio apartment ideas for working from home.
A shared desk in a living room
A couple shares a desk in a living room alcove. Plan: use colored labels on the cords, one color per person, and one strip per person if the wall has two outlets. Run all cords along the back wall, and use a clip along the desk edge so nothing hangs in view. Keep the router and any modem in a ventilated cabinet shelf, with space around them. Put a basket on the shelf for spare chargers. At the end of the day, the shared desk clears into two boxes. See also how to fit a desk into a studio apartment for layout choices.
Monthly cable check routine
Cable management is not a one-time task. A short routine keeps it working.
- Weekly: wipe the desk and the visible cords, and check that nothing has drifted into the foot path.
- Monthly: feel the power strip and the adapters after a work session, look for fraying, and check that labels still read well.
- Quarterly: unplug and dust behind the desk. Re-check the load on the strip, and remove devices you no longer use.
- Yearly: audit again. Replace worn cables, and check whether new devices have crept in.
For habits that make this stick, our post on small home organization ideas that actually last explains how to turn one-off fixes into routines.
Mistakes to avoid
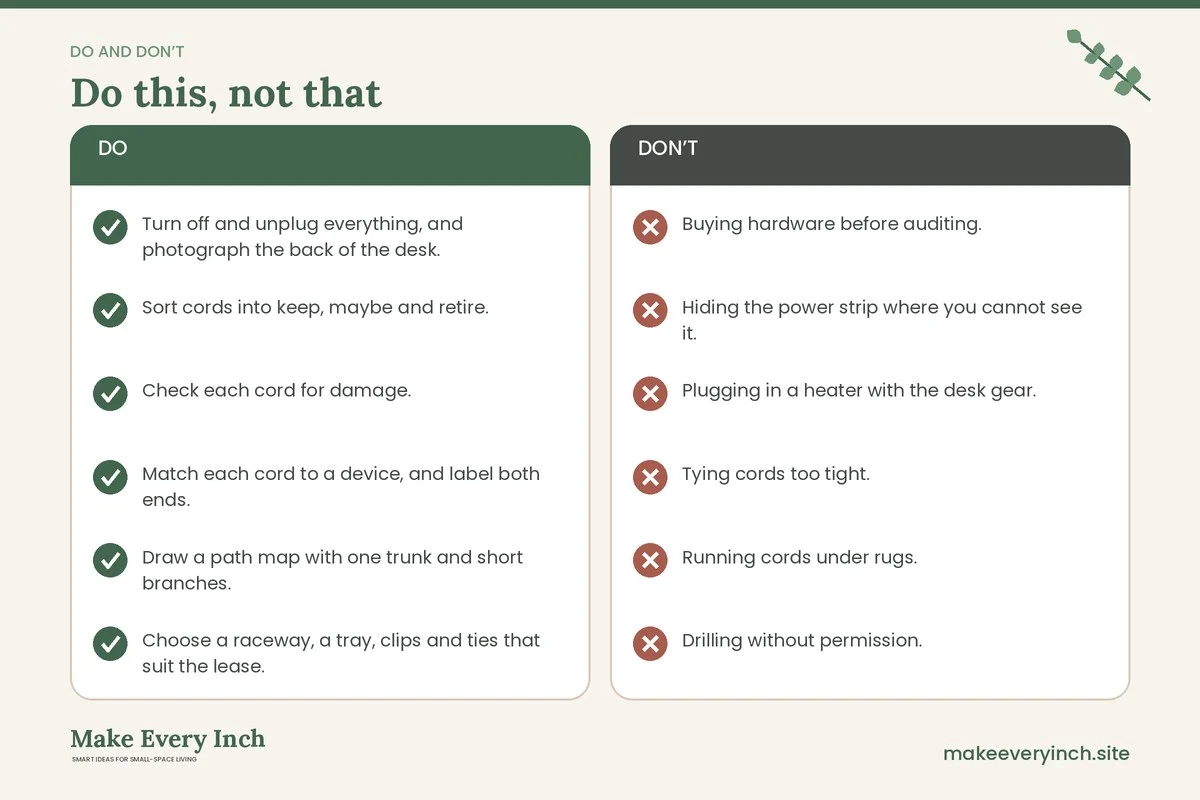
- Buying hardware before auditing. You will buy the wrong size and keep cords you do not need.
- Hiding the power strip where you cannot see it. Out of sight can become out of mind, including when it overheats.
- Plugging in a heater with the desk gear. High-draw devices belong on a wall outlet.
- Tying cords too tight. It can damage the jacket and trap heat.
- Running cords under rugs. This hides damage and creates a trip hazard.
- Drilling without permission. In a rental, ask first. Use adhesive, clamps or freestanding parts instead.
- Forgetting to label. Without labels the clean setup becomes a puzzle the next time you change a device.
- Leaving no slack. A tight cord strains plugs and fails early.
Renting: lease and landlord checks
In a rental, check the lease before you attach anything to the wall, the baseboard or the desk. Photograph the wall before you start. Use adhesive products on a hidden test spot first, and do not use anything that will lift paint. Choose clamp-on or freestanding hardware for the desk. Do not alter the wall outlet, the wiring or the cover plates. If you need more outlets, ask your landlord, who may arrange a licensed electrician. For more no-damage options, read no-drill storage ideas for renters.
Lighting and glare around the cable zone
Lamps and monitors add cords, so plan them with the cable path. Put the desk lamp on the side of the desk nearer the outlet, so its cord is short. Place the light so that the glare does not fall on the screen, which means a lamp to the side of the monitor, not behind it. A lamp with a built-in outlet or a USB port can reduce the number of adapters. Our post on small living room lighting ideas explains the layers of light that also suit a desk corner.
Budget approach
You can build most of this with what you have. Start with the audit, which is free. Then use paper tape and a marker for labels, hook-and-loop ties or reused twist fasteners for bundles, and a shoebox or an existing basket as a tray if it is safe and open for airflow. Spend on a good power strip with a suitable rating and a switch if your current one is old, damaged or overloaded. Replace the cheapest part of the system last, which is usually the clips. Keep receipts for anything you might return, and avoid buying a kit before you know the sizes you need.
Cable management checklist
- Turn off and unplug everything, and photograph the back of the desk.
- Sort cords into keep, maybe and retire.
- Check each cord for damage.
- Match each cord to a device, and label both ends.
- Draw a path map with one trunk and short branches.
- Choose a raceway, a tray, clips and ties that suit the lease.
- Read the strip’s rating and add up the load.
- Plug heaters and other high-draw devices into the wall.
- Leave air around the strip and adapters.
- Keep cords out of the foot path and away from doorways.
- Test a full range of motion on a standing desk or a monitor arm.
- Set a monthly check for heat, fraying and labels.
FAQ
What is the first step in managing cables in a small home office?
Run an audit. Unplug everything, sort the cords into keep, maybe and retire piles, and label what you keep. It tells you what hardware you need.
How do I hide cables without drilling?
Use clamp-on trays, adhesive clips tested on a hidden spot, hook-and-loop ties and freestanding furniture. Check the lease before you attach anything to the wall.
How many things can I plug into one power strip?
It depends on the strip’s rating and the devices. Add up the loads, never daisy-chain strips, and plug heaters into the wall. If in doubt, ask an electrician.
Is it safe to put a power strip in a tray under the desk?
It can be, if the tray is open, the strip has space around it and you can see it. Avoid enclosed boxes with no airflow, and check the strip for warmth each month.
How do I stop tripping on cords?
Route them along the wall or the desk legs, away from the foot path. Avoid crossing doorways, and use a low floor cover only if you cannot re-route.
Should I bundle all cords together?
Bundle the trunk run, but avoid tight bundles of power cords with heavy loads. Use loose, reusable ties, and keep power and data on separate paths where you can.
What is the best way to label cords?
Label both ends with short device names, near the plug. Mark the sockets on the strip as well.
How often should I check my cables?
A quick look each month, and a full audit once a year, will catch most problems early.
Keep going: Keep planning with our pillar on small home office ideas, the companion guide on how to create a work zone in a small apartment and our tips for small space organization ideas.
Save this guide for later
Pin the ideas you like to Pinterest so you can come back to them when you plan your space.