12 Weekend DIY Projects for Small Homes in Two Days
Quick answer: The best weekend diy projects small homes can finish are the ones that fit inside two work blocks of about three to four hours each: a no-tool shoe bench cover, a fabric-wrapped pinboard, a rail-and-basket kitchen setup, a tension-rod closet shelf, a paint-free headboard and similar jobs. Pick one main project and one small one, buy everything before Saturday, cut and sand on day one, and finish and cure on day two. Check the lease, anchor tall pieces and never drill without permission.
Weekend diy projects small homes can actually finish are different from the ambitious builds you see in photo galleries. A small home has a small work area, a limited tool kit and neighbors on the other side of the wall, so the projects that succeed are the ones that need little floor space, make little noise and leave nothing half done on Sunday night. This guide is built around time rather than cost. It covers how to choose a project that fits a weekend, how to plan the two days hour by hour, 12 projects with steps and measurements, a table that compares them, three sample weekends for different homes, safety notes and a checklist. For the wider picture on spending less, see our hub on budget small space ideas.
Why a weekend is the right size for a small-home project
Most small-home projects fail for one of three reasons. The first is scope: the plan needs a workshop and a week. The second is storage: the half-built piece lives in the hallway and blocks the only path. The third is cure time: paint, glue and sealant need hours to set, and the person who starts on Sunday afternoon has nowhere to put the result while it dries. A weekend project solves all three because it is designed around the limits of the home.
Think of the weekend as four blocks. Saturday morning is for setup, cutting and rough shaping. Saturday afternoon is for assembly or the first coat. Sunday morning is for the second coat, finishing and fitting. Sunday afternoon is for cleanup, a safety check and putting the room back in order. If a project cannot be divided into these four blocks, it belongs on a longer calendar, and you can find slower ideas in our guide to DIY apartment upgrades.
The two-hour rule for noise and mess
In shared buildings, check the quiet hours in the lease or house rules and plan the loud steps, such as sawing and sanding with a power tool, inside the allowed window. Hand sanding, scissors, a utility knife and a mallet with a cloth are quieter alternatives. Do the messy steps in one place, such as on a balcony, a laundry area or a drop cloth on a hard floor, and wipe the area before moving to the next step.
Choose by space, not by style
Before you pick a project, measure three things: the free floor space where you will work, the space where the finished item will live, and the path it must travel between the two. A bench that is perfect in the workroom may not clear a bathroom door. Measure the narrowest point on the route and keep the finished piece at least 2 inches smaller.
Plan the two days
Write the plan down on Thursday. List the project, the steps, the materials and the tools, and count how many of the tools you already own. Buy or borrow the rest before Saturday morning so you do not lose half a day on errands. A cheap way to cut waste is to check the leftover paint, screws, fabric and wood you already have, and to ask neighbors and friends about tools they can lend.
Here is a simple time budget you can adapt.
- Thursday evening: measure, sketch, make the shopping list, clear the work area.
- Saturday 9:00 to 12:00: cut, sand, prime or prep. Keep all dust in one place.
- Saturday 1:00 to 4:00: assemble, glue or apply the first coat. Leave the item where it will not be touched.
- Sunday 9:00 to 12:00: second coat, finishing, fitting and hardware.
- Sunday 1:00 to 3:00: place the item, test it, clean tools and room, ventilate.
- Sunday evening: photograph the result and note what you would change.
Leave an hour of slack on each day. A job that runs over by 45 minutes is normal, and a weekend plan with no slack turns into a Monday night project.
The small tool kit
A small tool kit covers most of the projects below: a tape measure, a pencil, a level, a hand saw or a pair of strong scissors, sandpaper in two grits, a screwdriver set, a clamp or two, a staple gun, a glue that suits the material, a drop cloth and a pair of work gloves. For anything that makes dust or fumes, add safety glasses and a dust mask. Store the whole kit in one box so it takes up one shelf rather than a closet.
12 weekend diy projects small homes can finish
Each project below includes a rough time estimate, the main steps and a safety note. Times are ranges and depend on your skill, the material and the number of coats. Pick the project that matches your space, and always confirm that your lease allows it before you attach anything to a wall, a ceiling or a built-in fixture.
Projects for the entry and the hall
1. A shoe bench cover with a cushion
A plain low crate or a stack of sturdy boxes can become a seat with shoe storage underneath. Cut a piece of plywood or a thick board to cover the top, sand the edges, wrap a layer of foam in fabric and staple it to the underside. Allow three to five hours. Keep the bench at a seat height of 16 to 18 inches and make sure it cannot tip. Do not use it as a step stool unless it was built for that weight.
2. A fabric-wrapped pinboard for keys and mail
Cut a board to the size you need, such as 16 by 20 inches, wrap a layer of batting and fabric around it and staple the fabric on the back. Add a strip of ribbon or a small shelf for keys. Two to three hours, plus time to let any glue set. Hang with removable strips rated for the weight, or lean it on a console. If the wall is not yours, do not use nails.
3. A coat rail from a board and hooks
A board 24 to 36 inches long, sanded and finished, with three or four hooks screwed to the face. In a rental, hang it on an over-the-door frame or lean it against the wall behind a bench rather than drilling. Allow two to four hours. If you do have permission to attach it, find a stud or use anchors rated for the load. Keep the hooks away from children at eye height.
Projects for the living room
4. A paint-free headboard-style wall panel
This idea also works behind a sofa. Cut a panel of thin board to the width of the furniture, wrap it in batting and fabric, and lean or hang it. Four to six hours. The panel adds softness and sound absorption without a single drop of paint. Keep any fabric away from heaters and candles, and choose a flame-resistant fabric where possible.
5. A side table from stacked crates or a drum
Two or three sturdy crates stacked and screwed together at the joins, or a wooden spool, can serve as a side table. Sand, seal and add felt feet. Three to five hours. Make sure the top is level and the table can carry the load of a lamp and a drink. If the table sits near the sofa, keep it 16 to 24 inches from the seat for comfortable reach.
6. A plant stand from a leftover board
A short board on a pair of legs, or a stool you refinish, lifts a plant to the window light. Two to four hours. Use a saucer and a waterproof liner so water never reaches the floor. Check which plants are toxic to pets and children before placing them within reach.
Projects for the kitchen and dining area
7. A rail-and-basket kitchen setup
Mount a rail on the inside of a cabinet door or on an over-the-door frame, and hang baskets and hooks from it. Two to three hours. In a rental, use a tension rod or an over-door system, and avoid screwing into cabinets without permission. Keep sharp knives and heavy pans off the rail and keep the weight within the rating.
8. A fold-down shelf from a board and a pair of brackets
A fold-down shelf gives extra counter space on demand. It needs secure fixing into a stud or masonry, so it is a project for owners or for renters with written permission. Four to six hours. Use brackets rated well above the planned load, check the fixing with a firm downward pull before use, and keep the shelf away from the stove and the sink.
9. A spice shelf from a narrow board
A board 4 to 5 inches deep and 20 to 30 inches long with a small lip holds jars at eye level. Two to three hours. Place it away from heat, steam and splashes, and keep small jars secure on a lip so they do not slide.
Projects for the bedroom and closet
10. A tension-rod closet shelf
Two tension rods or a short board resting on a pair of rods double the space in a narrow closet. One to two hours. Check the weight rating of the rods, keep heavy items low and measure the closet width precisely. For more closet ideas, read our guide on DIY closet organization for small spaces.
11. A bed-risers-and-bins storage upgrade
Use sturdy risers to lift a bed frame, then fit labeled bins underneath. Three to four hours. Make sure the risers fit the bed’s legs, are rated for the total load and cannot tip, and never raise a bed so high that a child or an adult could fall from it. Check that the riser pieces are of the same height.
12. A fabric-covered storage box set
Wrap shoe boxes or sturdy cartons in fabric or paper for tidy shelf storage. Two to three hours. Choose water-based glue and ventilate the room. Label the box ends so you can find things without pulling everything out.
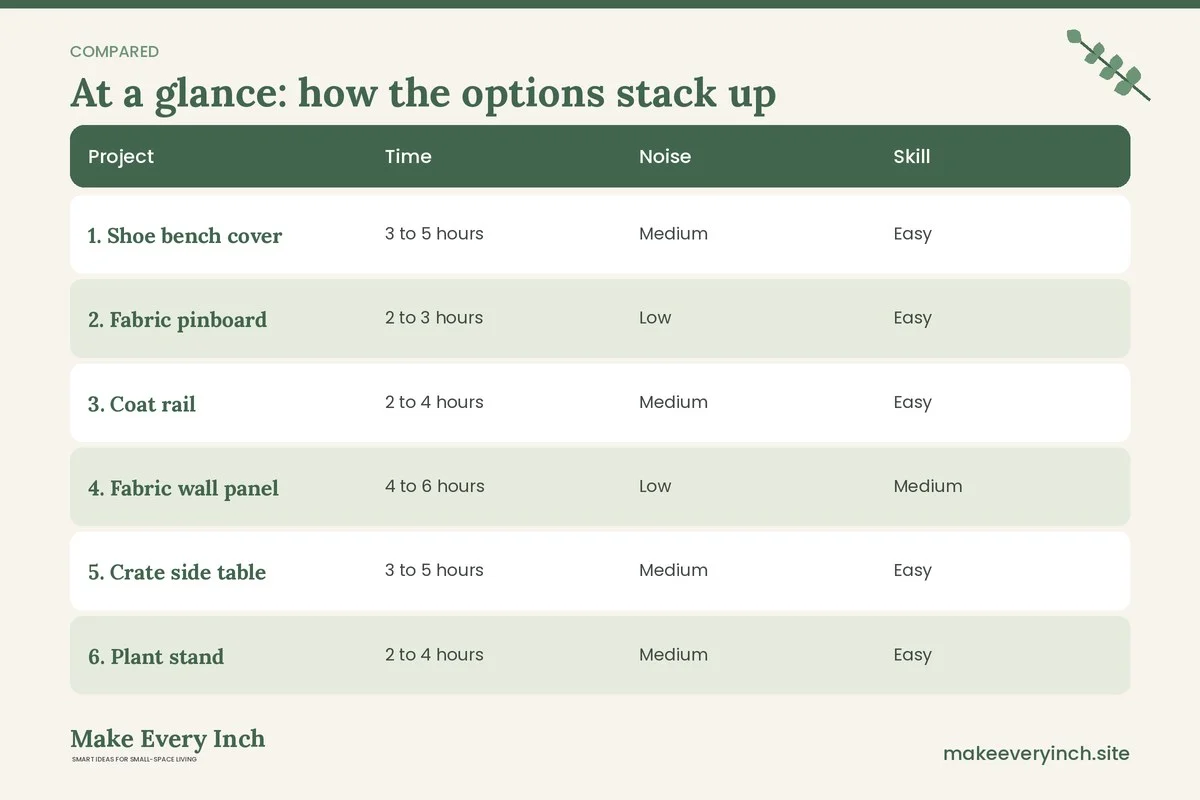
Compare the 12 projects
Use this table to pick a main project and a small project for the weekend. Time ranges assume one person and a basic tool kit.
| Project | Time | Noise | Skill | Needs permission? | |
|---|---|---|---|---|---|
| 1. Shoe bench cover | 3 to 5 hours | Medium | Easy | No | |
| 2. Fabric pinboard | 2 to 3 hours | Low | Easy | Only if mounted | |
| 3. Coat rail | 2 to 4 hours | Medium | Easy | Yes if screwed to the wall | |
| 4. Fabric wall panel | 4 to 6 hours | Low | Medium | Only if mounted | |
| 5. Crate side table | 3 to 5 hours | Medium | Easy | No | |
| 6. Plant stand | 2 to 4 hours | Medium | Easy | No | |
| 7. Rail-and-basket | 2 to 3 hours | Low | Easy | Yes if screwed | |
| 8. Fold-down shelf | 4 to 6 hours | High | Medium | Yes | |
| 9. Spice shelf | 2 to 3 hours | Low | Easy | Yes if screwed | |
| 10. Closet shelf | 1 to 2 hours | Low | Easy | No | |
| 11. Bed risers and bins | 3 to 4 hours | Low | Easy | No | |
| 12. Box set | 2 to 3 hours | Low | Easy | No |
Three of the projects need no tools beyond scissors and glue, and two need wall fixings that you should not use without written permission. If you rent, start with a free-standing project and leave the wall work for a place you own. Our list of no-drill storage ideas for renters shows more options that leave the walls untouched.
Three sample weekends
A studio apartment with 450 square feet
The studio has no spare room, so the work area is the balcony and the table. The goal is to separate the entry from the sleeping area. Saturday morning, measure the entry and cut the board for the bench cover. Saturday afternoon, wrap and staple the cushion and fit the shoe storage underneath. Sunday morning, make the fabric pinboard for keys, and Sunday afternoon, place both and tidy. The total is about six to eight hours, and the whole project fits on one table and a small drop cloth. For layout ideas, see our guide on DIY room divider ideas for studio apartments.
A one-bedroom with a tiny kitchen
The kitchen has no counter space and no wall for shelves. Saturday morning, build the spice shelf from a narrow board if you have permission, or make the rail-and-basket setup if you do not. Saturday afternoon, sand and finish. Sunday morning, add the tension-rod closet shelf in the bedroom. Sunday afternoon, load everything, test the weights and clean up. About seven to nine hours in total. If you want more kitchen fixes, browse our small kitchen ideas on a budget.
A family home with a shared hall
The hall is the only area where shoes, bags and coats land. Saturday morning, build the coat rail on an over-the-door frame and cut the bench top. Saturday afternoon, wrap the cushion and assemble the bench. Sunday morning, make the fabric box set for gloves and hats. Sunday afternoon, set it up at a height children can reach, keep sharp tools and fabric scraps away from small hands and wipe everything down. About eight to ten hours in total. For more ideas, read about DIY entryway storage for tiny homes.
Safety notes for weekend projects
A small home leaves little margin for mistakes, so build a few habits into every project.
- Permission first. Read the lease, and never drill, screw, glue or paint a wall, ceiling, built-in or fixture without written permission from the landlord or building manager.
- Anchor tall furniture. Any tall shelf, bookcase or dresser should be anchored to the wall with the correct hardware, ideally into a stud, particularly when children or pets are in the home. If you cannot anchor it, choose a shorter piece or a lower center of gravity.
- Ventilation and low-VOC finishes. Paint, stain, sealant and glue release fumes. Open windows, run a fan that pulls air out of the room, and choose low-VOC or water-based products. Keep children and pets out of the room while finishes cure, and keep rags with oil-based finishes in a closed metal container as directed on the label.
- Electrical. Do not alter wiring, outlets or built-in fixtures. Keep cords out of walkways, do not run them under rugs and do not overload power strips. If a project involves lighting, use plug-in or battery options.
- Wet areas and GFCI. In a bathroom, kitchen or laundry area, keep electrical items away from water and use only outlets with ground-fault protection. Do not place a shelf with electrical items over a sink.
- Weight limits. Every strip, hook, rod and bracket has a rating. Stay at or under half of the stated limit when possible, and check that the surface can take it.
- Dust and tools. Wear safety glasses and a dust mask when sanding or cutting, keep blades sharp and covered, and put tools away between steps.
- Children and pets. Keep small parts, glue, staples and fabric scraps off the floor, use rounded corners and avoid projects that create a climbing hazard.
Common mistakes to avoid
The most common mistake is buying materials before measuring. The second is starting a project that needs a tool you do not own. The third is leaving the cure to chance, for example hanging a wet-painted item, packing it with books and finding it warped a week later. The fourth is trying to finish two big projects in one weekend. The fifth is skipping the test, such as checking an adhesive strip on a hidden spot or checking a fabric for color run. A short pause before each step prevents most redo jobs. Our guide to small space decorating mistakes to avoid covers more of the common pitfalls.
Finish like a pro with small details
A weekend project looks finished when the edges are clean and the surfaces are consistent. Sand the corners slightly so the piece feels good to touch. Repeat one color or one material across two or three projects, so a bench, a pinboard and a box set look like a set. Keep hardware in the same finish. Add felt pads to the feet of anything that sits on a floor. Hide raw edges with fabric, trim or edge tape. For a cohesive look, read our guide on small home decorating ideas that feel cohesive.
Weekend checklist
- Check the lease and ask permission for anything that touches a wall, ceiling or fixture.
- Choose one main project and one small project.
- Measure the space, the item and the path between them.
- Write the plan with four time blocks and an hour of slack per day.
- Buy or borrow all materials and tools before Saturday.
- Clear and cover the work area, and plan where the item will dry.
- Check quiet hours for noisy steps.
- Ventilate and use low-VOC products.
- Anchor tall furniture and check weight limits before loading anything.
- Keep cords, small parts and sharp tools away from children and pets.
- Clean tools and the room, and photograph the result.
FAQ
How many projects can I finish in one weekend?
Most people can finish one main project and one small project. Trying to finish three or four usually leaves several items half done. Choose the main project by the amount of cure time it needs and the small one as a filler for the cure gaps.
Can I do these projects in a rental?
Yes, if you choose free-standing or tension-based options and confirm the rules. Bench covers, crate tables, plant stands, box sets and closet rods do not touch the walls. Anything that uses screws, nails, adhesive on paint or changes to fixtures needs written permission first.
What tools should a beginner buy first?
A tape measure, a level, a screwdriver set, sandpaper, a staple gun and a pair of clamps cover most of the projects here. Borrow larger tools, such as a saw, and use hand tools where noise is a concern.
How do I keep the mess contained in a small home?
Work on a drop cloth in one area, do the dusty steps first and the finishing steps last, and keep a small vacuum or brush close. Cover the bed and sofa with sheets, and move rugs out of the way. Ventilate during and after the work.
How do I know if a project is too big for a weekend?
If it needs more than one coat of finish with long drying times, wall fixings you are not allowed to use, or a tool you do not have, break it into two weekends or choose a simpler version.
What should I do with leftover materials?
Store small offcuts in a labeled box, use leftover fabric for a pillow cover or a box set, and take the rest to a reuse center. Keep paint and sealant in tightly closed cans in a cool place away from children and pets.
Keep going: Plan your next weekend with budget small space ideas, compare slower builds in DIY apartment upgrades, or pair this guide with our companion post on small space decor you can make yourself.
Save this guide for later
Pin the ideas you like to Pinterest so you can come back to them when you plan your space.