Small Kitchen Ideas That Maximize Every Inch
Quick answer: Small kitchen ideas that maximize every inch work in a fixed order. Audit the space, clear the counters, then mine four zones in turn: vertical space, corners, doors and the narrow gaps beside appliances. Finish by assigning each task to a zone so items live where you use them. Measure first, hedge your budget, and check the lease before you drill anything.
Small kitchen ideas that maximize every inch are rarely about one clever gadget. They are about a method: find the wasted inches, claim them one at a time, and make sure each claimed inch earns its place. A kitchen of 70 square feet can store as much as a kitchen of 110 if the unused air above the cabinets, inside the corners, behind the doors and beside the fridge is put to work. This guide is a playbook rather than a list of 25 tricks. It starts with a measurement audit, then walks through the four zones where space hides, compares the options in a table, shows three example kitchens, and ends with a checklist and an FAQ. For a broader idea list, see our pillar guide to small kitchen ideas, and for deeper dives on specific storage problems, our posts on small kitchen storage ideas and small kitchen organization ideas.
Why the playbook approach works
Most small kitchens are not short of space. They are short of usable space. A cabinet whose back third is unreachable, a corner that swallows pots, a wall that stops at eye level and a door with nothing on it all count as lost inches. Adding more containers on top of a messy system just hides the loss. A playbook works because it forces you to count what you have before you add anything.
The approach has five steps, and the order matters. First measure and audit. Second clear and edit, so you only plan for what you actually use. Third claim the four zones in sequence. Fourth assign each kitchen task to a zone. Fifth maintain the system with a short weekly reset. Skipping to step three is the usual mistake, and it is why many small kitchens end up with extra racks and no extra room.
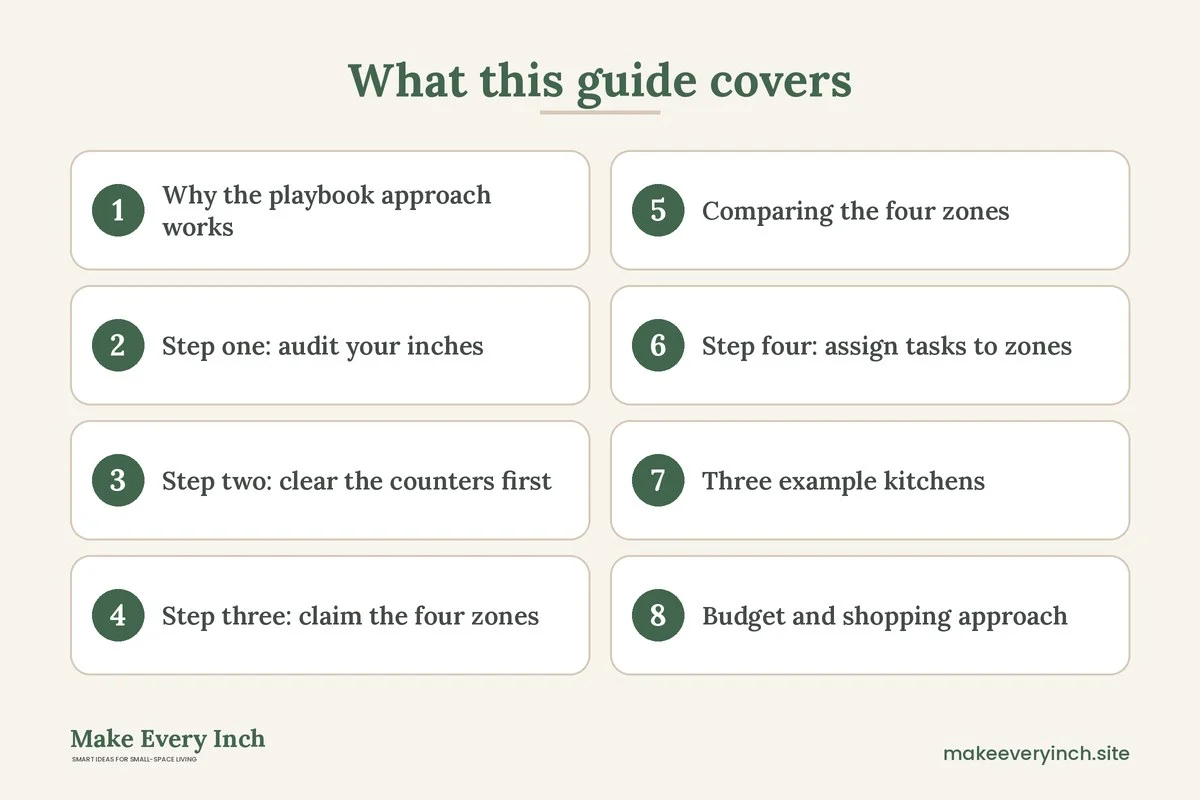
Step one: audit your inches
Grab a tape measure, a notepad and your phone. You are going to build a small map of the room, and you need numbers rather than impressions.
Measure the four things that matter
- Wall runs: note the length of every wall, and where the windows, doors and vents break it. Write the free length between obstacles, not the full length.
- Cabinet interiors: measure the width, depth and height of each cabinet and note the shelf positions. Many shelves are adjustable, which is useful if you can raise or lower them.
- Gap sizes: measure any gap between the fridge and the wall, between the stove and the counter end, and above the fridge. A gap of 6 to 10 inches fits a slim rolling rack, and a gap of 2 to 4 inches fits a spice or tray slot.
- Clearance above counters: measure from the counter to the underside of the wall cabinets, which is usually around 15 to 20 inches. This tells you what fits underneath, such as a rail or a mug hook.
Write down the numbers on a sketch. Many people discover that the largest wasted area is not in the cabinets at all, but in the vertical zone above them and in the corner cabinets that were never designed for access.
Photograph and label the current state
Take a photo of every open cabinet and every drawer. Then label each photo with the main task that happens nearby: prep, cooking, cleaning, coffee, or baking. Photos show you the real picture, including the layers of items that you stopped seeing a long time ago. They also give you a before image to compare against later.
Count what you actually use
Run a one-week log. Every time you take something out of a cabinet, put a tick on a sheet of paper stuck to the fridge. By the end of the week, you will know which items are daily, which are weekly and which are rare. Anything with no tick for the week goes on a second list for a monthly check, and anything that has not been used in a year is a candidate for a donation box or a high shelf. The log takes seconds a day, and it protects you from designing storage for items you never touch.
Step two: clear the counters first
A counter is the most valuable inch in a small kitchen, because it is the only surface that supports prep. Moving things off it frees real working space without adding a single shelf.
- Keep out only daily items. A kettle, a knife block alternative, a cutting board and one jar of utensils is plenty for most people. A coffee maker is acceptable if you use it every day.
- Move appliances into zones. The toaster lives near the breakfast cabinet, the blender near the prep area. If you use it less than weekly, store it out of sight.
- Give small items a tray. A tray with oils, salt and pepper looks tidy and lifts off in one move when you need to wipe the counter.
- Clear a 24 inch landing zone. Leave a clear span of at least 24 inches beside the stove and another beside the sink if you can. This is where hot pans and wet items go.
Once the counters are clear, take a photograph. The room usually looks bigger immediately, which is a good motivator for the harder work ahead.
Step three: claim the four zones
Now we hunt for lost inches. Work through the zones in this order, because the early ones usually give the biggest return for the least effort.
Zone one: the vertical space
Vertical space is the easiest to claim because it is mostly empty. Look at the wall above the counter, the space above the wall cabinets and the side of every cabinet or fridge.
1. A rail under the wall cabinets
A rail fixed under the cabinet edge, or hung from a no-drill hook where allowed, holds utensils, mugs and small pots. It clears drawers and puts daily tools within reach. Keep the rail at least 4 inches above the counter so you can still wipe underneath.
2. A wall grid or pegboard panel
A grid panel with hooks, small shelves and bins lets you shape storage to what you own. In a rental, a freestanding or leaning version, or one hung with a method the lease allows, avoids damage. Never drill into a wall without permission, and use the correct anchors for the wall type.
3. Baskets above the cabinets
The 12 to 18 inches above most wall cabinets is wasted. Fit lidded baskets or boxes for items you use a few times a year, such as roasting pans, party platters and seasonal bakeware. Keep heavy items low, and avoid placing anything above the stove, where heat and grease build up.
4. A tiered shelf inside the cabinet
Most cabinets have one shelf and a lot of air. A small riser or a second shelf doubles the usable surface. Choose one that matches the cabinet width, and check that the doors still close.
5. Side-of-fridge hooks and magnets
A fridge side wall holds a magnetic strip of knives or tools, or a slim rack for foil and wraps. Test the magnetic strength on a small item first, and keep sharp tools out of reach of children.
Zone two: the corners
Corners are where kitchens lose the most inches, because the shape makes access awkward. Items disappear into the back, and the first and second layers block the third.
6. A lazy susan in the corner cabinet
A turntable lets you spin items to the front. It suits oils, jars and baking supplies. Choose a low-lip version so that tall bottles do not fall, and keep the heaviest items near the center.
7. A pull-out corner system
If you have a blind corner cabinet, a pull-out system brings the back items forward. These units can be fitted by a handy person or a professional. If you rent, ask permission before you modify cabinets, and consider a freestanding turntable instead.
8. A corner shelf unit on the counter
A tiered corner shelf turns a dead counter corner into a mini pantry. It holds jars, oils and spices. Keep it light and stable, and leave room for a cutting board nearby.
9. Hooks on the inside corner of a wall
A hook rail on a short wall section beside a corner holds oven mitts, aprons and bags. It uses a space that is too narrow for a shelf.
10. A corner bakers rack
A floor-standing rack in a free corner adds 3 or 4 shelves of storage for appliances and dry goods. Anchor tall racks to the wall if the lease allows, or add a weighted base to stop tipping, particularly in a home with children or pets.
Zone three: the doors
Every door is a storage surface. Cabinet doors, the pantry door and the back of the entry door can hold light, flat or narrow items.
11. An over-the-door rack
These racks hang over the top edge of a door and need no drilling. They hold foils, wraps, cleaning products and snacks. Check the door clearance, because racks can stop a door from closing if the cabinet frame is narrow.
12. Inside-cabinet door racks
A slim rack on the back of a cabinet door holds spices, lids or baking sheets. Measure the depth so that the rack does not hit the shelf inside. Use adhesive-backed versions where drilling is not allowed.
13. A hanging organizer on the pantry door
A fabric pocket organizer holds snack bags, spice jars and small tools. It is inexpensive in effort, and easy to remove. Do not overfill it, since weight can pull on the door hinges.
14. A magnetic panel inside a door
A magnetic panel or sheet inside a metal door holds spice tins, tools and notes. It works only on steel surfaces, so test with a magnet first.
15. A drying rack that hangs from a door
A fold-flat rack can hang from a cabinet door for a while and then disappear. Keep an eye on wet items so water does not soak the door finish.
Zone four: the narrow gaps
Gaps are the least obvious of the four zones. A gap by the fridge, a space above the fridge or a slot beside the stove can hold something useful.
16. A slim rolling rack beside the fridge
A rolling rack of 6 to 9 inches wide fits cans, bottles or spices, and rolls out when needed. Measure carefully, and check that the fridge door can still open fully.
17. A tray slot above the fridge
The space above the fridge can hold a vertical slot for baking sheets, boards and trays, or a basket for items used rarely. Make sure the fridge’s ventilation is not blocked, and keep to the maker’s guidance on clearance.
18. A gap shelf beside the stove
A short shelf or a rail beside the stove suits oils and tools, but keep a clear distance from the heat source and follow the appliance guidance. Use heat-safe materials and avoid anything flammable near the burners.
19. A toe-kick drawer
Some cabinets have a toe-kick space of 3 to 4 inches. A shallow drawer there can hold baking sheets, pet bowls or flat trays. This is a task for a professional or a confident DIYer, and a rental may not allow it.
20. A narrow wall shelf at eye level
A 4 to 5 inch shelf above a counter or beside a window holds spice jars and oils without crowding the work surface. Check that it clears any window opening, and use proper anchors if drilling is allowed.
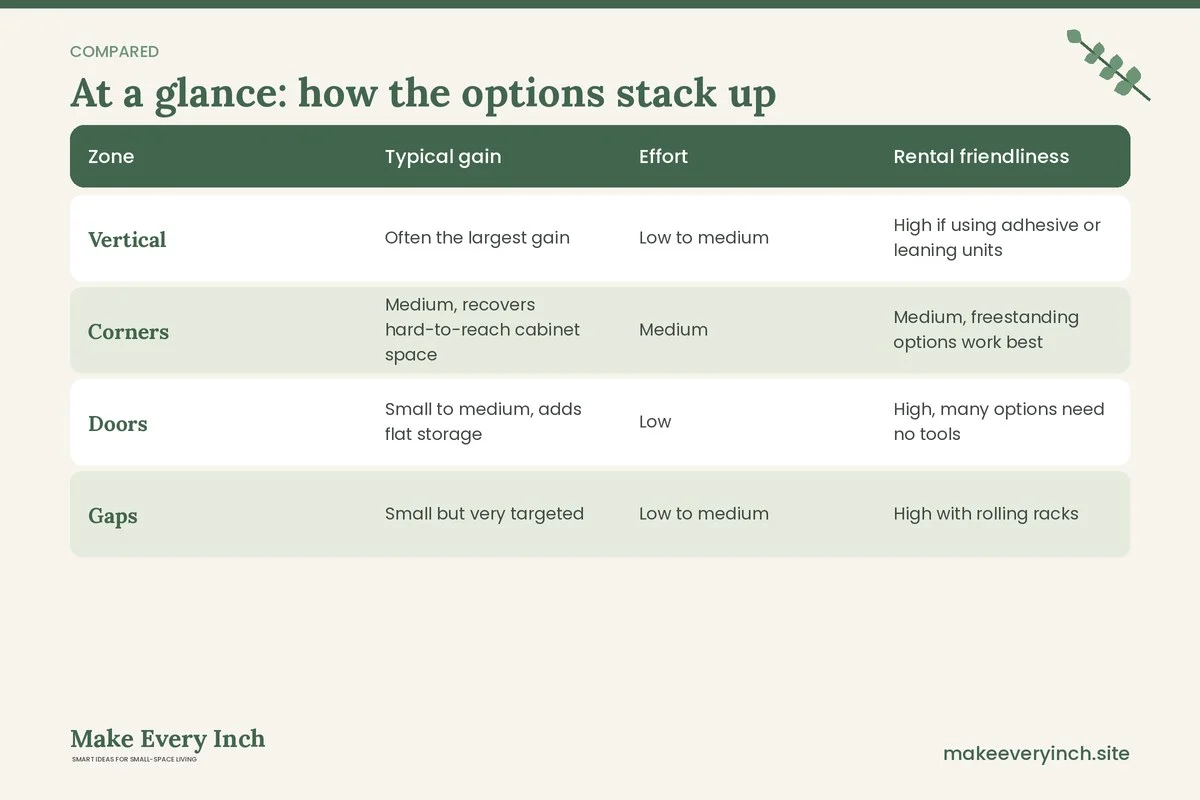
Comparing the four zones
Each zone has strengths and trade-offs. Use this table to decide where to start.
| Zone | Typical gain | Effort | Rental friendliness | Best for |
|---|---|---|---|---|
| Vertical | Often the largest gain | Low to medium | High if using adhesive or leaning units | Mugs, utensils, seasonal items |
| Corners | Medium, recovers hard-to-reach cabinet space | Medium | Medium, freestanding options work best | Jars, pots, baking supplies |
| Doors | Small to medium, adds flat storage | Low | High, many options need no tools | Wraps, lids, spices, cleaning items |
| Gaps | Small but very targeted | Low to medium | High with rolling racks | Cans, bottles, trays, slim tools |
If you can only do one thing this weekend, start with the vertical zone. It usually costs the least effort and delivers the biggest visible change. Move on to corners only once you have a clear plan for what goes there.
Step four: assign tasks to zones
Once you have extra space, give it a purpose. A kitchen works best when each task has a home: prep, cook, clean, coffee and bake. Group items by task, not by type, and place them within arm’s reach of where you do the task.
- Prep zone: boards, knives, bowls and a compost bin go near the longest clear counter section.
- Cook zone: oils, spices, pots, lids and tongs go near the stove, in the closest cabinet and on the rail.
- Clean zone: cleaning supplies, brushes, bin liners and dishcloths go beneath or beside the sink, with a hook or a door rack for cloths.
- Coffee zone: a mug rail, a coffee maker and a small tray form a station that keeps morning clutter off the main counters.
- Bake zone: sheets, mixing bowls and flour go in the cabinet nearest the prep counter or in the above-fridge slot.
Once the zones are set, the layout becomes intuitive, and guests can find things without asking. For layout and traffic questions, our companion post on small kitchen layout ideas for better workflow explains how the zones relate to the work triangle and walkways.
Three example kitchens
Numbers help, so here are three scenarios with real constraints. These are illustrative plans based on typical dimensions, not claims about specific homes.
Example one: a 7 by 9 foot rental galley
A renter has a narrow galley with two walls of cabinets, a fridge at one end and a window at the other. Counter space is 8 feet in total. The plan: clear the counters to a kettle and a utensil jar, add a rail under the wall cabinets for mugs and tools, fit lidded baskets above the cabinets for seasonal items, and slide a slim rolling rack into the 7 inch gap beside the fridge. An over-the-door rack on the pantry door takes wraps and cleaning supplies. No drilling is needed. For more on this room shape, see our guide to galley kitchen ideas.
Example two: an L-shaped studio kitchen
A studio apartment has an L-shaped kitchen with a blind corner cabinet and no pantry. The plan: install a freestanding turntable in the corner cabinet for oils and jars, add a tiered shelf inside the upper cabinets, put a baker’s rack at the open end of the L, and use the door of the cabinet beneath the sink for a rack of cleaning supplies. A rolling cart adds a movable prep surface when needed. The cart ideas in our small kitchen cart ideas post go deeper on sizes.
Example three: a family kitchen of 85 square feet
A family of four shares a kitchen with limited counters and one wall of cabinets. The plan: keep only daily items out, use a rail and magnetic strip on the main wall, hang a pocket organizer on the pantry door for snacks, and label baskets above the cabinets with the months when items are needed. A narrow shelf by the window holds herbs, and the fridge side carries a calendar and a tool rack. Children can reach a low drawer with unbreakable bowls and cups, which reduces traffic at the counters. For pantry options, our small kitchen pantry ideas post has more.
Budget and shopping approach
You do not need to buy everything at once. Start with free fixes: rearrange shelves, move rarely used items up, and use jars and boxes you already own. Next, spend on the zone that gives the most gain, usually the vertical zone. Compare a few options, and choose pieces that can be moved if you relocate. Costs vary widely by region and brand, so set a range before you shop and stick to it. Second-hand shops and online marketplaces often have racks, baskets and turntables at lower cost, though you should check them for rust, wobble and missing parts.
For a wider approach to the room as a whole, our post on small kitchen makeover ideas covers the cosmetic changes that go well with a storage upgrade, and the vertical storage ideas guide applies the same principle to every room.
Safety notes
- Anchor tall furniture. Bakers racks, tall shelves and freestanding units can tip. Anchor them to a wall where the lease allows, and keep heavy items on lower shelves.
- Never drill without permission. In a rental, check the lease and ask your landlord before drilling, and use adhesive or freestanding options where drilling is not allowed.
- Keep heat and grease away. Do not store paper, fabric or plastic near the stove, and keep a clear space around burners and the oven.
- Respect electrical limits. Do not overload sockets with appliances, and keep cords away from water and heat. If you add lighting or sockets, hire a qualified person.
- Mind the weight limits. Check the weight rating on every adhesive hook, shelf and rack, and leave a margin.
- Ventilate when you clean. If you use strong cleaners or low-VOC paint on cabinets, open a window and run the fan.
A weekly maintenance routine
A system holds only if you keep it. Set aside ten minutes once a week for a quick reset.
- Wipe the counters and put back anything that has wandered.
- Check the fridge and pantry for expired items.
- Return stray items to their zone.
- Empty the door racks and the basket by the fridge.
- Note any item that has become a nuisance, and move it up or out.
After a month, review the one-week log from your audit. Items that have crept onto the counters can be given a better home, and anything unused can leave.
Checklist for maximizing every inch
- Measure walls, gaps and cabinet interiors.
- Photograph every open cabinet.
- Run a one-week usage log.
- Clear the counters to daily items only.
- Keep a 24 inch landing zone beside the stove.
- Add a rail or grid in the vertical zone.
- Put lidded baskets above the wall cabinets.
- Fit a turntable or pull-out in the corner cabinet.
- Use the backs of doors for flat items.
- Slide a slim rack into the fridge gap.
- Assign prep, cook, clean, coffee and bake zones.
- Anchor tall units and check the lease before drilling.
- Schedule a ten minute weekly reset.
FAQ
What is the fastest way to make a small kitchen feel bigger?
Clear the counters. Moving everything except daily items off the work surface gives the largest instant change, and it costs nothing. After that, add a rail under the cabinets.
Which zone should I start with?
Start with vertical space, since it is usually mostly empty and the easiest to use. Corners come next, followed by doors and gaps.
How much can I store above the cabinets?
Most cabinets leave 12 to 18 inches of air above them. A lidded basket there can hold seasonal items and rarely used cookware. Keep heavy items low and away from the stove.
Do these ideas work in a rental?
Many do. Over-the-door racks, rolling racks, freestanding turntables, leaning panels and adhesive hooks avoid damage. Always check the lease, and ask before drilling or changing cabinets.
How do I stop clutter from coming back?
Give every item a home in a zone, label baskets, and run a ten minute reset each week. Each time you buy something new, remove one item that you no longer use.
Should I buy storage before I declutter?
No. Declutter first, then measure, then buy only what fills a gap you have identified. This prevents extra containers from becoming clutter themselves.
Keep going: Keep going with our small kitchen ideas, small kitchen storage ideas and small kitchen organization ideas.
Save this guide for later
Pin the ideas you like to Pinterest so you can come back to them when you plan your space.