Small Kitchen Layout Ideas for Better Workflow
Quick answer: Small kitchen layout ideas for better workflow start with the path between the fridge, sink and stove. Keep the three points close but not cramped, protect a clear landing area beside each, and give prep, cook and clean their own zones. One-wall, galley, L-shaped and U-shaped plans all work in a small room when aisles stay wide enough to open doors and drawers. Measure first and mark the plan with tape.
Small kitchen layout ideas for better workflow are about movement, not decoration. In a small kitchen the cook walks the same short routes dozens of times per meal, and every extra step, every blocked door and every missing landing spot adds friction. A good layout does not need more space. It needs the right distances, a sensible order of tasks and clear aisles. This guide explains the work triangle in a small room, the clearances that keep drawers and doors usable, how to set up prep, cook and clean zones, and how to adapt one-wall, galley, L-shaped and U-shaped kitchens. It includes a comparison table, three example kitchens, a tape-test method, a checklist and an FAQ. For storage and the wider idea list, see our pillar guide to small kitchen ideas, and for what goes inside the cabinets once the layout works, our posts on small kitchen storage ideas and small kitchen organization ideas.
What “workflow” means in a kitchen
Workflow is the order in which you move food and tools through the room. In most kitchens the sequence is the same: take food from storage (fridge or pantry), rinse and prep it near the sink, cook it at the stove, serve it, and clean up. A layout supports good workflow when these steps follow each other without crossing paths or backtracking.
Poor workflow shows up in small signs. You walk to the far end of the room for the cutting board. The fridge door blocks the only aisle when it is open. A hot pan has nowhere to land because the counter beside the stove is covered in appliances. Two people cannot pass without turning sideways. Each of these is a layout problem, and none of them is fixed by a prettier backsplash. It is better to diagnose them with a short observation exercise than to guess.
A ten minute observation exercise
Cook one ordinary meal and note the following on a sheet of paper.
- How many times did you cross the room between the fridge, sink and stove?
- Where did you set hot pans, wet vegetables and finished plates?
- Which drawers and doors did you open, and did any hit something?
- Where did a second person stand, and did they block you?
- What did you need that was not within two steps of where you were working?
Circle every point of friction. Most small kitchens have three to five. Those circles become the brief for your layout changes.

The work triangle in a small kitchen
The work triangle is the imaginary line joining the fridge, the sink and the stove. It is a classic planning rule, and it still helps. In a large kitchen the rule is often given as a total of roughly 13 to 26 feet for the three sides, with each side between about 4 and 9 feet. A small kitchen will usually sit at the low end of that range or just under it, and that is fine. The aim is not to hit a number. The aim is to keep the walking short without making the cook feel crowded.
Why a triangle can be too small
A triangle that is too tight causes its own trouble. If the sink and the stove are only 3 feet apart, there is no room for a cutting board between them, and splashes from the sink reach the hob. If the fridge sits directly beside the stove, heat reaches the fridge door and a person opening it blocks the cook. As a guide, aim for at least 24 inches of clear counter between the sink and the stove, and avoid putting the fridge immediately next to the stove.
Why a triangle can be too large
At the other extreme, a long kitchen with the fridge at one end and the stove at the other forces a cook to walk 8 feet for every trip. In that case, create a second mini-triangle with a movable item. A rolling cart near the stove can hold the items you reach for most, which shortens the routes.
When the triangle does not fit
Many one-wall and galley kitchens cannot form a true triangle, since the three points lie along one or two lines. In those cases think of a work line instead. The order should still be fridge, prep, sink, stove, with the prep surface at the longest clear span of counter. If your appliances are in a different order, you can still make the layout work by moving the prep zone to where the distances are shortest and by using a cart or a board that bridges the sink.
Clearances that keep a small kitchen usable
Clearances are the measurements around furniture and appliances that stop doors, drawers and bodies from colliding. They are the most overlooked part of a small kitchen plan. These figures are typical guideline ranges, so check your own appliance manuals and local rules before you commit.
- Main aisle: about 36 to 42 inches wide where one person cooks, and 42 to 48 inches where two people work. A narrow galley may only manage 36 inches, which is workable for one cook.
- Minimum aisle: around 30 to 32 inches is the lowest comfortable width for passing. Below that, you will shuffle sideways.
- Landing space beside the stove: at least 12 to 15 inches of clear, heat-safe counter on at least one side.
- Landing space beside the fridge: 15 inches or so on the handle side, so you can set down groceries.
- Beside the sink: 18 to 24 inches on one side for dishes and 12 to 18 inches on the other for drying.
- Dishwasher door: the open door projects up to 24 inches or more into the aisle, so leave room to stand beside it. Do not plan a cabinet door that opens into the same space.
- Oven door: allow the full swing, usually 20 to 24 inches, plus room for you to stand.
- Walls and corners: in corners where two drawers meet, use a filler panel or a small gap so the handles do not collide.
Check these against the real dimensions of your own appliances. Fridge doors in particular vary, and some can be reversed so that they open toward a wall rather than into the aisle. Reversing a door is often a simple task, but follow the maker’s instructions.
Safety clearances
Cooking appliances need clear space around them. Keep flammable items such as towels, paper and wooden utensils away from the burners. Keep the area above the stove clear of shelves unless the appliance maker and local rules say the distance is suitable. Ventilation matters too: use the extractor fan or open a window while cooking, and clean the filter regularly. Do not place cables or sockets near water, and hire a qualified electrician for any change to wiring or sockets.
Set up the three work zones
Think of the kitchen as three zones, each with its own surface, tools and storage. This is a different lens from the work triangle, because it focuses on tasks rather than appliances.
The prep zone
This is where you chop, mix and assemble. It needs the longest clear stretch of counter, ideally 24 to 36 inches wide, between the sink and the stove or beside the sink. Keep boards, knives, bowls and a compost or waste bin here. If your counter is short, extend it with a board that fits over the sink, a fold-down shelf or a rolling cart. Make sure any extension is stable and sized for the load.
The cook zone
This zone surrounds the stove. It needs a heat-safe landing spot on each side if you can, and storage for oils, spices, pots, lids and utensils within arm’s reach. A rail with hooks on the wall nearby holds tools, as long as it keeps a safe distance from the flame. Store the pans below the hob, so you can pull them out without crossing the room.
The clean zone
The clean zone is the sink, the dishwasher if you have one, and the places for drying and waste. Keep cleaning supplies below the sink or on a door rack, a bin close by, and a drying rack that can be put away. If the sink is deep, a board across it adds temporary counter space for prep. A kitchen is easier to run when the clean zone is on the opposite side of the prep zone from the cook zone, so that wet and hot areas do not meet.
How the zones connect
The best sequence runs in a line: storage, prep, cook, serve and clean. In a small kitchen, the zones will overlap, and that is acceptable. A single counter segment can be prep for one task and a landing space for another. What matters is that tools live where the work happens. A knife stored two rooms away is a workflow failure, however pretty the drawer.
For storage that matches each zone, see our guide to small kitchen counter organization ideas, which explains how to keep each work surface clear.
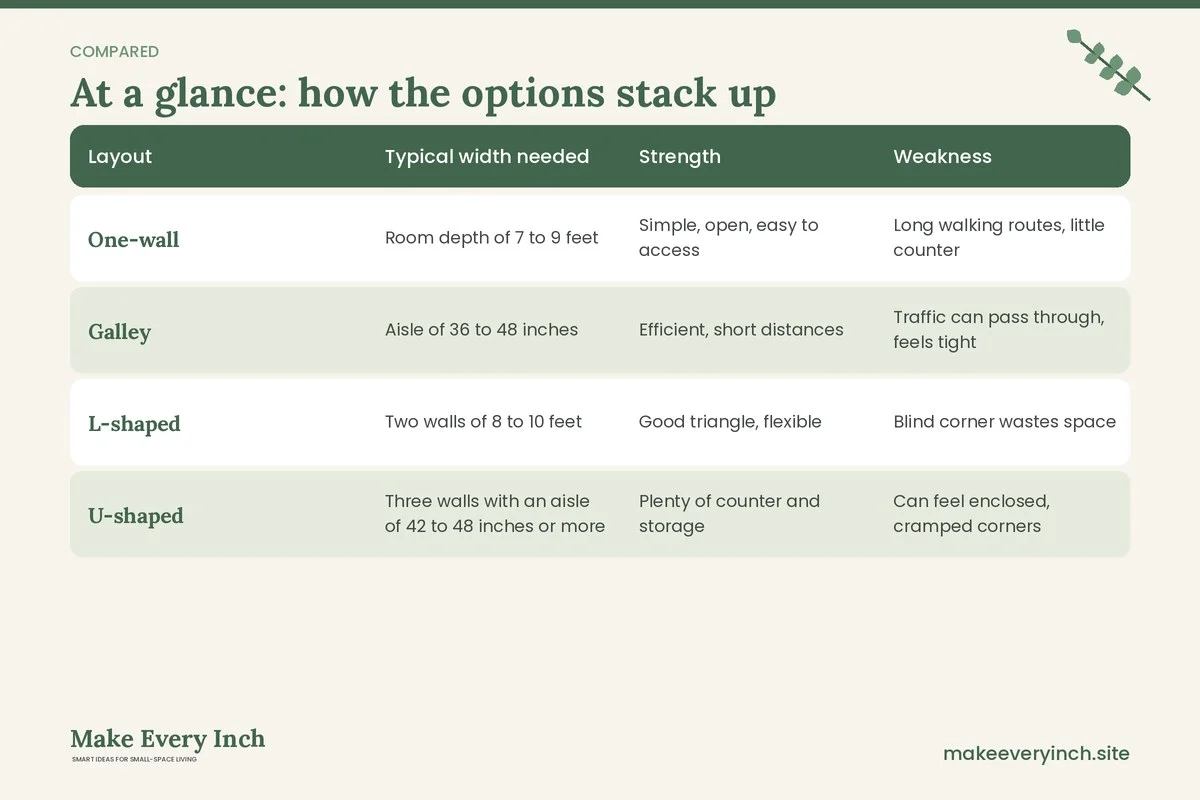
Layout types compared
Most small kitchens fall into one of four shapes. Each has its own strengths, and each suits different clearances.
| Layout | Typical width needed | Strength | Weakness | Best fix |
|---|---|---|---|---|
| One-wall | Room depth of 7 to 9 feet | Simple, open, easy to access | Long walking routes, little counter | Add a movable cart or island and put the sink in the middle |
| Galley | Aisle of 36 to 48 inches | Efficient, short distances | Traffic can pass through, feels tight | Keep one end open and align doors so they do not clash |
| L-shaped | Two walls of 8 to 10 feet | Good triangle, flexible | Blind corner wastes space | Use a turntable or pull-out in the corner |
| U-shaped | Three walls with an aisle of 42 to 48 inches or more | Plenty of counter and storage | Can feel enclosed, cramped corners | Open one wall or use open shelves to lighten the look |
None of these is better in every case. Choose according to the way you cook, how many people use the room, and what the architecture allows.
Layout-by-layout advice
One-wall kitchens
A one-wall kitchen puts the fridge, sink and stove along a single line. The usual mistake is to put the sink at one end and the stove at the other, leaving no space between them for prep. The best sequence is fridge, counter, sink, counter, stove, with a clear stretch of at least 24 inches on each side of the sink if the wall allows. If the wall is short, put the sink beside the stove with a movable board over the sink, and use a cart opposite the line as a second work surface. A cart that tucks under the counter when not in use costs no floor space at all. Our post on small kitchen cart ideas covers sizes and types.
Galley kitchens
In a galley layout the two parallel runs give short distances. The goal is to keep the aisle clear and to separate the zones across the aisle: for instance, prep and cook on one side and clean and storage on the other. This creates a natural loop so that a cook turns around rather than walking along the aisle. Keep doors from clashing: place the dishwasher and the oven on opposite sides, offset by at least one cabinet width, so opening both does not block the aisle. If your galley has a through route to another room, add a rug or runner to guide foot traffic, and keep the center clear of anything that tips. See our galley kitchen ideas guide for more.
L-shaped kitchens
An L-shaped kitchen offers a natural triangle, since the sink can sit on one leg and the stove on the other, with the fridge at the end of one of them. The challenge is the corner. A blind corner cabinet holds items that you cannot reach, so use a turntable, a pull-out or a corner drawer if possible. Avoid putting the stove right in the corner, because it leaves no landing space on one side. If the L opens into a living space, use the free side as a breakfast bar, and keep the traffic route to the dining area clear of the cook’s path.
U-shaped kitchens
A U-shape wraps three walls and gives the most counter in a small footprint. The middle aisle needs at least 42 inches, otherwise two doors on opposite sides collide. Place the sink at the base of the U, with the stove and fridge on the legs, which creates a compact triangle. The weak points are the two inside corners. Use turntables or shallow shelves in both, and consider replacing one run of wall cabinets with open shelves to keep the room from feeling closed. If the U has no door on the fourth side, make sure the entrance is at least 32 to 36 inches wide.
Kitchens with an island or peninsula
Adding an island needs at least 36 inches of aisle around it, and 42 inches is better when two people cook. In a small room, a peninsula is usually safer than an island, since it uses one wall as support and leaves a single aisle. A narrow drop-leaf table or a cart can stand in for an island in a rental.
Use the tape test before you commit
A layout on paper hides problems that appear immediately in the real room. The tape test is a free way to check them.
1. Measure the room and draw it to scale on graph paper, 1 inch to 1 foot, including windows, doors and vents.
2. Cut paper shapes for each appliance, cabinet and cart, using the real dimensions.
3. Move the shapes around the plan until the aisles meet the clearances above.
4. Mark the floor with painter’s tape for each item, including the swing of every door and drawer.
5. Act out a meal. Walk the route from fridge to sink to stove with a pot, open every door and pass a second person.
6. Adjust and retest until you can cook without bumping into anything.
This takes under an hour, and it can save you from a costly mistake. It is particularly helpful if you plan to buy a cart, an island or a new fridge, because it shows what will fit before you pay.
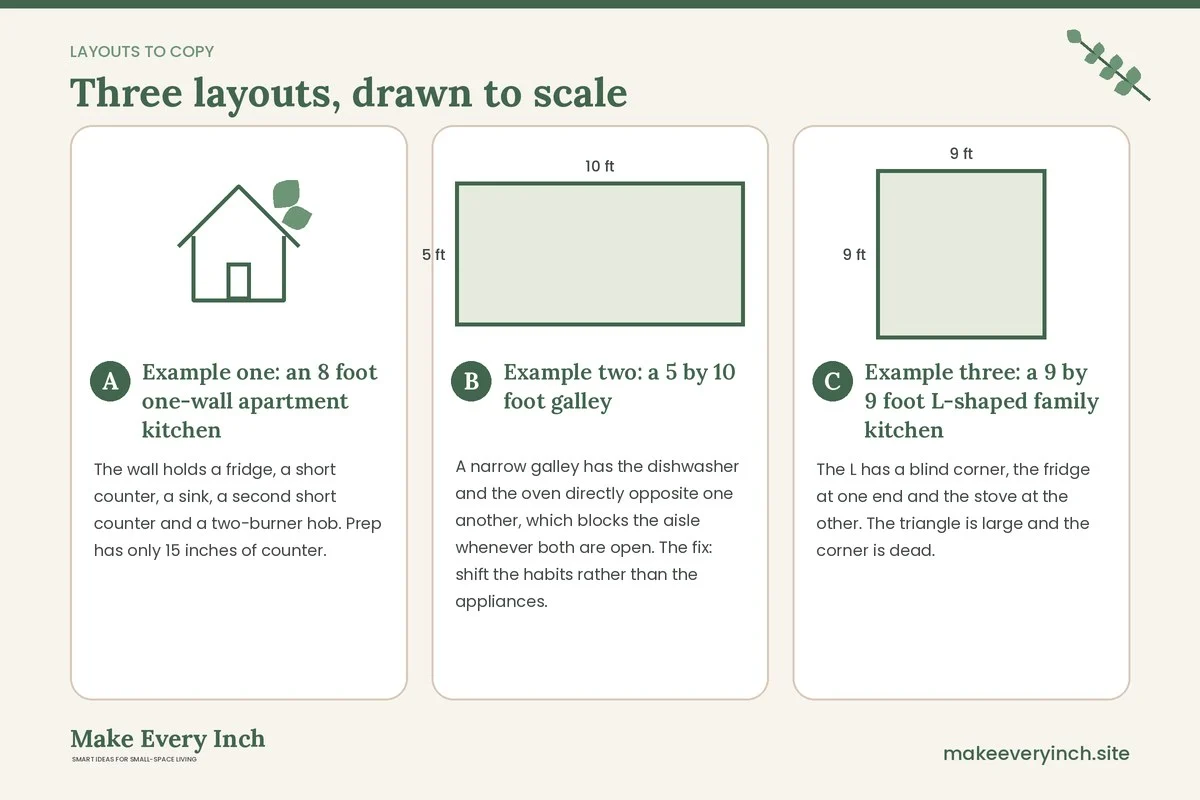
Three example kitchens
These are illustrative plans based on typical dimensions rather than reports about specific homes.
Example one: an 8 foot one-wall apartment kitchen
The wall holds a fridge, a short counter, a sink, a second short counter and a two-burner hob. Prep has only 15 inches of counter. The fix: swap the 15 inch counter beside the sink for 24 inches by moving the fridge to the end of the wall, add a sink-cover board for temporary space, and place a 14 inch deep cart opposite the line, leaving a 36 inch aisle. A rail above the hob holds tools, and a basket on the cart carries the most-used items. The workflow now runs fridge, sink board, hob in a straight sequence with a landing area on the cook side. You will find ideas that suit this room in our small apartment kitchen ideas post.
Example two: a 5 by 10 foot galley
A narrow galley has the dishwasher and the oven directly opposite one another, which blocks the aisle whenever both are open. The fix: shift the habits rather than the appliances. Load the dishwasher in a batch after the oven is finished, put the trash bin at the far end of the aisle out of the swing path, and move the toaster and kettle to the shorter run so that the longer counter stays clear for prep. A runner on the floor defines the aisle, and a pair of hooks on the door holds towels. The galley remains tight, but the friction points are gone.
Example three: a 9 by 9 foot L-shaped family kitchen
The L has a blind corner, the fridge at one end and the stove at the other. The triangle is large and the corner is dead. The fix: install a turntable in the corner cabinet for pots, shift the main prep area to the middle of the long leg, put a small cart beside the stove on the short leg, and leave the opposite wall free for a stool at a breakfast ledge. The walking distance falls, the corner becomes useful, and the children can sit and do homework without stepping into the cook’s path. For lighting in a layout like this, see our small kitchen lighting ideas post.
Layout mistakes to avoid
- Placing the fridge so its door blocks the aisle. Check the swing, and reverse the hinge if possible.
- No landing space beside the stove. Hot pans need somewhere to go.
- Putting the bin far from prep. Peelings travel across the room.
- Hanging shelves where you bump your head. Keep shelves clear of the standing zone at the sink and stove.
- Overloading one counter with appliances. Spread them to the zones where they are used.
- Ignoring natural light and sightlines. A cook working in a shadow makes mistakes, and a cluttered sightline makes the room feel smaller.
- Buying furniture before the tape test. A cart that is a few inches too wide can ruin the aisle.

Renters and no-drill layout changes
Many layout improvements need no tools. Reverse a fridge door, if the maker allows it. Add a freestanding cart, a drop-leaf table or a slim shelving unit. Use a sink-cover board for temporary counter space. Place a runner to define the aisle. Use freestanding racks beside the fridge rather than fixed ones. Check the lease before you move anything fixed to the wall, and never drill without permission. For more ideas, our guide to renter-friendly kitchen upgrades explains which changes are usually safe, and the companion post on small kitchen ideas that maximize every inch shows how to claim the vertical, corner and door space once the layout is settled.
If your kitchen is very small, our tiny kitchen ideas guide looks at the extreme end, and if you are thinking of bigger changes, our small kitchen makeover ideas post covers the cosmetic side. Always get a qualified professional to move gas, plumbing or electrics, and check local rules before any structural change.
Checklist for a better small kitchen workflow
- Cook a meal and mark the friction points.
- Measure the room, the appliances and the door swings.
- Draw the plan to scale and test it with paper shapes.
- Keep the fridge, sink and stove close, but not touching.
- Leave at least 24 inches of counter between the sink and the stove.
- Keep a heat-safe landing space beside the stove.
- Keep the main aisle at 36 inches or more where you can.
- Check that no two doors open into the same space.
- Set the prep, cook and clean zones and store tools in each.
- Tape the plan on the floor and act out a meal.
- Keep flammables away from the burners and use the extractor fan.
- Check the lease before changing anything fixed.
FAQ
What is the work triangle?
It is the imaginary line between the fridge, the sink and the stove. Keeping the three points close, usually with sides of roughly 4 to 9 feet, shortens the routes you walk when cooking. In a small kitchen the triangle will be at the low end of that range.
Does the work triangle matter in a very small kitchen?
Yes, but as a guide rather than a rule. In one-wall and galley kitchens, think of a work line, with prep between the sink and the stove, instead of a true triangle.
How wide should the aisle be?
Aim for around 36 to 42 inches for one cook and 42 to 48 inches for two. A galley may only manage 36 inches, and the lowest comfortable width for passing is around 30 inches.
Which layout suits a small kitchen best?
It depends on the room. A galley is efficient, an L-shape offers a natural triangle, a U-shape gives the most storage and a one-wall kitchen is simple and open. The best layout is the one that fits your room with the aisles intact.
Can I add an island to a small kitchen?
Only if you can keep around 36 to 42 inches of aisle on every side. A peninsula, a cart or a drop-leaf table is usually a safer choice in a small room.
How do I get more counter space without remodeling?
Clear the counters of rarely used items, add a board over the sink, use a cart, and consider a wall-mounted fold-down shelf where allowed. Each adds a surface without moving a wall.
Do I need a professional to change my layout?
Moving a sink, a stove or sockets involves plumbing, gas or electrics, so you should hire a qualified professional and check local rules. Cosmetic and furniture changes can usually be done yourself.
Keep going: Keep going with our small kitchen ideas, small kitchen storage ideas and small kitchen organization ideas.
Save this guide for later
Pin the ideas you like to Pinterest so you can come back to them when you plan your space.