How to Create an Entryway in an Open-Plan Home Without Walls
Quick answer: To create an entryway in an open plan home, mark a landing zone of about 4 by 5 feet just inside the door with a rug, a floor-standing or wall-hung storage piece, a light source and a change in surface or color. Keep a 36 inch path from the door to the main room, break the sight line to the sofa or bed with something open or low, and give every item that arrives with you a home within arm’s reach.
If your front door opens straight into the living room, you already know the problem. Shoes end up beside the sofa, a bag lands on the dining table and the first thing a guest sees is the back of a couch. To create entryway open plan home zones that feel intentional, you do not need to build a wall. You need to give arrival its own small territory, with a floor marker, a place to sit or lean, a light, a hook and a visual edge. This guide covers how to measure the space you have, how to choose a boundary that suits your lease and your room, which furniture to use, how to light and ventilate the area, three example layouts, a comparison table, common mistakes and a checklist. For the basics of tiny entries, start with our pillar on small entryway ideas, and for related situations see home entryway ideas when there is no foyer and how to zone a small open plan home.
Why open plan entries are a different problem
A traditional entry is a room, or at least a hallway, with doors and walls that hide what you drop there. In an open plan home the door opens into the same volume that holds the living area and often the kitchen. That has three effects.
First, there is no buffer for noise, drafts or smells. Opening the door brings outdoor air into the sofa area, and cooking odors travel to the door. Second, clutter has no hiding place. Anything you place near the door is part of the view from every seat. Third, there is no clear boundary, so the entry area tends to creep. Shoes spread across the floor, coats migrate to the nearest chair and the main walkway turns into a storage lane.
The fix is to treat the entry as a zone, not a room. A zone is defined by a few cues the eye reads quickly: a floor treatment, a vertical element, a light and a change in furniture type. When these cues group together, the area reads as a place even though no wall exists. If you want a wider look at how open plan spaces can be divided, our guide on small home design ideas for open plan living has more room-level ideas.
Measure before you buy anything
Most entry zones fail because the pieces are chosen before the space is measured. Spend ten minutes with a tape measure and painter’s tape.
- Door swing: note whether the door opens inward and how far. Mark the arc on the floor. Nothing permanent should sit inside it.
- Landing depth: measure from the door threshold into the room. You need roughly 36 to 48 inches of clear floor to take off shoes and turn.
- Zone width: 4 to 5 feet wide is comfortable for one or two people. A zone of 3 feet works for a single resident.
- Path to the room: keep at least 36 inches clear from the door to the main seating or kitchen area. Some building codes treat 36 inches as a minimum width for a path, so check local rules if you are changing a layout.
- Wall segment: find the wall nearest to the door. Even 24 inches of free wall can hold hooks and a shelf.
- Outlets and switches: note where they are before you place a lamp or plug-in light.
- Radiators and vents: note heat sources. Do not block a radiator or a return vent with furniture, and keep fabric away from heaters.
Tape the zone rectangle on the floor, then live with it for a few days. Walk in with groceries, a stroller or a bike helmet and see whether the rectangle holds up. Adjust the tape before you spend on furniture.
Choose the boundary: six ways to define the zone
The boundary decides how much privacy and how much light the entry gets. Pick the one that matches your room and your lease.
1. A rug as a floor marker
A rug is the simplest cue because it needs no installation. Choose a flat, low-pile runner or a small rectangle about 2 by 3 feet or 3 by 5 feet that sits just inside the door and ends before the main room. Use a thin non-slip pad that is safe for your floor, and avoid thick rugs that catch the door. Pick a color or pattern that differs from the living room rug so the two do not blur together. A washable or doormat-style surface also traps grit before it reaches your sofa. Our guide on choosing a rug size for a small living room explains how to size the neighboring rug so the two rugs do not collide.
2. A low console or bench perpendicular to the wall
Turn a narrow console, shelf or bench so it sticks out from the wall at a right angle. It acts as a half wall at about 30 to 36 inches high and shields the entry from the living room without blocking light. The back of the piece faces the sofa, so choose one with a finished back or cover the back with a fabric panel. Keep the end near the door open, so a person can reach the surface as they walk in.
3. An open shelving unit as a divider
A bookcase or cube unit with an open back lets light through and gives you storage on both sides. Use the entry side for baskets, hooks and shoes, and use the living room side for books and décor. Because it is tall, it must be anchored to the wall with the hardware recommended by the maker, or placed so it does not tip. If you rent, ask for permission before you drill, and consider a freestanding unit that is wide, low and heavy at the base. Never leave a tall unit unanchored in a home with children or pets, and never place heavy items on the top shelves.
4. A folding screen or fabric panel
A screen is flexible and cheap to move. A three-panel folding screen about 5 to 6 feet tall blocks the sight line and can be folded flat when you want an open room. Look for a stable base and wide feet. A fabric panel hung from a ceiling track or tension rod can do the same job, but check weight limits and permission first. Keep fabric away from any heater or open flame.
5. A plant wall or tall plants in a row
A row of tall plants in pots, or a plant stand with trailing plants, defines the edge softly and adds fresh air. Choose plants that tolerate the light by the door, and avoid species that are harmful to pets or children if they chew the leaves. Place heavy pots on stable stands, and use saucers so that watering never stains the floor.
6. A change in wall color or an accent panel
If you are allowed to paint, a deep color on the wall beside the door, or a panel painted around the hooks, tells the eye that this is a separate zone. Choose a low-VOC or zero-VOC paint, ventilate the room while it dries and keep children and pets away until it has cured. In a rental, use a peel-and-stick panel or a framed board painted off site, and hang it with the methods your lease allows.
Comparison table: which boundary suits you?
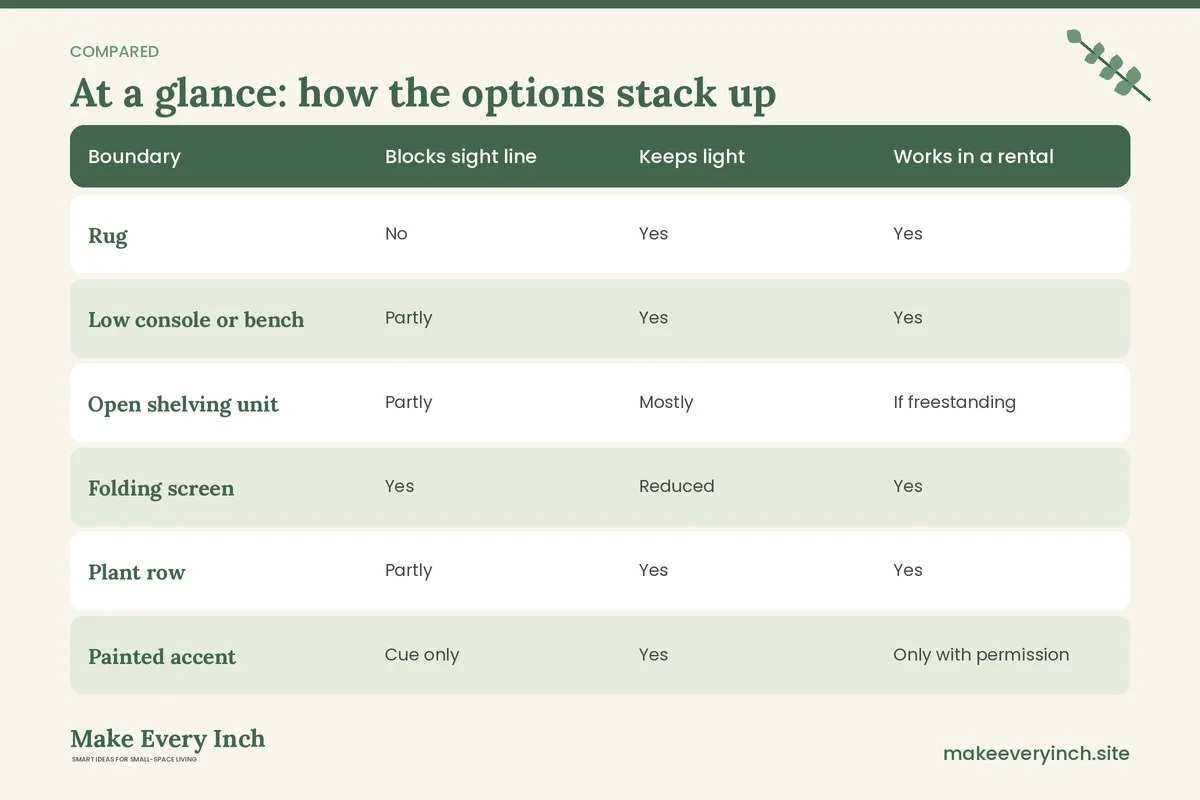
| Boundary | Blocks sight line | Keeps light | Works in a rental | Typical footprint | Main caution |
|---|---|---|---|---|---|
| Rug | No | Yes | Yes | 2 by 3 to 3 by 5 feet | Keep the door clear of the pile |
| Low console or bench | Partly | Yes | Yes | 12 to 16 inches deep | Finish the back |
| Open shelving unit | Partly | Mostly | If freestanding | 12 to 15 inches deep | Anchor tall units |
| Folding screen | Yes | Reduced | Yes | 12 inches folded | Stable feet, no heaters nearby |
| Plant row | Partly | Yes | Yes | 10 to 14 inches deep | Pet and child safety |
| Painted accent | Cue only | Yes | Only with permission | None | Low-VOC paint, ventilation |
Build the zone from the floor up
The floor
Use a surface that handles wet shoes. A rug with a rubber-style backing under a woven top is common, but test it on your floor type first, since some backings can mark vinyl or finished wood. If your floor meets a different material at the zone edge, a transition strip or the rug edge can help mark the spot. For wet climates, add a boot tray, which is a shallow tray with a raised lip, under the bench to catch drips.
The seat
A seat saves backs and boundaries. Even a 14 inch deep bench or stool lets a person put on shoes without leaning on a wall. A bench with a shelf below holds shoes. If the room is very narrow, a wall-hung fold-down seat is an option, though it needs to be fixed into studs or into solid material by someone who knows the right fixings, and only with permission in a rental. See our notes on small entryway bench ideas for more designs.
The hooks
Hooks are the most important part of the zone. A row of three to five hooks at 60 to 66 inches above the floor suits adults, and a second row at 40 to 48 inches suits children. Heavy coats pull on adhesive hooks, so check the rated weight on the package and keep loads well below it. If you cannot drill, an over-the-door hook rack or a freestanding coat rack can take over. A freestanding coat rack must have a heavy, wide base, because a rack with a full load of winter coats can tip.
The surface
A shelf or ledge about 8 to 10 inches deep holds keys, mail and sunglasses. At a minimum, place a small tray or bowl on it so the small items have a defined spot. Keep it clear of the door arc, and keep it a few inches below eye level from the sofa so the clutter is not on display.
The mirror
A mirror above the surface helps you check your look before you leave and bounces light into the zone. Place it where it will not reflect a messy kitchen or a television. If you hang it, use hardware rated for its weight, and in a rental use a leaning floor mirror with a safety strap or wall anchor if permitted.
Light and air in an open plan entry
The entry should feel welcoming without being the brightest spot in the room. Aim for a warm, soft light in the zone itself.
- Overhead: if there is a ceiling light near the door, check whether it can be changed to a lower-glare bulb. Ask before replacing fixtures in a rental.
- Plug-in wall sconce or small lamp: a plug-in sconce on a surface or a small lamp on the console works without wiring. Keep cords tidy and out of the walking path, and do not run cords under rugs, where they can overheat or become a trip hazard.
- Motion-sensor light: a battery light that turns on as you enter helps with arriving at night. Use the right batteries for it and keep it away from damp places.
- Natural light: do not block a window beside the door with a tall piece. Leave glass clear.
For more on this, see our guide on renter-friendly lighting ideas. On air, remember that wet coats and shoes need ventilation to dry. Do not stack them in a closed cabinet. Slatted shelves, open racks or a cabinet with vents let moisture escape. If the entry is next to the kitchen, keep sprays and cleaning products out of reach of children, and keep the area clear of anything near the stove.
Storage that stays inside the zone
The rule for an open plan entry is that everything that comes through the door lands in the zone and stays there. Use the following checklist for what belongs.
- Shoes: two to four pairs of the current season. The rest go in a closet or under a bed. A narrow rack or a shallow cabinet helps, and see our list of narrow shoe cabinets for ideas on slim designs.
- Coats: one per person on hooks, with the rest in a closet.
- Bags: a hook or a basket for each person.
- Keys and wallet: a tray or hook, with a second set of keys for guests stored out of sight.
- Mail: a slim file or a basket that is emptied every few days.
- Umbrella: a stand or a hook at the edge of the zone.
- Pet items: leash and waste bags on a hook near the door, with treats out of reach of the pets.
- Bike gear: helmets on a hook, with the bike itself stored elsewhere unless you have a secure wall mount fixed with permission.
If your space is short on all of these, our guide on small home drop zone ideas and our article on renter-friendly entryway organization ideas cover more fixes.
Three example layouts
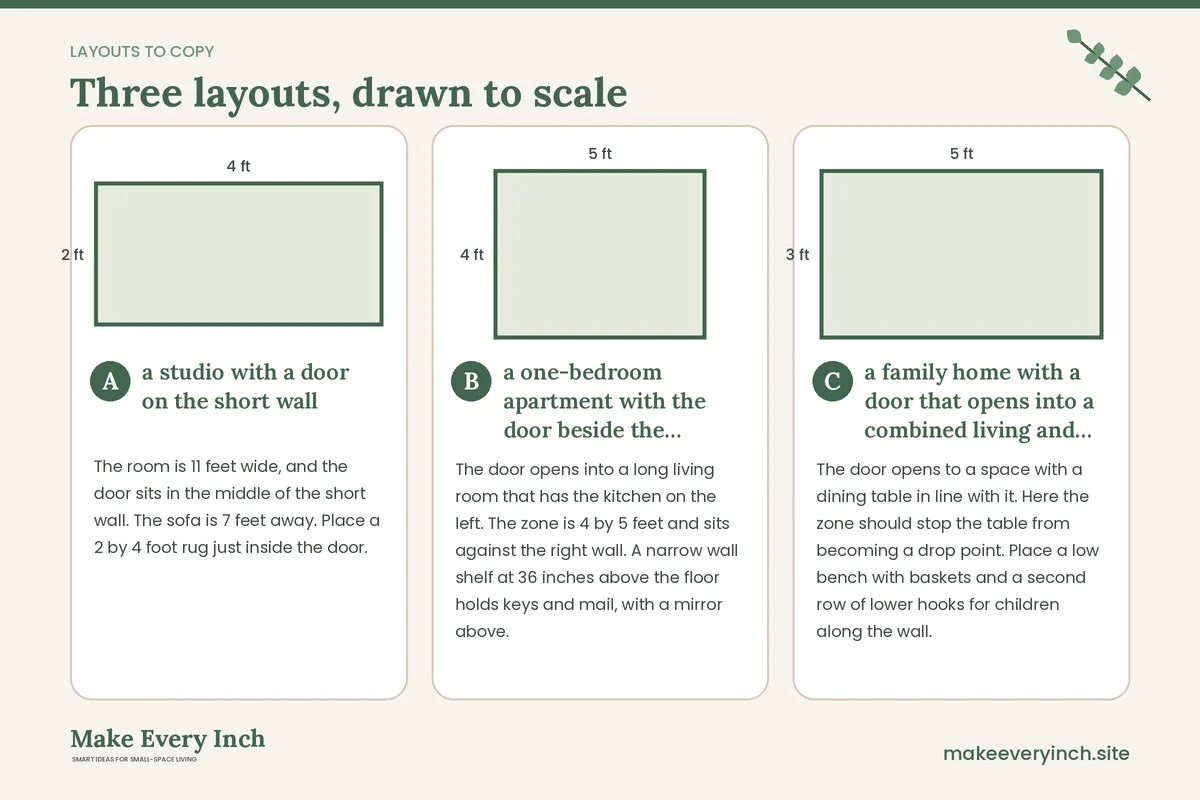
Layout A: a studio with a door on the short wall
The room is 11 feet wide, and the door sits in the middle of the short wall. The sofa is 7 feet away. Place a 2 by 4 foot rug just inside the door. Put a 12 inch deep bench on one side of the door, against the wall, with three hooks above it. On the other side, put a freestanding open bookcase, 12 inches deep and about 4 feet wide, angled slightly so the entry side holds baskets and the back faces the bed. The path remains 36 inches wide. The bookcase must be wide and stable, anchored if the lease allows, and the lower shelves should hold the heavy items.
Layout B: a one-bedroom apartment with the door beside the kitchen
The door opens into a long living room that has the kitchen on the left. The zone is 4 by 5 feet and sits against the right wall. A narrow wall shelf at 36 inches above the floor holds keys and mail, with a mirror above. A row of hooks and a boot tray sit below, with a runner on the floor. A tall plant in the corner softens the edge facing the sofa. Because the kitchen is nearby, the zone keeps a gap of at least 24 inches from the stove and any oven door, and the coats hang away from the cooktop.
Layout C: a family home with a door that opens into a combined living and dining area
The door opens to a space with a dining table in line with it. Here the zone should stop the table from becoming a drop point. Place a low bench with baskets and a second row of lower hooks for children along the wall. Add a 3 by 5 foot washable rug, and use a folding screen about 5 feet tall to shield the dining table from the door when needed. Keep the bench low so children can sit down safely, and keep the screen away from where children run. Anchor any tall furniture, and store anything small enough to be a choking hazard out of reach of toddlers.
Mistakes to avoid
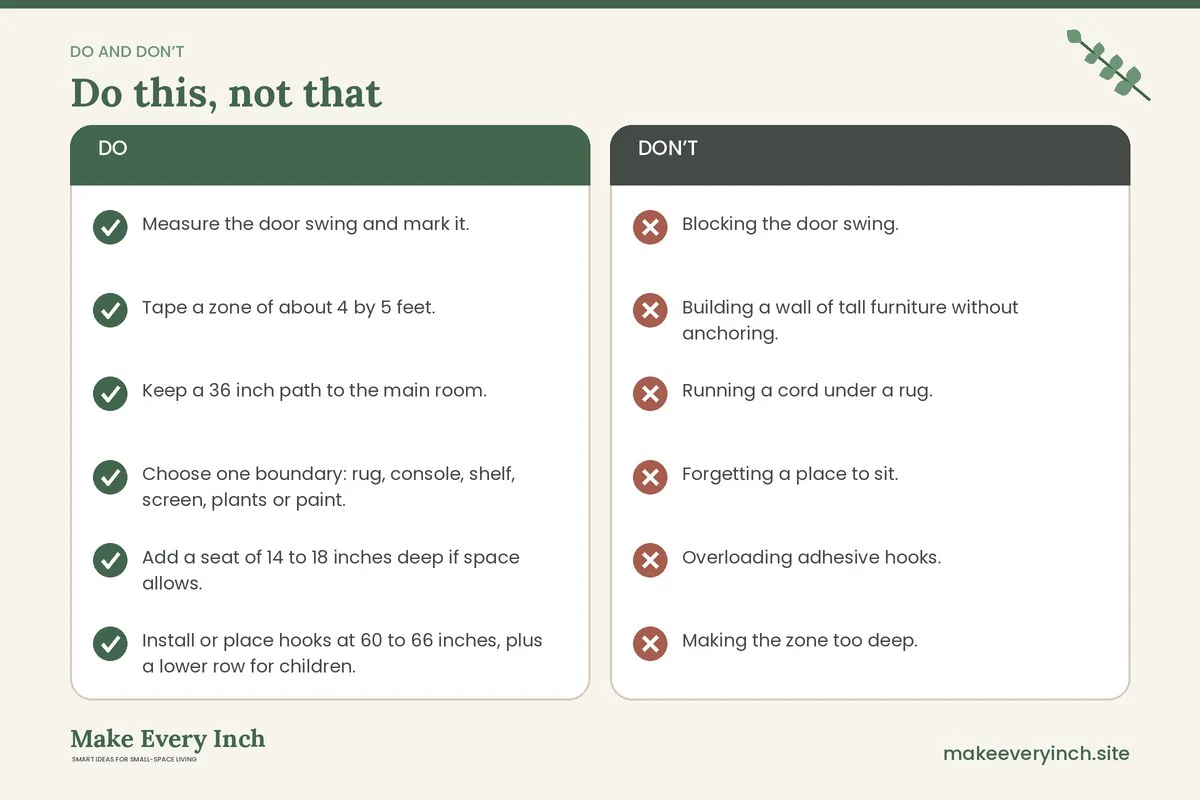
- Blocking the door swing. The zone must never stop the door from opening fully, or from closing in an emergency.
- Building a wall of tall furniture without anchoring. Tall pieces are tip hazards. Use the correct anchors, or choose low pieces.
- Running a cord under a rug. Heat and friction can damage the cord, and it creates a trip point.
- Forgetting a place to sit. Without a seat, shoes get pulled off in the middle of the walkway.
- Overloading adhesive hooks. Heavy winter coats can pull hooks off the wall. Stay well under the rated limit, or use a rack.
- Making the zone too deep. A zone of more than 5 feet starts to eat the living room.
- Matching everything to the living room. The entry zone can have its own color or pattern. A visual change is what makes it a zone.
- Using a closed cabinet for wet gear. Moisture and odors build up. Use ventilated storage.
- Ignoring emergency exits. Keep a clear path to the door at all times. Do not place furniture where you could trip in the dark.
A weekend plan to create entryway open plan home zones
Day one is for measuring and clearing. Tape the zone, empty your current drop spots and decide what you will keep. Return the items that do not belong, such as mail from last month and shoes for other seasons. Day two is for setting up. Lay down the rug, place the bench or console, install the hooks with permission or use a rack, and set up lighting. At the end, walk in as if you had just come home with bags in both hands, and adjust anything that you bumped into. In a week, check whether the zone is staying tidy. If not, find which item is escaping and give it a better home.
Renting? Keep it reversible
Check your lease for what is allowed on walls and floors. Most of the ideas above can be done without any permanent change: a rug, a freestanding bench, a screen, a leaning mirror and plants. For hooks, over-the-door racks and freestanding stands avoid holes. Our guide on no-drill storage ideas for renters covers more options. Do not drill, cut or paint without written permission, and put felt or pads under furniture to protect floors. When you move out, you can take the whole zone with you.
Checklist to create entryway open plan home zones
- Measure the door swing and mark it.
- Tape a zone of about 4 by 5 feet.
- Keep a 36 inch path to the main room.
- Choose one boundary: rug, console, shelf, screen, plants or paint.
- Add a seat of 14 to 18 inches deep if space allows.
- Install or place hooks at 60 to 66 inches, plus a lower row for children.
- Add a surface with a tray for keys and mail.
- Add a light that does not need new wiring.
- Place a mirror where it reflects light, not clutter.
- Anchor tall furniture, or choose low pieces.
- Keep cords away from the walking path.
- Use ventilated storage for wet items.
- Confirm lease permission before drilling or painting.
- Do a bags-in-both-hands test.
FAQ
Can I create an entryway in an open plan home without drilling?
Yes. A rug, a freestanding bench, a coat rack with a heavy base, an over-the-door hook rack, a folding screen and plants all define a zone without holes. Adhesive hooks suit light items only, so follow the weight rating on the package and test on a hidden spot.
How much space does an open plan entry need?
A zone about 4 by 5 feet is comfortable for one or two people. A smaller space of 3 by 3 feet can work if you use wall hooks and a slim shelf. Always keep a clear path of about 36 inches from the door to the main room.
How do I stop guests from seeing the whole living room as they enter?
Break the sight line with something that does not need to be solid, such as a low console, an open shelving unit, a screen or a row of tall plants. Even a partial block makes the entry feel like a separate place.
What is the best way to separate the entry from the dining area?
A low bench with baskets or a narrow console works well because it adds storage without blocking the dining table. Keep at least 36 inches of walkway between the dining chairs and the entry zone, and about 24 inches between the zone and any stove.
Is it safe to use a tall bookcase as a divider?
It can be, if it is anchored to the wall with the correct hardware or placed so that it cannot tip. Keep heavy items low. In a rental, ask permission before drilling, or use a low, wide unit instead.
What lighting works best for an open plan entry?
A warm, soft light such as a plug-in sconce or a small lamp is a good choice. Avoid glare and keep cords out of the path. A motion-sensor light helps with night arrivals.
Keep going: Ready to set up your landing zone? Start with small entryway ideas, solve the missing foyer with home entryway ideas when there is no foyer and plan the rest of the room with how to zone a small open plan home.
Save this guide for later
Pin the ideas you like to Pinterest so you can come back to them when you plan your space.