Hallway Gallery Wall Ideas for Small Homes
Quick answer: The best hallway gallery wall ideas for small homes start on the floor with paper templates, then move to the wall with painter’s tape. Keep frames shallow (under about 1.5 inches deep), leave 2 to 3 inches between them, center the group near 57 inches from the floor, and keep at least 36 inches of clear walking width. Renters can use rated adhesive strips, picture ledges or leaning frames.
Hallway gallery wall ideas for small homes work differently from living room ideas, because a hallway is a place people walk through, not a place they sit and study. The wall is long, the light is poor, the distance from one side to the other is short, and every frame sticks out into a path that may be only 36 inches wide. A gallery wall in that space has to be planned with more care than one over a sofa, and it pays off in a big way: a hallway with art feels like a deliberate part of the home instead of a leftover corridor. This guide walks you through the whole process. It covers measuring, paper templates, spacing rules, narrow-depth frames, hanging methods for owners and renters, lighting, three example hallways, a comparison table, common mistakes and a checklist. For the wider topic, start with our pillar guide to small entryway ideas and the companion piece on narrow hallway ideas.
Start with the hallway, not the art
Most gallery walls go wrong because people choose frames first and the wall second. In a hallway, reverse that order. The wall decides everything, so begin with a few measurements and a quick look at how the space is used.
Measure the wall and the clearance
Take four measurements and write them down.
- Hallway width: measure from wall to wall at the narrowest point, often near a door casing or a radiator.
- Usable wall length: measure the stretch of wall between the corners, doors and light switches. Subtract about 6 inches from each end so the art does not crowd a corner.
- Ceiling height: a typical ceiling is 8 feet, or 96 inches, but older homes vary a great deal.
- Obstacles: note switches, thermostats, vents, outlets, door swings and the height of any console or radiator along the wall.
Check the width first, because it sets the rules for how far frames may project. A common comfort figure for a path used by one adult is about 36 inches, and many building codes treat 36 inches as a common minimum for a clear route in a dwelling, though local rules differ, so check yours if the space is part of an escape route. If your hall is 36 inches wide, the frames and anything else on the wall should add as little depth as possible. A frame that sticks out 1 inch on each side is fine. A deep shadow box or a ledge holding a heavy vase is not.
Watch how people move
Stand in the hall and walk it a few times with a bag, a laundry basket and a coat. Notice where your shoulder brushes the wall. That strip, usually between 36 and 60 inches from the floor, is where things get knocked. If one side of the hall has a door that swings in, that side may not suit art at all. Choose the wall with the fewest openings, or place the gallery on the stretch where the hall opens up near the entry.
Choose a theme before you buy
A hallway reads at a glance, so a clear idea helps. You might pick one color family, one frame finish, one subject (family photos, botanical prints, maps) or one shape. A tight theme makes a crowded wall look calm. A loose theme can look busy in a narrow space. If you have mixed pieces already, unify them with a common mat color or a shared frame finish rather than buying everything new.
Plan with paper templates
Paper templates are the single best habit for a hallway gallery. They cost almost nothing, they save you from filling the wall with extra nail holes and they let you see the arrangement at real scale before you commit. They also work for renters who want to test a layout before using adhesive.
How to make and use templates
1. Lay each frame face down on kraft paper, newspaper, wrapping paper or the back of old wallpaper, and trace the outside edge.
2. Cut out each shape and write the name of the piece on it.
3. Mark on the back of each template where the hanging point sits. For a frame with a wire, pull the wire taut to the height you expect, measure down from the top of the frame to the wire and mark that spot on the paper. For a sawtooth hanger, mark its center.
4. Tape the templates to the wall with painter’s tape, leaving the tape on only the top edge so you can lift them.
5. Step back to the far end of the hall and look from a walking distance. Look again from the entry door.
6. Move pieces until the group looks balanced, and then take a photo for reference.
7. When you are ready to hang, replace each template with its real frame, one by one, and leave the other templates up as guides.
A hallway benefits from one extra step: look at the arrangement from an angle. In a narrow space you almost never face the wall straight on. You see it sliding past at an angle, so a group that looks even from the front can feel lopsided from the side. Check from both ends.
Lay it out on the floor first
If a hall is too narrow to step back from, lay the arrangement on the floor of a larger room first. Outline the wall area with painter’s tape, place the frames inside it, and rearrange. Photograph the result and transfer it to the wall using the template method. Many people find it easier to judge spacing on the floor and then confirm on the wall.
Spacing and height rules that work in a hallway
Gallery rules are simple, but a few of them need adjusting for a narrow space.
- Center height: aim for the middle of the whole group to sit at about 57 inches from the floor, which is a common museum eye height. In a hallway where people walk past, you can lower this to 54 to 56 inches so the art reads better at a glance.
- Space between frames: 2 to 3 inches works for most groups. Smaller frames can sit at about 2 inches, and larger ones look better at 3. Keep the gap the same for every pair.
- Distance from corners: leave 4 to 6 inches between the last frame and a corner or door casing, so nothing seems squeezed.
- Total height of the group: in a hall with an 8 foot ceiling, keep the whole group within about 30 to 36 inches of height. A tall, thin group suits a short wall, and a wide, low group suits a long wall.
- Width of the group: if there is a console or a bench below, the group can be about two thirds of its width. If the wall is bare, fill it more loosely.
- Light switches and outlets: keep the art at least 2 to 3 inches away from them so there is room to use a plug or switch plate without bumping a frame.
- Radiators and vents: hot air can warp paper, fade colors and dry out wood frames. Keep art at least about 6 inches to the side of a vent, and do not hang a print directly over a heat source.
Choose a layout pattern
A hallway usually works best with a rhythm that moves the eye along the wall rather than a big clump.
- A single line: frames of the same height in a row. This is the calmest pattern, and it suits a hall under 40 inches wide because the group stays shallow in height.
- Two rows: one row above another, with the same gap between rows as between frames. It adds depth without breaking the line.
- A grid: identical frames in a block. It looks formal and suits hallways with high ceilings.
- A salon style cluster: mixed sizes arranged around a central large piece. It is lively, but in a hall it needs very careful spacing to avoid chaos.
- A stair-stepped group: if your hall includes stairs, follow the slope of the stairs and keep the same distance from each step to the bottom edge of each frame.
Frames for narrow-depth walls
Depth is the main constraint in a hallway. A deep frame might project 1.5 to 2 inches, and that can matter when the clear path is only a few inches wider than a shoulder. Use these ideas to keep the profile low.
- Pick shallow frames: look for frames with a total depth of about 1 inch or less. Thin metal and slim wood frames are usually shallower than chunky molded ones.
- Use flat or thin glazing: thin acrylic is lighter than glass and less dangerous if a frame is bumped. It is a good fit for a path where people brush past. Check the product notes about UV and scratches.
- Skip the shadow box: objects with depth, such as a hat or a pressed flower, need a deep case. Keep these for a wider room.
- Use frameless options: clip frames, poster hangers with magnets and canvas prints on thin stretcher bars add very little projection.
- Mats help: a wide mat makes a small print look important and does not add depth. A mat of 2 to 3 inches around a 5 by 7 inch print makes a frame of about 10 by 12 inches.
- Keep the weight down: lighter frames are easier on adhesive, on drywall anchors and on the people who bump them.
Consider the corridor’s color and light
A hallway often has no window. Light paint on the wall helps art stand out, while a dark wall can be dramatic but needs good lighting. If you plan to repaint, use a low-VOC paint and open windows or run a fan while it dries, and check the label for ventilation advice. Our guide to removable wallpaper ideas covers another way to give the wall a backdrop without painting.
Hanging methods: what holds what
Your hanging method depends on the wall material, the frame weight and whether you own the home. Never drill or nail into a wall without permission if you rent, and always check for hidden wires and pipes before drilling into any wall.
For owners and those with permission
- Picture hooks with nails: a small hook rated for the weight of the frame is the traditional method. Use two hooks for wide frames so they stay level.
- Wall anchors: use an anchor suited to drywall if you are not hitting a stud. Check the manufacturer’s weight rating, and give a safety margin.
- A picture rail: older homes sometimes have a rail near the ceiling. Hooks and cords let you change the arrangement without making new holes.
- A rail system: a single track mounted to the wall holds hanging cords, so you can slide the pieces left or right.
Before drilling, use a stud finder, and avoid the area directly above or below an outlet or switch where wires usually run. If you are unsure, ask a professional.
For renters
Your lease decides what is allowed, so read it and ask in writing. When nails are banned, try these options. For more, see our guides to renter-friendly wall decor ideas and no-drill storage ideas for renters.
- Rated adhesive strips: check the weight rating on the package and use more strips than the minimum. Clean the wall, press for the time stated and follow the removal steps exactly so you do not peel paint. Avoid textured or damp walls, and test a hidden spot first.
- Picture ledges: a ledge mounted with adhesive can hold lightweight frames, and a freestanding ledge on a console or shelf avoids the wall altogether.
- Leaning frames: rest larger frames on a console, a bench or the floor against the wall. In a hall this should only happen where nobody will bump them, and it works best in a wider spot or near the entry.
- A tension rod: a tension rod across an alcove or door frame can hold hanging art or a fabric panel. Check the limit on its weight.
- A wire or string and clips: a string across a door or a wall section, fixed with removable hooks, can display photos and postcards.
- Washi tape and mounting putty: these suit very light paper pieces, and you should test them on an out-of-sight area first.
A quick weight guide
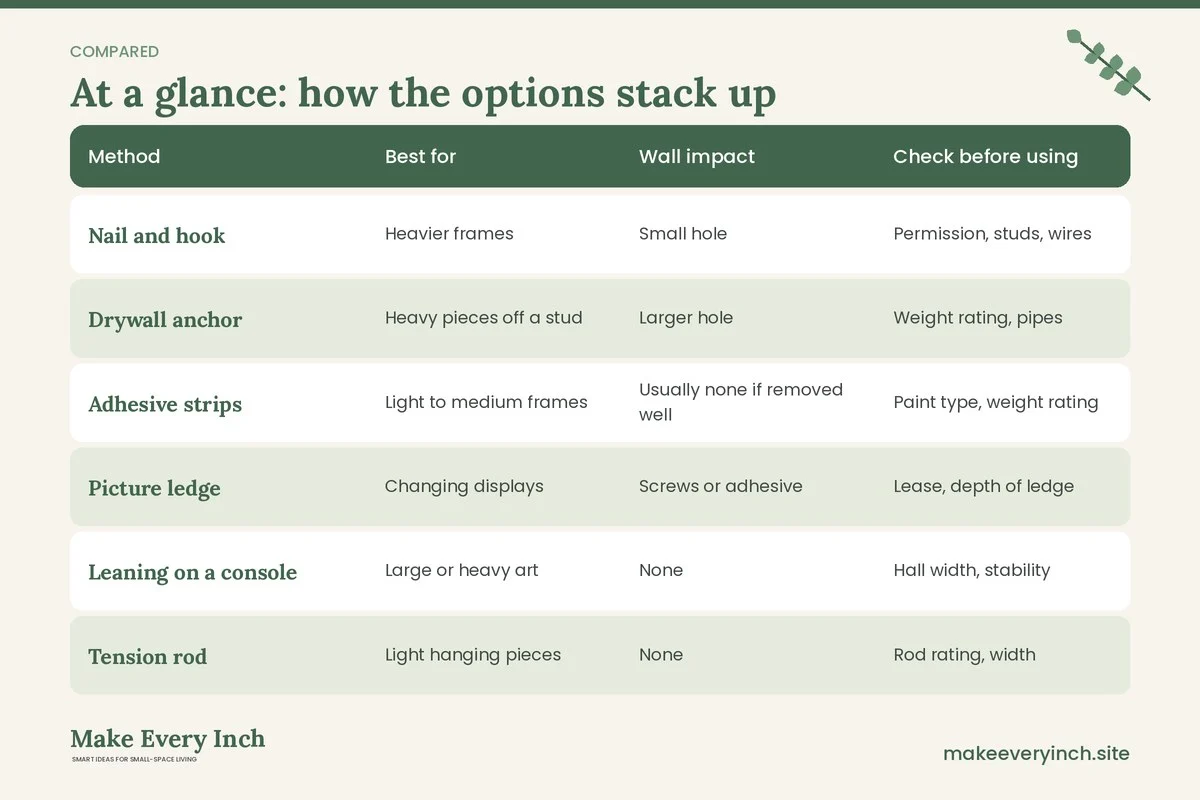
The table below compares common hanging methods. It is a general guide only, so read the rating on the actual product and keep a safety margin.
| Method | Best for | Wall impact | Check before using |
|---|---|---|---|
| Nail and hook | Heavier frames | Small hole | Permission, studs, wires |
| Drywall anchor | Heavy pieces off a stud | Larger hole | Weight rating, pipes |
| Adhesive strips | Light to medium frames | Usually none if removed well | Paint type, weight rating |
| Picture ledge | Changing displays | Screws or adhesive | Lease, depth of ledge |
| Leaning on a console | Large or heavy art | None | Hall width, stability |
| Tension rod | Light hanging pieces | None | Rod rating, width |
| Rail or picture molding | Changing arrangements | Existing hardware | Rail rating, cord length |
Make it earthquake and bump resistant
In a hallway, frames get bumped. Small earthquake putty or museum wax under the lower corners of a frame helps it stay level and reduces swaying. Choose strong hangers, and put anything breakable or heavy away from head height in the narrowest stretch. Thin acrylic glazing is lighter than glass, which matters if a frame does fall.
Lighting a gallery in a hallway
Without light, a gallery wall disappears. Hallways are usually lit by a single ceiling fixture, which throws shadows. A few simple changes help.
- Use warm bulbs: about 2700 to 3000 kelvin bulbs make art look inviting. Cooler bulbs can flatten colors.
- Add a plug-in wall sconce: a plug-in sconce with a cord cover needs no wiring, but should be mounted only with permission. Our guide to renter-friendly lighting ideas shows options.
- Use a picture light with batteries: a battery-powered light avoids cords altogether. Check how bright it is, and do not leave it on a heat-sensitive print for long periods.
- Use a slim floor lamp at the end: at the end of a hall, a floor lamp can glow on the group. Our list of best floor lamps for small rooms can help you choose one with a small footprint.
- Keep lights away from paper: direct, strong light can fade prints over time. Use a diffuse light, and avoid placing paper prints in a window with direct sun.
Electrical safety matters. Any plug-in light should run on a cord that does not cross the walking path, and extension cords should never be stapled or run under a rug in a hall. If wiring a hardwired fixture, use a licensed electrician.
Hallway gallery wall ideas for small homes: 12 layouts
Single-line ideas
1. A ribbon of identical frames
Hang five or six identical frames in a single row at 57 inches on center. The simple repetition suits a hall that is only 36 to 40 inches wide and makes the corridor look longer.
2. A tall-and-short alternation
Alternate vertical and horizontal frames along a single line, aligned on their centers. The rhythm gives energy without taking up any extra height.
3. A shelf line
Mount a single long picture ledge at 54 to 58 inches and lean frames on it. You can change the art whenever you like, and renters can pick a ledge that attaches with adhesive if the lease allows it.
Two-row and grid ideas
4. A two-by-three grid
Six frames of the same size in two rows of three, with 2 inches between each. This is the neatest answer to a long hall, and it suits family portraits.
5. A staggered pair of rows
Two rows with the top row shifted by half a frame, like bricks. It makes a long wall feel more relaxed than a strict grid.
6. A mirror among the art
Place one mirror among the frames to bounce light along the hall. A mirror that is roughly the size of the largest frame fits in well. Read our tiny foyer ideas for more on using mirrors in a small entry.
Cluster ideas
7. A hero piece with satellites
One large piece, about 24 by 36 inches, with four to six small frames around it. Keep the gap at 2 to 3 inches all around.
8. A color family cluster
Use prints in related colors, such as blues and creams. The color story calms a busy cluster and ties it to the hall’s paint.
9. A photo timeline
Hang family photos in chronological order, left to right, along the hall. It gives the hall a story. Use one frame finish and one mat color.
Small-space tricks
10. A gallery above the door frame
In a hall where the sides are crowded with doors, use the wall above the doors. A row of lightweight frames, set 4 to 6 inches above the casing, adds interest without projecting into the path. This is an owner option, since adhesive strips are a poor match for the top of a heavy door.
11. A gallery at the end of the hall
Treat the end wall as the main stage. A group on the end wall is seen straight on, which removes the angle problem, and it makes the hall feel finished.
12. A rotating gallery
Put up a ledge or a rail and change the art with the seasons. Keep spare pieces flat in a drawer or under a bed. See our post on under-bed storage ideas for storing them.
Three example hallways
A 3-foot-wide rental hall, 10 feet long
The hall is 36 inches wide, so the plan has to stay shallow. The renter cannot use nails, so a single picture ledge held with rated strips runs along 7 feet of wall at 56 inches from the floor. Five thin frames lean on it, each under 1 inch deep, with a 2 inch gap between them. The renter checks the paint type, tests a strip in a hidden spot and photographs the wall first. At move-out, the strips are removed slowly, following the pack instructions.
A 4-foot-wide hall with a console
A 12 inch deep console sits near the entry, with 36 inches of clear walking space left. Above it hangs a hero piece of 24 by 30 inches, with four small frames around it. The group is two thirds as wide as the console, with its center at about 57 inches. A plug-in sconce with a cord cover sits at one side, with permission. The group acts as the anchor for the entry. Our guide to small entryway organization can help you plan the console below it.
A hall with a staircase wall
The wall follows the slope of the stairs. The plan uses a stair-stepped group, with each frame’s bottom edge set about 4 to 5 inches above the line of the stair nosing. The group is made from a mix of sizes in black frames with white mats. Since people hold the handrail and look down at their feet, the group is lower than usual and lighter in weight, to avoid being hit by a shoulder or a bag. The owner uses wall anchors, rated for the weight, and checks for wires first.
Mistakes to avoid
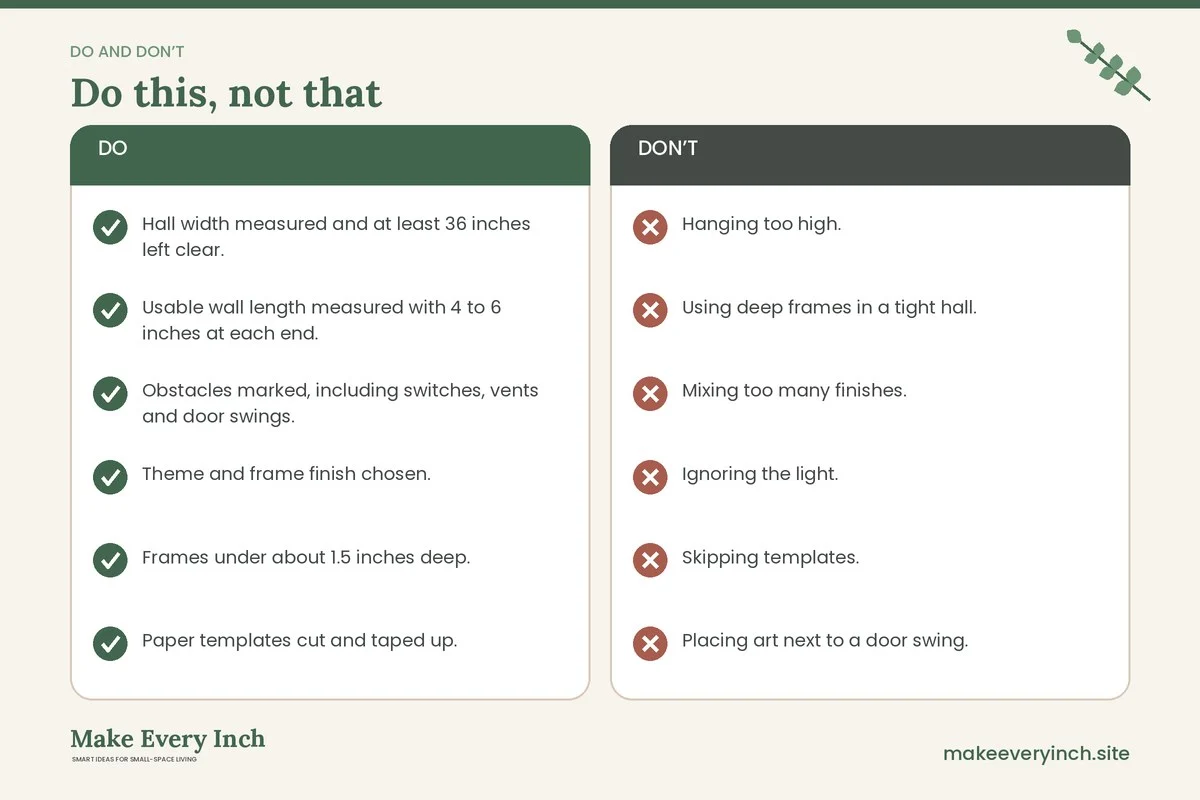
- Hanging too high. Art at ceiling height feels disconnected. Aim for the group’s center at about 54 to 57 inches.
- Using deep frames in a tight hall. Shadow boxes and thick frames snag sleeves and bags.
- Mixing too many finishes. Three frame finishes at most, or the wall looks messy.
- Ignoring the light. Without a light, the group disappears in the evening.
- Skipping templates. The first nail hole is rarely in the right place.
- Placing art next to a door swing. A door that opens into the wall will hit frames.
- Hanging heavy glass above a bench. If a frame falls, someone is sitting there. Use acrylic or keep the group higher.
- Forgetting the removal plan. Renters should note how to remove each adhesive product and keep the instructions.
A step-by-step hanging plan
1. Measure the wall, clearance and obstacles.
2. Choose the theme, the frame finish and the layout pattern.
3. Make paper templates for every piece.
4. Tape the templates to the wall and adjust.
5. Check the arrangement from both ends of the hall.
6. Decide the hanging method for each piece, and check ratings.
7. Mark the hanging points, and use a level for the first piece.
8. Hang the center piece first, then work outward.
9. Add lighting and check the cord path.
10. Step back, take a photo and adjust.
Checklist
- Hall width measured and at least 36 inches left clear.
- Usable wall length measured with 4 to 6 inches at each end.
- Obstacles marked, including switches, vents and door swings.
- Theme and frame finish chosen.
- Frames under about 1.5 inches deep.
- Paper templates cut and taped up.
- Center of the group at 54 to 57 inches.
- Gaps of 2 to 3 inches, the same throughout.
- Hanging method matched to the frame weight and the wall.
- Permission obtained for any drilling or adhesive.
- Wires and pipes checked before drilling.
- Warm lighting planned, with no cord across the path.
- Removal plan written down if renting.
FAQ
How wide should a hallway be for a gallery wall?
A path of about 36 inches is a common comfort figure for one person, and wider is better. Keep the frames shallow, under about 1.5 inches, so they do not eat into that width.
How high should I hang a gallery wall in a hallway?
Aim for the center of the group at about 54 to 57 inches from the floor. Lower than a living room figure is fine, because people are walking, not sitting.
What size frames suit a narrow hallway?
Small and medium frames, from 5 by 7 inches to about 16 by 20 inches, in shallow profiles. One larger piece can anchor the group if the wall is long.
Can I hang a gallery wall without drilling?
Yes. Rated adhesive strips, picture ledges, leaning frames and tension rods all avoid drilling. Check the weight rating, test a hidden spot and read your lease first.
How many frames should I use?
Three to nine suits most small halls. Fewer frames look cleaner in a narrow space, and more frames work only if the spacing is exact.
Do paper templates really help?
They let you see the layout at full scale and avoid extra holes. They also let renters check a plan before using any adhesive.
What if my hall has no light?
Use a plug-in sconce with permission, a battery picture light or a slim floor lamp at the end of the hall. Warm bulbs make the art look better.
Keep going: Keep going with our guides to small entryway storage, small home drop zone ideas and small mudroom ideas without a mudroom.
Save this guide for later
Pin the ideas you like to Pinterest so you can come back to them when you plan your space.