Small Kitchen Storage Ideas Without Remodeling
Quick answer: The best small kitchen storage ideas without remodeling add a layer to what you already have: shelf risers inside cabinets, racks on the backs of doors, a rail or tension rod under the upper cabinets, a slim rack beside the fridge and a few stackable bins. Measure each space first, respect the weight limit of every hook or rack, and keep the heaviest items low and close to the floor.
Small kitchen storage ideas without remodeling are for the many people who cannot or do not want to rip out cabinets. You might rent, you might own a kitchen you plan to leave for years, or you might simply not want a dusty construction project for the sake of a few more inches of space. The good news is that most small kitchens waste a surprising amount of air. There is empty height inside every cabinet, empty depth behind every door, empty wall between the counter and the upper cabinets and an unused sliver beside the fridge. This guide shows how to claim that air with rails, racks, shelf risers and door-back storage, and it explains how to choose, measure and install each one safely. It also covers a comparison table, three example kitchens, a weekly reset and a checklist. If you want the wider picture of storage in a compact kitchen, start with our small kitchen ideas pillar guide. For the broader range of furniture and shelving choices, read our guide to small kitchen storage ideas, and for the sorting side of the job, see small kitchen organization ideas.
What “without remodeling” really means
For this guide, a no-remodel solution is one that you can install and remove without changing the kitchen itself. That means no cutting, no moving plumbing or wiring and no replacing cabinet boxes. Most of the ideas below sit, hang, clip or lean. A few use small screws or adhesive, and those are flagged so you can decide whether they suit your situation.
The line matters for two reasons. First, renters need to protect a deposit and often have a lease clause about fixtures. Second, a remodel is expensive and disruptive, and a better-organized kitchen often removes the urge to remodel at all. Before you spend, check what you really need. Many kitchens have enough cubic space and simply lack structure inside it, so everything is stacked in piles that are hard to reach.
If you rent, read the lease and ask before you drill, screw or glue anything to a cabinet, tile or wall. Adhesive products can pull off paint or laminate, so test a hidden spot first. Our guide to renter-friendly kitchen upgrades explains how to think about reversible changes, and our post on no-drill storage ideas for renters covers the wider range of options for people who cannot make holes.
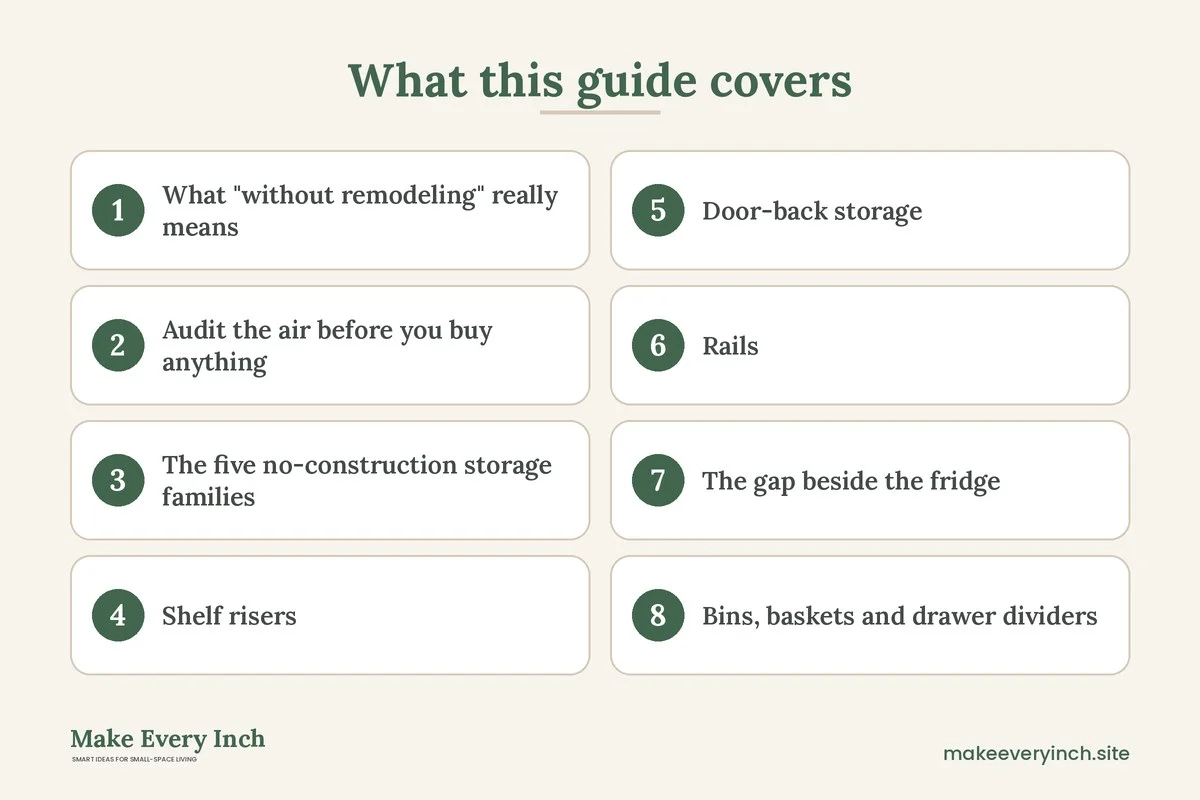
Audit the air before you buy anything
Open each cabinet and look at it as a box of volume rather than a shelf. A typical base cabinet is around 24 inches deep and 30 to 34 inches tall inside. A typical upper cabinet is 12 to 13 inches deep and 24 to 36 inches tall. Most are only half used, because the items inside are stacked in one layer and the space above them is wasted.
Take five measurements and write them on a piece of paper or your phone. Doing this once saves returns later.
- Interior width, depth and height of each cabinet. Measure between the inside edges, not the outside frame. Frames, hinges and shelf pins often take 1 to 2 inches.
- Clearance behind the door. Close the door and measure the gap between the inside of the door and the front of the shelf or the items. Many doors have only 1 to 2 inches, which limits what hangs on them.
- Gap between the counter and the upper cabinets. The typical range is 15 to 20 inches. A rail here must clear the appliances and the outlets.
- Gap beside the fridge. Often 3 to 8 inches wide, tall and unused. Measure the width at the front and at the back, because the sides may not be parallel.
- Inside the sink cabinet. Note the position of the pipes and the garbage disposal, if you have one. A rack there must leave access for plumbing.
Next, sort what you own into “daily”, “weekly” and “rarely”. Daily items belong in the best spots, between hip and shoulder height and within reach of where you use them. Weekly items can go in the next-best zone. Rare items, such as a large roasting pan or a seasonal appliance, can go on the top shelf or in a closet outside the kitchen. This step decides which of the ideas below matter most for you. A person who bakes needs sheet pan storage, and a person who cooks one pot meals needs lid storage.
The five no-construction storage families
Almost every no-remodel kitchen idea falls into one of five families. Knowing the family helps you choose the right tool for the problem rather than buying whatever looks tidy in a photo.
- Risers double the number of layers inside a cabinet or on a counter.
- Racks hold items on a flat surface, such as the back of a door or the side of the fridge.
- Rails hold hooks and baskets in a line, usually on the wall or under a cabinet.
- Bins and baskets corral loose small items in a stack or a drawer.
- Rolling and slide-out pieces make deep spaces reachable.
The sections below walk through each family with sizes, limits and traps.
Shelf risers: double the layers inside cabinets
A shelf riser is a small freestanding step or tier that sits on an existing shelf. It makes two layers out of one. It needs no tools, no adhesive and no permission, and it removes in a second. This makes it the safest first purchase in a small kitchen.
Where risers work best
- Plates and bowls. A riser lets you keep a stack of bowls behind a stack of plates, instead of piling everything in a single tower. Pick a riser that is at least as wide as the items so the stack does not tip.
- Mugs and glasses. A two-tier riser lets you place short glasses in front and tall ones behind. You can see everything and pull out one item without moving the others.
- Canned goods and jars. A stepped riser turns the back row into a visible row, which stops the “lost can” problem.
- Spices. A tiered spice step inside a cabinet makes every bottle readable from above.
How to choose and measure
Measure the height from the shelf to the shelf above. Subtract the height of the tallest item you plan to put on the top tier, and make sure the riser plus that item fits with at least 1 inch of clearance. Most risers are 4 to 8 inches tall, so a cabinet with a 12-inch shelf gap handles a riser and a normal stack of mugs but not a tall pitcher. Choose a riser with a non-slip base or add a thin liner mat under it, because a sliding riser can knock over glassware every time you open the door.
Load and safety
Most freestanding risers are rated for a limited weight, often a modest amount for plastic and more for steel. Check the manufacturer’s rating and do not stack heavy cast iron on a light plastic tier. Put the heaviest items on the bottom shelf of the cabinet itself. A heavy riser high in a wall cabinet can pull on the shelf supports, and in an older cabinet the shelf pins might be small.
Door-back storage: use the hidden panel
The inside of a cabinet door is the most overlooked surface in a small kitchen. It faces you every time you open the cabinet, it is a flat panel and it has a small but real depth to use.
Types of door-back storage
- Over-the-door racks. A rack that hooks over the top edge of the door needs no screws. It can hold foil, plastic wrap, small spice jars or cleaning supplies. The hooks must clear the door frame, and the door must still close, so check the gap before buying.
- Adhesive hooks and strips. These hold light items, such as oven mitts, measuring cups or a small cutting board. Follow the weight rating, test on a hidden spot and let the adhesive cure before loading. Laminate and painted doors may be damaged on removal.
- Screw-in organizers. If you own the cabinets or have permission, a small screw-in rack is the most stable option. Use short screws that do not poke through the door front.
- Tension-fit wire shelves and racks. Some racks clip onto the door edge and stay put with friction. They suit shallow cabinets and rented kitchens.
The clearance rule
Close the door, then look at the gap between the back of the door and the nearest shelf or item. Anything you hang must fit within that gap. A common rule is to keep every door-back item at least 1/2 inch clear of the shelf edge so that it does not scrape or jam. Never overload a door. Cabinet hinges are designed for the weight of the door itself, and a heavy rack can sag the door over time. Keep door-back loads light and put heavy things below.
The best things to hang there
Think flat and light. Foil and wrap boxes, bags clips, pot lid holders, trivets, a cutting board and a short row of spice jars all work. Heavy bottles and glass jars belong on a shelf, and a pot lid rack is useful only if the lids are not larger than the door allows.
Rails: the wall strip under the upper cabinets
A rail is a straight bar that holds hooks, baskets or small shelves. In a small kitchen the most valuable rail location is the strip between the counter and the upper cabinets, because it uses wall space that is otherwise empty and it keeps tools within reach of the stove or sink.
Three ways to mount a rail
- Screwed to the wall or backsplash. This is the strongest option and holds the most weight. It needs a drill, wall anchors suited to the wall material and permission from the landlord if you rent. Tile requires a masonry or tile bit and a careful hand. Do not drill into a wall near a known pipe or wire. If you are not sure what is behind the wall, ask a professional.
- Under-cabinet hanging rail. Some rails hook or clip onto the underside of an upper cabinet’s front lip and need no wall holes. They are best for light items such as mugs and utensils.
- Adhesive or magnetic rail. A rail with strong adhesive holds light utensils on smooth tile or glass. Magnetic strips suit knives and metal tools. Never place a magnetic strip near a stovetop where heat could weaken the adhesive, and keep knives out of reach of children.
What to hang
Hang the things you reach for every day. A good rule is to place hooks at about 2 to 4 inches apart, and to keep heavier items near the supports. Typical rail loads include a ladle and a spatula, a whisk, a colander, a small pan and a set of measuring spoons. Leave at least 12 inches above the counter’s work area so you can still chop and roll dough, and keep rails away from the back of the stove, where grease and heat build up. Keep hanging items at least a hand’s width away from any open flame or hot burner, and never hang cloth directly above a gas burner.
The tension rod alternative
A tension rod fits snugly between two cabinets or inside a cabinet, and it can hold hanging cleaning bottles, spray cans or small pots by the handles. It costs little and leaves no mark on most surfaces, although a heavy load can make it slip. Use a rod rated for your load, twist it firmly and test it by pulling down before you load it.
The gap beside the fridge
Many kitchens have a narrow gap, often between 3 and 8 inches wide, beside the fridge, the stove or the end of a counter. A slim rolling rack can slide into that gap and hold cans, oils, spices and bottles on three or four tiers. When you need something, you pull the rack out like a drawer. When you finish, you push it back in.
Choosing a slim rack
Measure the width and depth of the gap at the front, the middle and the back, because walls and appliances are rarely perfectly square. Allow at least 1/2 inch of clearance on each side so the casters do not scrape. Choose a rack with locking wheels, a sturdy frame and a lip on each shelf so jars do not slide off.
Safety notes
- Heat and ventilation. Do not slide a rack against a hot oven side or leave it blocking vents on the fridge or stove. Fridge coils and vents need airflow, and a blocked vent can make the appliance work harder.
- Weight and tipping. A tall, narrow rack can tip when full. Put the heaviest items on the bottom shelf, and consider a rack with wide feet. If there are children in the home, keep the top tiers for light items.
- Gas appliances. Never push furniture against a gas line or shut-off valve. Keep access clear for emergencies.
Bins, baskets and drawer dividers
Containers add structure to loose items. They help most in drawers and on deep shelves.
- Drawer dividers. Adjustable dividers sort utensils, foil and tools into lanes, which makes a shallow drawer feel bigger. Measure the drawer’s interior length and width and choose an expandable set.
- Stackable bins. Clear stackable bins hold snacks, bags and packets. Label the front so you do not have to open each bin to know what it contains.
- Lazy Susans. A turntable in a corner cabinet or on a shelf lets you reach the back with a spin. Choose one with a raised rim.
- Pull-out baskets that sit on a shelf. A wire basket on a rail can slide forward like a drawer, and some are freestanding with no installation.
- Lid and pan organizers. A rack that holds pan lids upright, and a rack that stores pans on edge, free the stack that otherwise needs unstacking each time.
Group items by task rather than by size. A “breakfast bin” with cereal bags, oats and tea saves several trips. A “baking bin” with flour, sugar and measuring tools lifts out and goes back as a set.
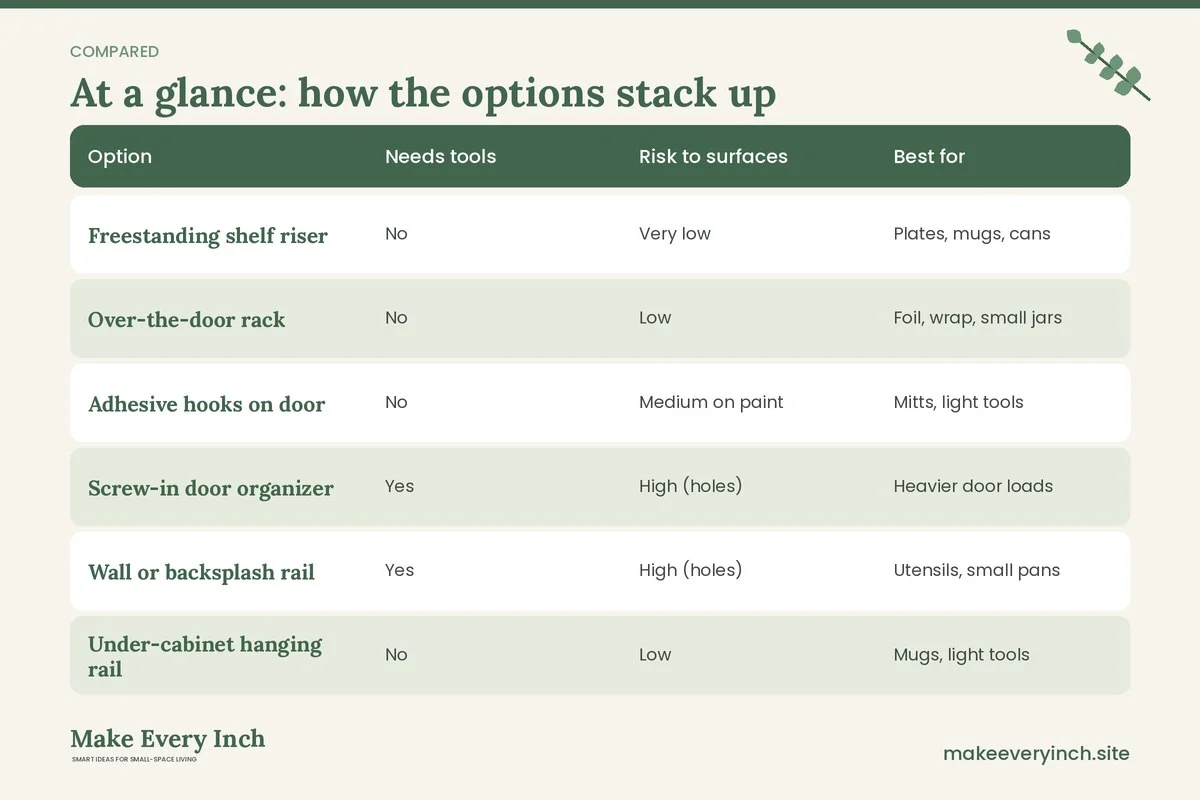
Comparison table: which no-remodel option fits
The table compares the main options by what they need, the risk to your surfaces and the best use. Use it to choose before you buy.
| Option | Needs tools | Risk to surfaces | Best for | Watch out for |
|---|---|---|---|---|
| Freestanding shelf riser | No | Very low | Plates, mugs, cans | Slipping on smooth shelves |
| Over-the-door rack | No | Low | Foil, wrap, small jars | Door must still close |
| Adhesive hooks on door | No | Medium on paint | Mitts, light tools | Weight limit, removal damage |
| Screw-in door organizer | Yes | High (holes) | Heavier door loads | Needs permission and short screws |
| Wall or backsplash rail | Yes | High (holes) | Utensils, small pans | Check wall type and pipes |
| Under-cabinet hanging rail | No | Low | Mugs, light tools | Fits only some cabinet lips |
| Tension rod | No | Low | Spray bottles, light pans | Slips under heavy loads |
| Magnetic strip | Sometimes | Low to medium | Knives, metal tools | Keep away from heat and children |
| Slim rolling rack | No | Low | Oils, cans, spices | Ventilation, tipping |
| Drawer dividers and bins | No | None | Utensils, small items | Measure before buying |
Three example kitchens
A galley kitchen of 7 by 9 feet
A narrow galley has two parallel runs of cabinets with a walkway of around 3 feet. The walkway cannot take a cart, so storage has to move onto the walls and into the cabinets. Add shelf risers to every cabinet that holds plates, mugs or cans. Put a rail with hooks between the counter and the upper cabinets on the side with the stove. Add an over-the-door rack for foil and bags inside the cabinet nearest the sink. A slim rack in a 6-inch gap beside the fridge carries oils and canned goods. For more layouts of this shape, read our galley kitchen ideas.
A studio kitchenette along one wall
A kitchenette along one wall has little counter and two or three cabinets. Here, the strongest move is to use the vertical space between the counter and the uppers. Add an under-cabinet hanging rail for mugs and a magnetic strip for knives. Use drawer dividers to sort utensils into lanes, and stack bins on the top shelf for rarely used items. Because the counter is tiny, keep only the kettle and one board on it. The tiny kitchen ideas guide has more ways to work with a very small space.
A rental kitchen with no pantry
A rental often has fewer cabinets and no pantry. Create a pantry zone with a slim rolling rack beside the fridge, then add risers in the cabinet nearest the stove for cans and jars. Use stackable bins for snacks and baking supplies, and a lazy susan in the corner cabinet. Hang a tension rod under the sink for spray bottles. For fuller plans, see our guide to small kitchen pantry ideas.
The under-sink cabinet
The sink cabinet is hard because of the pipes. Do not remove or move the plumbing. Instead, use a two-tier organizer made with cutouts for pipes, or a pair of stackable bins on either side of the drain. A tension rod across the top holds spray bottles by their necks. Place a shallow tray or liner at the bottom to catch leaks, and check it each month. Keep cleaning chemicals in a closed container, stored high or locked if there are children or pets in the home. Never store different cleaning products together in a way that could mix them if they leak, and read the label of each product.
The counter edge and the top of the cabinets
Two more places are often missed. The first is the counter edge: a clamp-on shelf or a small wire rack holds a few items without taking counter space, but clamps need a counter edge that is the right thickness, and some surfaces can be marked by the clamp pad. The second is the top of the upper cabinets. Use it for rarely used items such as a large platter or a basket of spare bags. Keep the weight light, pull items back from the edge and avoid placing anything there that could fall into a hot pan. If the area collects grease, line it with paper that you can change and keep items in lidded boxes so dust does not build up.
Safety rules for every installation
Storage that falls is worse than no storage. Follow these rules whenever you add anything.
- Check weight ratings on every rack, hook and rod, and stay well below the limit.
- Put heavy items low. Cast iron, bottles and canned goods belong on lower shelves.
- Anchor tall, freestanding racks if they can tip, and keep the top shelves light.
- Never drill or screw into a wall, cabinet or tile without permission if the home is rented, and avoid drilling near visible wiring, outlets or plumbing.
- Keep electricity safe. Do not run cords under racks, and keep water away from outlets and power strips. Do not hang anything from a light fixture or a vent hood.
- Leave airflow around appliances. Fridges, ovens and dishwashers need clearance.
- Respect heat. Keep fabric, paper and plastic racks away from burners and the oven.
- Test adhesive on a hidden spot and give it time to cure before loading.
A step-by-step plan for one weekend
You do not need to do everything at once. A staged plan prevents buying the wrong thing.
1. Empty one cabinet and wipe it. Sort the contents into keep, move and donate.
2. Measure the space. Write down width, depth and height.
3. Choose one tool. Pick a riser, a rack or a bin that matches the measurement and the item.
4. Place and test. Put the tool in place without loading it, close the door and check clearance.
5. Load and live with it for a week. Notice what you reach for and what you do not.
6. Repeat for the next cabinet. Over several weeks, the kitchen improves one zone at a time.
Keeping it organized
A no-remodel system works only if it stays tidy. Use a short weekly reset: wipe a shelf, return strays to their zone and check that nothing is stuck behind a door. Once a month, check hooks, adhesive and rods for slippage. Once a season, pull out the rarely used items and decide whether they still earn their space. If an item has not left the cabinet in a year, it is a candidate to donate.
Common mistakes
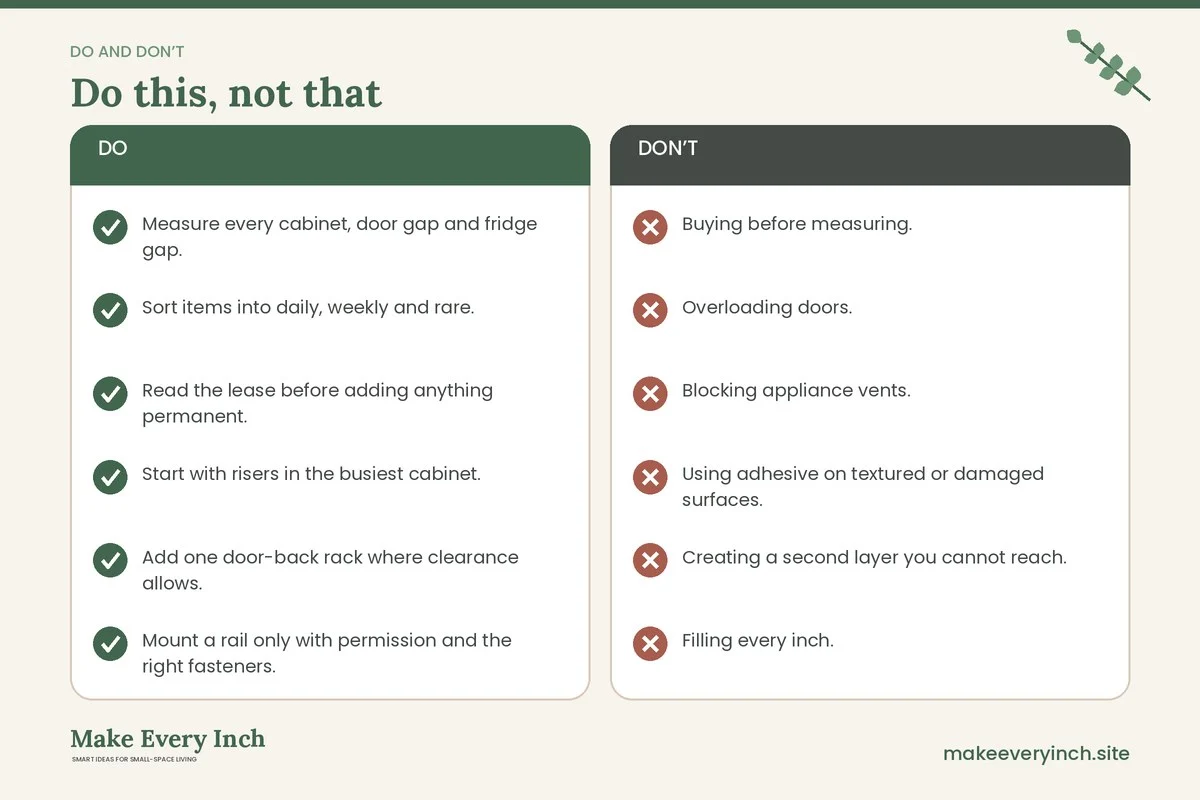
- Buying before measuring. Most returns are sizing mistakes, so take the five measurements first.
- Overloading doors. Hinges can sag, so keep door-back loads light.
- Blocking appliance vents. Fridge and stove vents need free space.
- Using adhesive on textured or damaged surfaces. It will fail and may pull off finishes.
- Creating a second layer you cannot reach. A riser that hides the back row defeats the point, so use stepped tiers.
- Filling every inch. A cabinet at 100 percent capacity is hard to use, so leave a little empty space.
Checklist
- Measure every cabinet, door gap and fridge gap.
- Sort items into daily, weekly and rare.
- Read the lease before adding anything permanent.
- Start with risers in the busiest cabinet.
- Add one door-back rack where clearance allows.
- Mount a rail only with permission and the right fasteners.
- Test adhesive on a hidden spot.
- Keep heavy items low and light items high.
- Leave airflow around the fridge, oven and dishwasher.
- Use dividers in the cutlery and tool drawers.
- Label bins so you can see the contents at a glance.
- Review the system after one week and adjust.
FAQ
What is the cheapest way to add storage to a small kitchen without remodeling?
Shelf risers and drawer dividers usually cost the least and make the biggest difference, because they use space you already have. Prices vary a lot by store and material, so compare a few options.
Can I add storage to my kitchen if I rent?
Yes. Choose freestanding, clip-on, tension-based and over-the-door items, and ask your landlord before using screws or strong adhesive. Our post on renter-friendly kitchen upgrades lists safe choices.
How much weight can a door-back rack hold?
It depends on the rack, the door and the hinges, so follow the manufacturer’s rating and keep loads light. Heavy items belong on a shelf, not on a door.
Are adhesive hooks safe on kitchen walls?
They work on clean, smooth surfaces for light items, but grease, steam and heat weaken them. Test a hidden spot, keep them away from the stove and avoid using them for heavy or fragile things.
How do I store pots and pans without a pantry?
Use a rail or hanging rod for a few, a slim rack for lids and a riser or divider inside a base cabinet for the rest. Stack only what you can lift easily.
Do I need to anchor a slim rolling rack?
Light racks in a narrow gap are usually stable, but tall ones can tip when overloaded. Keep heavy items low, and anchor any tall piece if you can do so with permission.
What should I do first?
Measure, then add risers to the cabinet you use most. A small change in the busiest spot makes the whole kitchen feel calmer. For more on counters, read our small kitchen counter organization guide.
Keep going: Keep going with our vertical storage ideas, small kitchen cart ideas and hidden storage ideas.
Save this guide for later
Pin the ideas you like to Pinterest so you can come back to them when you plan your space.