Small Home Organization Without Buying Bins
Quick answer: Small home organization without buying bins starts with what you own. Reuse clean jars, shoeboxes, food tins and cartons as dividers, rearrange shelves so tall items sit at the back, use drawers you already have for categories, and label with tape and a marker. Sort and remove clutter first, measure the space, and buy a container only when a specific gap remains that nothing at home can fill.
Small home organization without buying bins is possible because most clutter problems are about sorting and placement, not about missing containers. A bin is a tool for holding a group of things, and you can often create that group with a box that is already in your recycling, a jar from last week’s dinner or a drawer you never fully used. Buying containers first usually adds to the clutter, since you end up with a new pile of empty plastic. This guide shows how to organize a small home with what you have. It covers the order of operations, a household audit of reusable containers, ideas room by room, free labeling methods, rearranging tricks, a comparison table, three example scenarios, safety notes and a checklist. For the wider topic, read our pillar on small space organization ideas, and for a time-focused approach, see the companion post on small home organization for busy people.
Why sorting beats shopping
A bin does not remove clutter. It hides it, and it adds its own footprint. In a small home, every inch of shelf or floor space that a container takes is an inch you cannot use for the items inside. Often a lot of the stuff inside is duplicate, broken or unused. If you buy first, you fit the container to the mess. If you sort first, you fit the container to what you really need, and often discover you need none.
Use this order every time: remove, group, place, contain. First, take out what you do not use. Second, group like with like. Third, place each group where you use it. Fourth, only then decide whether the group needs a container. Many groups end up not needing one because a shelf edge, a drawer front or a hook does the same job.
Take a container audit
Before you shop or even think about shopping, collect the containers already in your home. Walk through the kitchen, the recycling, the bathroom and the closets, and put everything that holds or divides into a pile on the table. You will probably be surprised.
What counts as a container
- Glass jars with lids: from sauces, spreads and pickles. Soak off labels in warm water, dry well and check there are no cracks or chips.
- Food tins and cans: with smooth edges. Use a can opener that leaves a safe rim, or sand or tape a sharp edge before reuse.
- Shoeboxes and gift boxes: good for under-bed storage, drawers and shelves. Sturdy lids stack well.
- Cereal and cracker boxes: cut the top diagonally to make magazine files or cable holders.
- Mugs, cups and bowls: hold pens, makeup brushes, spoons or small tools.
- Baskets and bags: tote bags, paper bags with folded tops and old baskets.
- Takeaway containers: rinsed plastic tubs with lids work for craft supplies and loose screws.
- Drawer inserts from old furniture: cutlery trays and jewelry trays can move to other drawers.
- Cartons: egg cartons for small hardware or jewelry, and milk cartons cut down as dividers.
Wash everything before you reuse it, and avoid containers that held harsh chemicals or strong smells. Never use a container that previously held cleaning products for food, and do not store food in containers that are not food-safe.
Sort the pile
Pick containers that are clean, sturdy and the right size. Keep a limited number, perhaps ten to twenty for a whole home, and recycle the rest. Having too many containers is a form of clutter too. Group them by size on a shelf, so you can see what is available when a new need arises.
Reuse ideas by room
Kitchen
The kitchen is the room where reuse works best, since it generates the most jars and boxes.
- Jars for dry goods: store rice, lentils, pasta and nuts in clean jars. Label the lid with masking tape. Wide-mouth jars are easiest to fill and scoop.
- Jars for utensils: a tall jar on the counter holds wooden spoons and spatulas, and frees up drawer space.
- Tins for tea and spices: cover rough edges, and stack tins on a shelf.
- Box dividers in drawers: cut a shoebox lid or a cereal box to fit the drawer width, and use pieces as dividers for cutlery and tools.
- A magazine file for foil, wraps and trays: a cut cereal box holds them upright inside a cabinet door or on a shelf.
- Mugs for small items: keep the tea bags, the sugar packets or the sponges in a mug.
For more drawer layouts, see small kitchen drawer organization ideas and our guide to small kitchen organization ideas.
Bedroom and closet
- Shoeboxes in drawers: small boxes keep socks, underwear and belts in rows. Cut the sides lower if they are too tall.
- Folding upright: fold clothes into rectangles and file them on edge in a drawer, so you can see every piece. This needs no container at all.
- Under-bed boxes: a sturdy box with a lid holds off-season clothes. Slide it on a towel to protect the floor. For more, read under-bed storage ideas.
- Tins for jewelry: a tin lined with a scrap of fabric holds rings and earrings.
- A tote bag as a hanging hamper: hang on a hook behind the door.
- Hangers as organizers: hook a belt, scarf or tie to a hanger, so the closet rod holds more.
See also our small bedroom organization ideas and small closet organization ideas.
Bathroom
- Jars for cotton and swabs: clean glass jars look tidy and keep dust out. Use plastic if there are children, because glass can break.
- A mug for toothbrushes: wash it weekly.
- A tray for daily products: a baking tray or a wooden board corrals bottles on the vanity.
- A shoebox in a cabinet: group dental, first aid and hair items by type.
- A tension rod under the sink: hang spray bottles by their triggers.
More ideas are in small bathroom organization ideas.
Entryway and living room
- A bowl for keys: any shallow dish works.
- A basket or box by the sofa: a sturdy carton wrapped in fabric or paper holds the throw and remotes.
- Stacked crates or boxes as shelves: place sturdy boxes on their sides, and stack them in a pyramid, so they work as a cube shelf. Do not use them for heavy items unless they are strong.
- A shoe tray from a baking sheet: it collects mud and keeps the floor dry.
- Books as risers: a pair of thick books lifts a lamp or a plant and creates a space for the remote beneath.
See small entryway organization for more.
Desk and paper
- Jars and mugs for pens: group by use, such as writing and cutting.
- A cereal box as a file: cut diagonally, cover with paper and label the front.
- A binder clip on a shelf edge: holds a cable or a note.
- Cardboard tubes: keep cords tidy by looping and sliding them into a toilet paper tube.
Use furniture as the container
Often the best container is the furniture you already own. Shelves, drawers and the tops of cabinets all hold more than we use.
Drawers
A drawer can be a category in itself. Give each drawer a single purpose, such as one for baking tools, one for cables and one for light bulbs. When a drawer has a single purpose, you rarely need a divider. Fill it only two thirds full so items do not tangle. If a drawer is too deep, stack items in layers, with the one you use most on top.
Shelves
Shelves have a lot of unused vertical air. Shelve items in two rows on deep shelves, with the tall items at the back and the short items in front, so you can see both. On a shelf with a high gap, add a second level by placing a sturdy board on two stacks of books or boxes, or use a wire rack from the oven if you have a spare. Keep the heaviest items low and never overload a makeshift shelf.
Inside doors and backs of doors
The back of a door or the inside of a cabinet door is free space. Use adhesive hooks within their weight rating for lids, bags, oven mitts and towels. An over-the-door hook needs no adhesive at all. If you rent, see no-drill storage ideas for renters for options that leave no marks.
Furniture with built-in space
Look at the ottoman, bench, sofa or bed you own. Many have hollow space inside. A lift-up lid, a drawer or a gap beneath can hold blankets, shoes or extra bedding. If you have an old suitcase, it can store off-season items under the bed or on top of a wardrobe. For ideas, see hidden storage ideas.
Rearrange before you store
Moving things costs nothing and often creates more room than any container.
1. Empty the space completely. Pull everything out of one shelf or drawer, wipe it down and look at the empty space. You see its real size.
2. Measure the shelf height. If there is more than a few inches above the tallest item, you can add a layer.
3. Put tall things at the back. The eye reads depth, and you can see every item.
4. Zone by task. Put coffee items together, breakfast items together and baking items together. Task zones reduce time spent searching.
5. Use the golden zone. The area between hip and shoulder is easiest to reach. Put daily items there, and heavy or rare items above or below.
6. Face labels forward. Turn jars, cans and bottles so you can read them without moving anything.
7. Make a front row rule. Keep one row at the front and a spare row behind. When the front row empties, bring up the next.
Label without buying labels
Labels help everyone know where things go, even if you are the only person in the house. You can make them for nothing.
- Masking tape and a marker: the simplest, and easy to peel off. Use a pen that does not smudge.
- Paper and a rubber band: write on a scrap of paper and tuck it under a rubber band around a jar.
- Chalk or a dry-erase pen on glass: good for pantry jars, and wipes off easily.
- A clothespin with a note: clip a card to the edge of a shelf or box.
- Use the original package label: cut the front panel of a food box and tape it to the container.
- Color coding with scrap fabric or paper: one color per person or per category.
- A photo label: take a photo of the contents and tape it to the box. Great for children.
- A map of the shelf: on the inside of a cabinet door, tape a list of what lives where.
Label the front, at eye level, and write in clear block capitals. Include the date for food. Keep the labeling system consistent: if one shelf uses tape, all should.
When containers do help
Saying no to buying bins is not saying never. A good container does a job that nothing else can. Before you buy, ask whether any of the following apply.
You have a real gap
If you have sorted, measured and tried reuse, and there is still a loose category that spills, a container may help. Examples include a pile of small items that fall through shelves, items that need to be sealed against pests or moisture, or items that must stack to use vertical space.
Safety or hygiene needs it
Food that attracts pests needs airtight containers. Things that spill or leak need lids. Sharp objects such as knives or razor blades need a safe holder. Medicine and cleaning products need secure storage out of reach of children and pets. In these cases, buy or choose a container made for the job.
Uniformity helps you stay tidy
Some people keep a space neat if it looks uniform. A set of matching baskets on a shelf can stop visual clutter. If you notice that mismatched boxes bother you, you may find that a few matching containers make the system last. Buy them after you have sorted, and measure first.
Sizes that fit the space
Measure the width, depth and height of the shelf or drawer. Subtract about half an inch so the container slides in. Check the door swing or drawer clearance. Buy the fewest containers that fill the space, not the most. Keep the receipt in case they do not fit.
Comparison: reuse, rearrange or buy
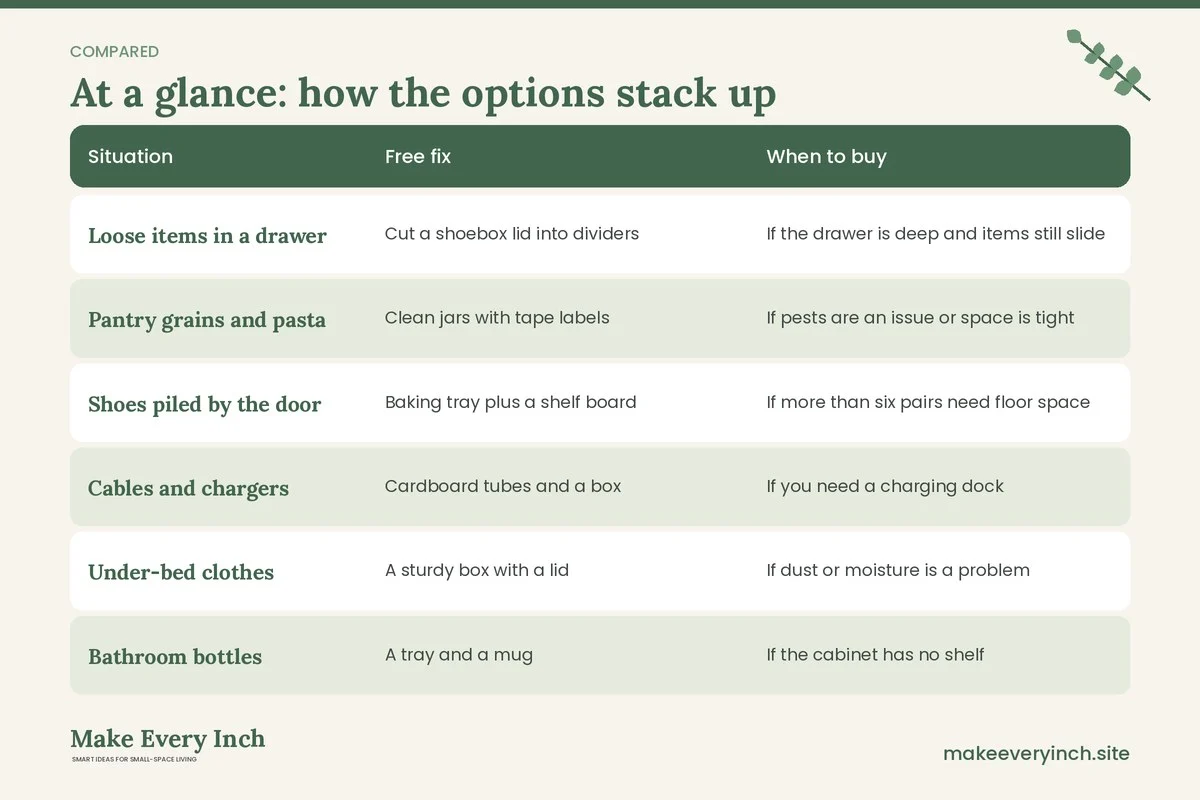
| Situation | Free fix | When to buy |
|---|---|---|
| Loose items in a drawer | Cut a shoebox lid into dividers | If the drawer is deep and items still slide |
| Pantry grains and pasta | Clean jars with tape labels | If pests are an issue or space is tight |
| Shoes piled by the door | Baking tray plus a shelf board | If more than six pairs need floor space |
| Cables and chargers | Cardboard tubes and a box | If you need a charging dock |
| Under-bed clothes | A sturdy box with a lid | If dust or moisture is a problem |
| Bathroom bottles | A tray and a mug | If the cabinet has no shelf |
| Paper and mail | A cereal-box file | If you handle many documents |
| Cleaning supplies | A bucket or a box | If you need a locking cabinet |
Three example scenarios
Scenario 1: A studio kitchen with one cabinet
A single wall cabinet holds all the dishes, food and pans. The owner empties it, removes expired food and finds that 40 percent of the items are duplicates. Clean jars hold rice, oats and pasta, and the jars line up on the lowest shelf. A cut cereal box holds baking trays upright. Cups hang on the inside of the door with adhesive hooks, within the weight rating. A mug on the counter holds the utensils. The result frees a shelf and a drawer without buying anything. The only container they decide to buy later is an airtight bin for flour, since pests are a concern.
Scenario 2: A shared bedroom with two people and one dresser
Each person gets two drawers. In each drawer, upright folding replaces piles, and shoeboxes divide socks, underwear and accessories. A tote bag on the door hook becomes a laundry bag. Off-season clothes go into a suitcase under the bed. The couple writes each person’s name on masking tape on the drawer fronts. The room feels calmer, and nobody had to shop. They anchor the dresser to the wall with the manufacturer’s hardware, with the landlord’s permission for any holes.
Scenario 3: A rental entry with no closet
The entry is a short hall, with a door and a wall. The renter hangs a row of hooks that use removable adhesive, within the weight rating, for bags and coats. A baking tray collects shoes on the floor. A bowl on a small shelf holds keys, and a sturdy box holds umbrellas and gloves. A shoebox wrapped in paper holds mail. Total cost is nearly zero. If the renter later adds a bench, they can measure what fits. Read small entryway storage for next steps.
Safety and care notes
- Anchor tall furniture, such as bookcases and dressers, to the wall, and never stack boxes high enough to topple.
- Do not drill into walls without permission from your landlord or building owner. Use removable hooks within their weight rating.
- Wash glass and tins before reuse, and check for sharp edges and cracks.
- Do not store food in containers not meant for food.
- Keep cleaning products in their original containers with labels, and out of reach of children and pets.
- Do not store paper or fabric near heaters, stoves or lamps, and keep cords clear of cardboard.
- Ventilate your space when you clean or paint, and choose low-VOC paint if you decide to refresh a shelf.
- Do not overload makeshift shelves, and keep heavy items low.
Make it look good for free
Reused containers can look tidy with small touches. Wrap a shoebox in leftover wrapping paper, fabric or a paper bag, and glue or tape the edges. Paint jar lids in one color with leftover paint, in a ventilated area. Remove all brand labels so the shelf looks calm. Group items in odd numbers, such as three jars, and keep them in the same row. Leave space between groups so the eye can rest. If the system looks calm and clear, you are more likely to maintain it.
Mistakes to avoid
- Buying containers before sorting. You pay for the same clutter in a new form.
- Keeping too many jars and boxes. A free container is still clutter if you never use it.
- Using damaged or dirty containers. They attract pests and smell.
- Overfilling reused boxes. Cardboard bends and collapses under heavy loads.
- Hiding everything in opaque boxes. If you cannot see it, you forget it. Label clearly.
- Ignoring weight limits on adhesive. Check the rating, and keep items light.
- Skipping the label. An unlabeled system relies on memory.
A simple three-weekend plan
Weekend 1: do the container audit and pick your ten to twenty keepers. Recycle the rest. Weekend 2: choose one room and run remove, group, place, contain. Start with the kitchen or the bedroom, since they have the most daily use. Weekend 3: label, photograph the result and note what still spills. Only that last list is a shopping list. Many people find the list is shorter than they expected, and some find it is empty. For more low-spend ideas, read cheap storage ideas for apartments and budget small space ideas.
No-bin checklist
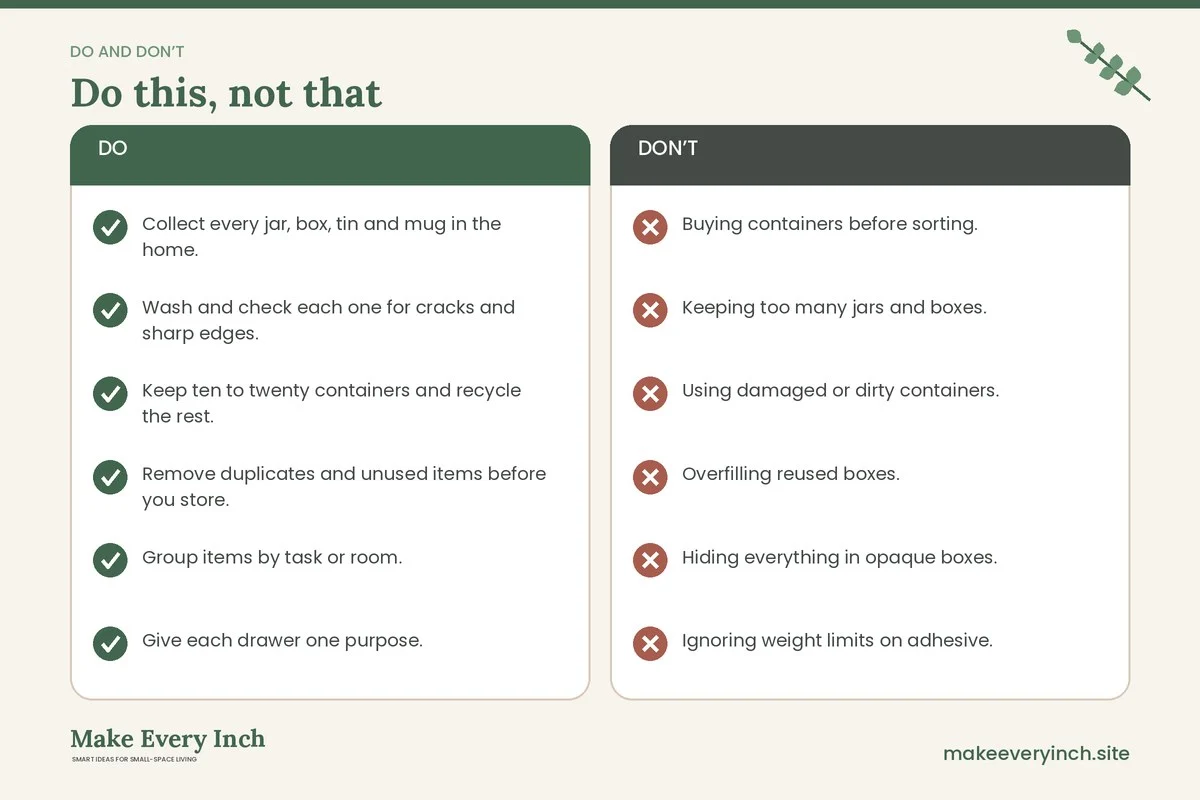
- Collect every jar, box, tin and mug in the home.
- Wash and check each one for cracks and sharp edges.
- Keep ten to twenty containers and recycle the rest.
- Remove duplicates and unused items before you store.
- Group items by task or room.
- Give each drawer one purpose.
- Put tall items at the back and short ones in front.
- Use the back of doors and inside cabinets, within weight limits.
- Label with tape, chalk or paper.
- Anchor tall furniture and avoid unapproved drilling.
- Make a short list of real gaps before buying anything.
- Measure the space and subtract half an inch.
FAQ
Can you really organize a small home without buying anything?
Often yes. Sorting and grouping solve most clutter problems, and reused jars, boxes and mugs fill the rest. A few gaps may need a purchase, but the list is usually short.
What household items make good organizers?
Clean glass jars, shoeboxes, food tins with smooth edges, cut cereal boxes, mugs, cardboard tubes, trays and tote bags all work. Choose clean and sturdy ones.
Is it safe to reuse jars and tins?
Yes, if they are clean, undamaged and meant for food when they will hold food. Check tins for sharp edges. Do not reuse containers that held chemicals for food.
How do I label things for free?
Masking tape and a marker are easiest. Chalk or a dry-erase pen works on glass, and a paper tag with a rubber band works on boxes. Keep the style consistent.
When is it worth buying a container?
Buy one when you have sorted and measured and still have a gap, or when safety or hygiene calls for it, such as airtight food storage or a locked medicine box. See small home organization for busy people for low-maintenance systems that work with or without containers.
How do I stop reused boxes from looking messy?
Limit them to a few sizes, wrap or cover them in one paper or fabric, remove brand labels and keep them in rows. A calm look comes from consistency.
What if I rent and cannot drill?
Use furniture you own, over-the-door hooks, tension rods and adhesive hooks within the weight rating. See organization ideas for renters.
Keep going: Keep going with our small space organization ideas, small home organization for busy people and small apartment decluttering ideas.
Save this guide for later
Pin the ideas you like to Pinterest so you can come back to them when you plan your space.