Small Kitchen Backsplash Ideas for Small Spaces
Quick answer: The best small kitchen backsplash ideas for small spaces use light, low-contrast colors, a reflective or glossy finish, small or simple patterns and thin grout lines to make walls feel larger. Choose a heat-rated material near the stove, use peel-and-stick only where the manufacturer allows it, and pick something that wipes clean quickly.
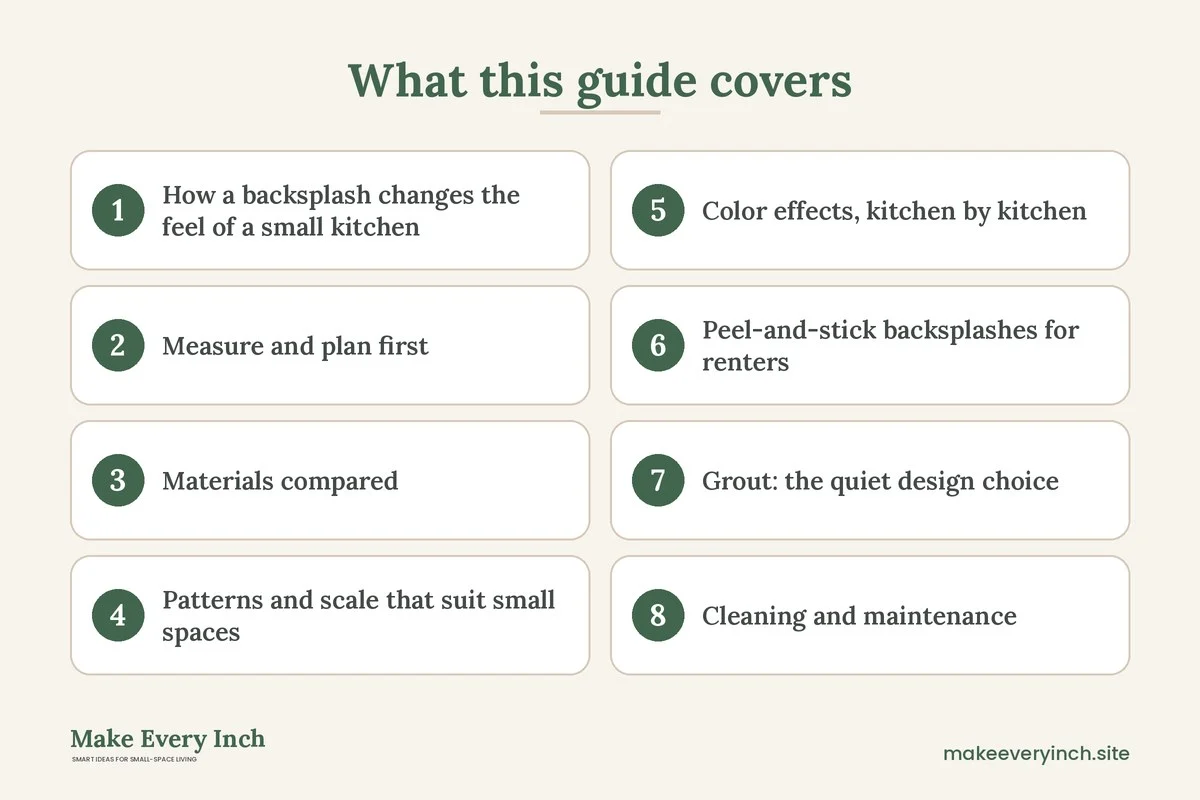
Small kitchen backsplash ideas for small spaces are really about one question: how much visual weight can a strip of wall carry before the room feels tighter? In a large kitchen a bold backsplash is a feature. In a small kitchen it is often the biggest uninterrupted surface at eye level, so it sets the mood of the whole room. The material, the pattern, the scale of the pieces, the color of the grout and even the direction the tiles run all change how big the kitchen seems. This guide covers those effects one by one, then the practical side: peel-and-stick for renters, grout choices, cleaning, and heat safety near the stove. For the wider topic, read our pillar on small kitchen ideas, and for a quick renter-focused look at removable options see temporary backsplash ideas. If you are also adding wall storage, our sibling guide on small kitchen wall storage ideas explains how to hang things on the same wall.
How a backsplash changes the feel of a small kitchen
A backsplash is a band of wall between the counter and the upper cabinets, typically 15 to 20 inches tall. In a small kitchen it is seen from every spot in the room, so small decisions add up. Five levers matter most.
- Color value: Light colors reflect more light and recede, which tends to make walls feel further away. Dark colors absorb light and pull the wall closer, which can feel cozy but can also feel tight in a room with little natural light.
- Contrast: A backsplash that is close in tone to the cabinets and the wall blends into one calm surface. A strong contrast draws the eye to the wall and can make the room feel busier.
- Sheen: Glossy and glazed surfaces bounce light around. Matte surfaces absorb it and feel softer. In a dim kitchen, gloss helps. In a bright kitchen with lots of sun, a satin finish avoids glare.
- Scale of the pieces: Large pieces mean fewer lines and a calmer look. Very small pieces create many lines and a textured, busy look. Medium sizes sit between.
- Direction and pattern: Lines that run vertically draw the eye up and add height. Lines that run horizontally widen a narrow wall. A diagonal or busy pattern adds energy and shrinks the sense of space.
None of these rules is absolute. A small, dark kitchen can look rich and intentional with the right lighting. The point is to know the effect you are choosing, so you pick it on purpose.
Measure and plan first
Before choosing a material, measure the actual area. Run a tape along the width of the wall behind the counter and measure the height from counter to cabinet underside. Multiply to get the area, then add about 10 to 15 percent for cuts and waste. Note any outlets, switches, a window, a range hood and the edge of the stove, because these shape the cutting and the pattern.
Mark the vertical center of the main wall, usually behind the stove or the sink, and plan the pattern from that line so cuts at the edges are balanced. A narrow sliver of tile at the end of a run looks unplanned. Dry lay a few pieces on the counter or tape paper templates to the wall to preview the effect from your usual standing spot.
Decide how far the backsplash should go. A standard height of 4 inches protects only the wall edge. A full-height backsplash up to the underside of the upper cabinets, or even to the ceiling behind a range, adds more protection and makes the wall feel taller. For a small kitchen with a low ceiling, running the surface to the ceiling above the stove can make the room feel taller, if the material is rated for it.
Materials compared
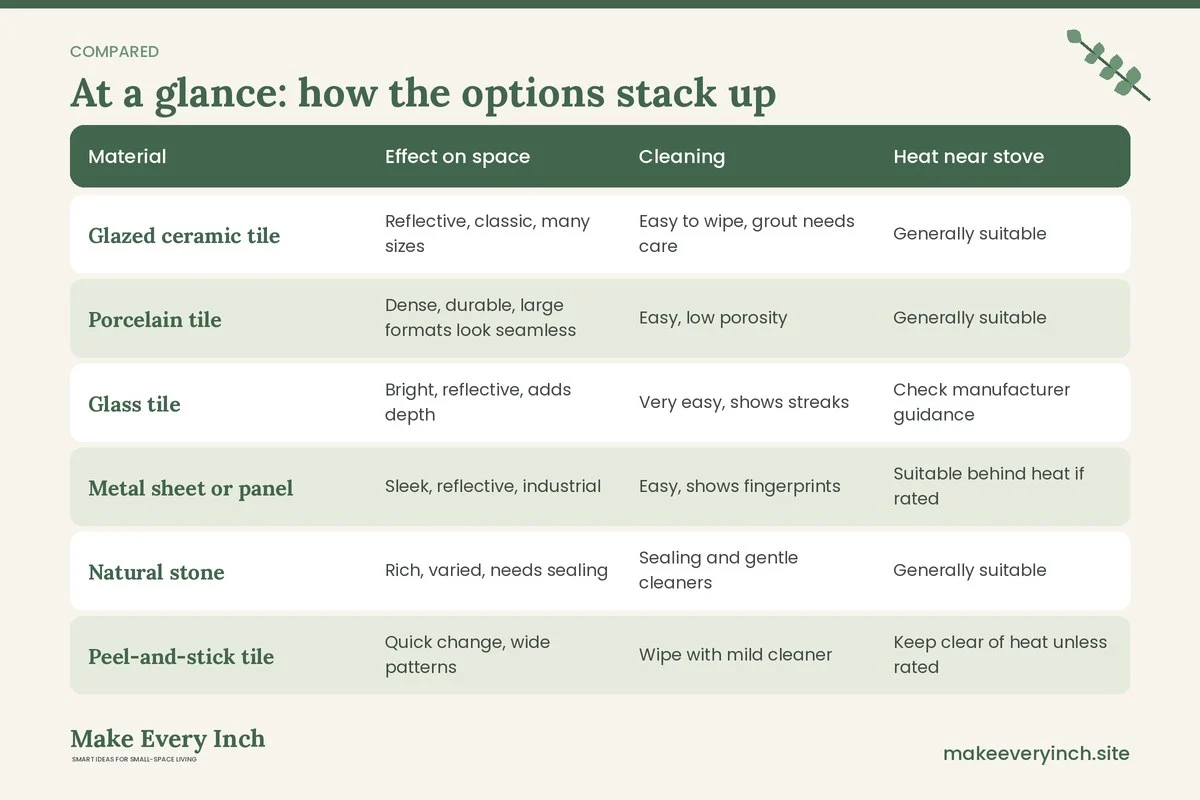
| Material | Effect on space | Cleaning | Heat near stove | Best for |
|---|---|---|---|---|
| Glazed ceramic tile | Reflective, classic, many sizes | Easy to wipe, grout needs care | Generally suitable | Owners, long-term kitchens |
| Porcelain tile | Dense, durable, large formats look seamless | Easy, low porosity | Generally suitable | Busy cooking kitchens |
| Glass tile | Bright, reflective, adds depth | Very easy, shows streaks | Check manufacturer guidance | Dim kitchens |
| Metal sheet or panel | Sleek, reflective, industrial | Easy, shows fingerprints | Suitable behind heat if rated | Compact modern kitchens |
| Natural stone | Rich, varied, needs sealing | Sealing and gentle cleaners | Generally suitable | Warm, traditional kitchens |
| Peel-and-stick tile | Quick change, wide patterns | Wipe with mild cleaner | Keep clear of heat unless rated | Renters, short-term updates |
| Paintable or sealed surface | Seamless, low cost | Depends on sealant | Use heat-rated finish | Light-use areas |
| Glass or acrylic panel | Seamless, easy | Very easy | Heat-rated glass only near stove | Small walls, stove area |
| Beadboard or wood paneling | Warm, textured | Needs sealing, avoid splash | Keep away from heat | Dry areas away from the sink |
The table is a general guide. Always read the manufacturer’s guidance for the exact product, since heat ratings and cleaning advice vary.
Patterns and scale that suit small spaces
Large format tiles
Large tiles, such as 12 by 24 inches, mean fewer grout lines. With fewer lines the wall reads as one smooth surface, which helps a small kitchen feel calmer. The drawback is that large tiles need a flat wall and more cutting around outlets.
Stacked or straight lay
Setting rectangular tiles in a straight grid, vertical or horizontal, gives a clean, orderly look. A vertical stack adds a sense of height, and a horizontal stack widens a short wall. Straight lay shows imperfections in the wall more than offset patterns do.
Subway and brick patterns
The familiar brick pattern is popular because it is easy and forgiving. In a small kitchen choose a light color with a narrow grout line, so the pattern whispers rather than shouts. A larger subway, such as 4 by 12 inches, feels less busy than the smallest sizes.
Herringbone and chevron
These patterns add movement and interest, but they also add a lot of lines. They work best on a single focal area, such as behind the stove, rather than a whole kitchen. Keep colors tonal so the pattern does not overwhelm.
Mosaic and penny rounds
Tiny tiles on mesh sheets are easy to install on curves and add texture. They also create many grout lines, so keep them to a small accent and pick grout that matches the tile. A matching grout softens the busy effect.
Zellige-style and handmade looks
Slightly uneven handmade surfaces catch the light and add depth. They suit a kitchen where you want warmth over uniformity. Because they vary, order a little extra and mix from several boxes.
Bold prints
Patterned cement-style or graphic tiles make a strong statement. In a small kitchen, limit a bold print to a single area, such as a narrow strip behind the stove, and keep the counters and cabinets plain. A single feature beats a whole wall of pattern.
Color effects, kitchen by kitchen
Light and white
White, cream and pale gray reflect light and make walls recede. They work in almost any small kitchen. To avoid a clinical look, choose warm whites and add texture through a handmade finish or a gentle gloss.
Soft color
Pale sage, blue, blush or sand add personality without shrinking the room. Pick a tone close to the wall color for a seamless effect.
Mid-tones
Mid-range colors, such as muted green or terracotta, give warmth but absorb more light. They suit kitchens with a window or good lighting. Pair with light counters to keep contrast manageable.
Dark and moody
Navy, charcoal and deep green can look rich and make walls visually disappear in the right light. They work best in kitchens with plenty of task lighting and a lighter counter. In a dim room, they can feel heavy. See our guide to small kitchen lighting ideas for ways to brighten a darker wall.
Matching the cabinets
Using the same color for cabinets and backsplash blurs the edges and makes the kitchen feel like one block of color. This trick can make a small kitchen feel larger, especially in a galley. A tone-on-tone approach avoids the eye stopping at each edge.
Contrasting the cabinets
A backsplash that contrasts with the cabinets creates a focal point and defines the zones. This suits a kitchen with generous light and a simple layout, but can be busy in a cramped one.
Peel-and-stick backsplashes for renters
Peel-and-stick tile is the main route for tenants who cannot grout or tile. It is a thin adhesive-backed sheet or tile, usually made of a vinyl, gel or metal-effect layer. It is quick to install and removable in many cases. The main risks are heat, moisture, grease and the wall surface, so a careful approach pays off.
Before you buy
- Check the lease and ask the landlord. Even removable products can lift paint or damage a weak surface. Written permission protects your deposit.
- Read the product’s limits. Look for advice on heat, moisture and the surface it suits. Not every product suits the area right behind a stove.
- Measure and order extra. Add 10 to 15 percent for cuts, mistakes and later repairs.
- Test a sample. Stick a small piece in a hidden spot for a week, then peel it to see how the paint reacts.
Prepare the wall
Clean the wall with a degreaser, rinse, and dry it fully. Remove loose paint, fill holes and let any filler cure. Fresh paint needs time to harden fully, often several weeks, before an adhesive sheet will release without lifting the paint. Textured walls hold peel-and-stick poorly, so smooth them first or choose another approach.
Install it
1. Start at the center line and work out, so the cuts are even at the edges.
2. Peel back a small amount of backing, align the edge, and smooth with a squeegee or a soft cloth.
3. Press out bubbles toward the edge.
4. Cut around outlets with a sharp blade after turning off the power at the breaker and removing the cover plates. Do not leave the sheet touching exposed contacts.
5. Reinstall the cover plates, which may need longer screws for the extra thickness.
6. Seal the top edge with clear caulk if the product allows it, to keep moisture out.
Peel-and-stick near the stove
Heat is the weak point. Adhesive can soften, and vinyl can curl or discolor when it sits close to a burner. Keep ordinary peel-and-stick back from the hot zone, and use a heat-rated option or a piece of tempered glass, metal sheet or tile behind the stove where possible. A common approach is to put peel-and-stick on the main wall and a removable heat-safe panel directly behind the cooker. Always follow the manufacturer’s clearance guidance for your cooker and keep a vent hood clear.
For more renter-friendly updates, read our post on renter-friendly kitchen upgrades and the guide to removable wallpaper ideas.
Grout: the quiet design choice
Grout fills the gaps between tiles, and in a small kitchen it matters more than most people expect.
- Match the tile for a calm look. A grout color close to the tile blurs the lines, which makes the wall feel smoother and larger.
- Contrast for a graphic look. White tile with dark grout draws a grid across the wall. It looks bold, but it also makes the room busier and shows every wobble in the layout.
- Keep the lines thin. A gap of 1/16 to 1/8 inch looks tidy and is easier to clean. Wide gaps collect grease.
- Pick a stain-resistant type. Some grouts are formulated to resist stains and moisture, and others need sealing. Read the instructions and seal where advised.
- Consider a lighter color near the stove. Grease darkens grout fast, so a mid-tone hides marks better than pure white.
- Use flexible caulk at the counter edge. Where the backsplash meets the counter, use a flexible sealant rather than grout, since the joint moves slightly. Replace it when it cracks.
Cleaning and maintenance
A backsplash takes splashes, steam and grease, so the finish you pick should match how you cook.
- Smooth beats textured. A glossy tile wipes clean in a swipe. A textured or handmade surface traps grease and takes more effort.
- Wipe after cooking. A quick pass with warm soapy water stops grease from building up. Dry the surface to prevent streaks.
- Use gentle cleaners. Avoid harsh abrasives, strong acids or bleach on natural stone, metal and some grout. Test cleaners in a hidden spot first.
- Clean grout with a soft brush. A small brush and a mild cleaner lifts stains. Avoid wire brushes that scratch.
- Reseal as needed. Natural stone and some grouts need periodic sealing. Check the manufacturer’s advice for frequency.
- Peel-and-stick care. Wipe with a soft cloth and a mild cleaner, and avoid soaking the edges, because water can creep under the sheet and loosen the adhesive.
- Check the seal. Look at the line between the backsplash and the counter every few months. Reseal if you see gaps.
Heat and fire safety near the stove
The zone behind the cooktop deserves extra care, whatever the style.
- Choose a non-combustible surface: Ceramic, porcelain, glass and metal are common choices. Avoid wood, plastic and paper-based finishes directly behind burners.
- Check clearance rules: Cookers and hoods have stated minimum distances to combustible surfaces. Read the manual and keep to it.
- Use heat-rated products: If the product states a temperature limit, make sure it exceeds what your cooker produces on that wall.
- Keep gas appliances safe: Never block the air supply or the vent near a gas cooker. Do not cover or modify gas fittings.
- Mind electrical outlets: Turn off the power at the breaker before removing covers or tiling around outlets. Outlets near a sink or a stove should be installed to code, and any new work belongs to a qualified electrician.
- Ventilate: Run the extractor fan while cooking to reduce steam and grease. Use low-VOC adhesives and sealants, and open a window when installing.
- Keep hanging items clear: Do not hang towels or wooden utensils directly above burners.
Three example kitchens
A 6 by 8 foot galley with little natural light
Two parallel runs of counter, a single small window and white cabinets. A glossy, pale glazed tile in a straight horizontal lay in a warm white reflects what light there is, and a thin matching grout line keeps the wall smooth. The tile runs from counter to cabinet underside, with a slim strip of under-cabinet light that bounces off the gloss. The result is a bright, uncluttered wall. Read our galley kitchen ideas for layout options.
A rental studio kitchenette
A single wall of cabinets, a cooker and a lease that bans tiling. A peel-and-stick sheet in a light, soft pattern covers the main wall, applied after a test patch and written permission. Behind the cooker, a piece of heat-rated metal or tempered glass, cut to size and held with a removable method, protects the area that gets hot. The sheet comes off at move-out, and the walls stay as they were. See small apartment kitchen ideas for more renter-friendly updates.
A small L-shaped kitchen with a bold feature
An L-shaped kitchen with plain cabinets and a stove on the short wall. A graphic patterned tile limited to a 30-inch strip behind the stove is the one bold gesture, and a calm, tone-on-tone tile covers the rest of the wall. The pattern becomes a focal point without overwhelming the room. Match the grout to the quieter tile so the feature stands out.
Budget-minded ways to refresh a backsplash
You do not need a full tile job to change the look of a small kitchen.
- Paint with a washable, moisture-resistant finish: It is the cheapest refresh. Use a low-VOC product, ventilate, and keep it away from the direct heat of the burners.
- Reuse and overlay: Existing tile can sometimes be painted with a product made for tile, or covered with a thin overlay. Check compatibility first.
- Cover only the splash zone: A smaller area behind the sink and stove covers most of the mess. The rest can stay painted.
- Remnants and offcuts: Small amounts of a stone or tile are often available as offcuts, which suit a narrow kitchen.
- Do it in stages: Start behind the stove, then extend later.
For more budget ideas see our guides on small kitchen ideas on a budget and the budget small kitchen makeover.
Mistakes to avoid
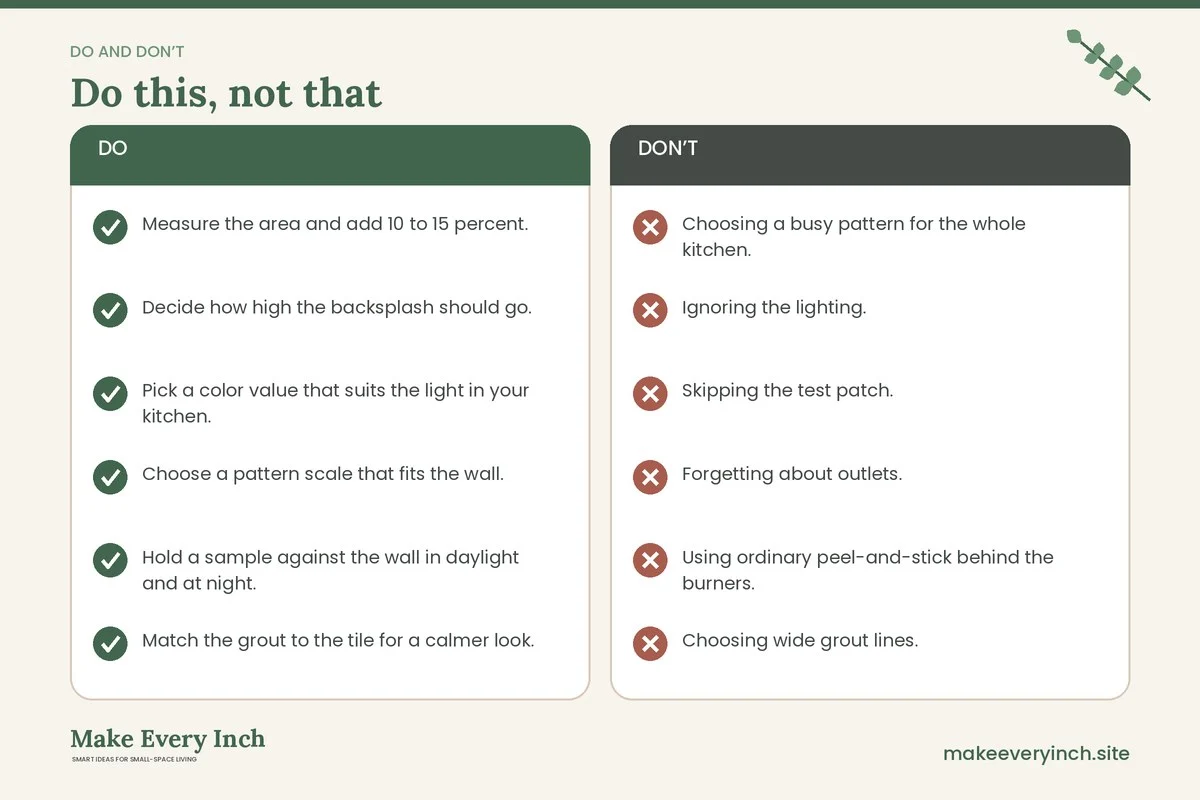
- Choosing a busy pattern for the whole kitchen. Keep bold prints to a single zone.
- Ignoring the lighting. A dark or glossy surface looks different under warm and cool bulbs, so check samples at night.
- Skipping the test patch. A sample on the wall shows how color and sheen behave in your light.
- Forgetting about outlets. Plan around them and keep power off while working near them.
- Using ordinary peel-and-stick behind the burners. Keep to products rated for heat or use a protective panel.
- Choosing wide grout lines. They collect grease and look busy.
- Not sealing the counter edge. Water gets behind the backsplash and causes damage.
Backsplash checklist
- Measure the area and add 10 to 15 percent.
- Decide how high the backsplash should go.
- Pick a color value that suits the light in your kitchen.
- Choose a pattern scale that fits the wall.
- Hold a sample against the wall in daylight and at night.
- Match the grout to the tile for a calmer look.
- Check heat ratings for the area behind the stove.
- Read the cooker and hood clearance rules.
- Switch off power before working near outlets.
- Get written permission if you rent.
- Seal the counter joint with flexible caulk.
- Plan a simple cleaning routine.
FAQ
What backsplash makes a small kitchen look bigger?
A light, glossy surface with few grout lines and a color close to the walls and cabinets usually helps. Large format tile and a tone-on-tone look make the wall feel like one smooth plane.
Can I put peel-and-stick tile behind the stove?
Only if the product is rated for that heat. Many are not, so keep ordinary sheets away from burners and use a heat-safe panel, glass or metal directly behind the cooker, following the cooker’s clearance guidance.
Does dark grout make a kitchen look smaller?
Dark grout on a light tile draws a visible grid, which adds busyness. A grout that matches the tile blurs the lines and looks calmer.
How tall should a small kitchen backsplash be?
A common height runs from the counter to the underside of the upper cabinets, around 15 to 20 inches. A full wall behind the stove can add height and protection.
How do I clean a backsplash with textured tile?
Use warm soapy water and a soft brush, wipe after cooking and dry the surface. Avoid harsh abrasives, and check the cleaner on a hidden spot first.
Will a backsplash help in a small rental kitchen?
Yes. A removable option protects the wall and refreshes the look without a permanent change. Get permission, test a sample and follow the removal steps when you move.
Is a bold backsplash a bad idea in a small kitchen?
No, but keep it contained. One pattern in a small zone, with calm surroundings, adds personality without crowding the room.
Keep going: Keep going with our guides to small kitchen makeover ideas, small kitchen storage ideas and tiny kitchen ideas.
Save this guide for later
Pin the ideas you like to Pinterest so you can come back to them when you plan your space.