DIY Room Divider Ideas for Studio Apartments
Quick answer: The best DIY room divider ideas for studio apartments are a ceiling-hung or tension-rod curtain, a low open shelf, a folding screen, a plant wall and a slatted frame. Pick by what you need most: privacy, storage or light. Keep dividers stable, leave a clear path to every exit, keep fabric away from heaters and stoves, and get permission before drilling into walls or ceilings.
DIY room divider ideas for studio apartments solve one stubborn problem: a single room has to act like a bedroom, a living room and sometimes an office. A divider gives each zone an edge, hides the bed from the front door and lets you rest your eyes from the desk. The trick is choosing a divider that fits how you live, does not block daylight, does not trap you in an emergency and does not require holes your landlord has not approved. This guide covers how to plan the split, five divider families with build notes, a comparison table, three example studios, safety rules, a checklist and an FAQ. It leans on low-cost materials and relative effort rather than exact prices, because costs vary widely by region and by what you already own. For the wider money-saving picture, read our main guide on budget small space ideas, the companion post on small space organization ideas and the sibling guide to thrifted furniture ideas for small homes, since a thrifted shelf or screen is often the cheapest divider of all.
Decide what the divider must do
Before choosing a material, name the job. Most studio dividers do one or two of these things, and rarely all four.
- Visual privacy: hiding the bed or the desk from the entrance. Needs height of roughly 5 to 7 feet and a solid or semi-solid surface.
- Storage: giving books, shoes or kitchen items a home. Needs a stable structure and a depth of about 10 to 16 inches.
- Light and air: keeping the room bright and breathable. Needs open gaps, thin fabric or glass-like panels.
- Sound softening: taking the edge off echo or a roommate’s calls. Needs mass and soft surfaces, such as thick fabric, books or cork.
Rank them. If privacy for sleep is the top need, a curtain wins. If storage matters most, a shelf wins. If your studio is already dim, choose an open slatted frame or sheer panels. If you need all four, combine two lightweight dividers instead of building one heavy wall. A curtain beside a low shelf is easier to move, cheaper to build and kinder to a lease than a single big partition.

Where to put the line
Studios usually have one window wall and one door wall. The most useful divider position protects light for the whole room and keeps the entry feeling open.
- Place the divider at right angles to the window wall so daylight reaches both zones along the length of the room.
- Keep the sleeping zone farthest from the front door and the kitchen, where noise and cooking smells are strongest.
- Avoid putting a divider directly in front of a closet door, a radiator, a vent or an electrical panel. Leave at least 36 inches clear in front of a panel and enough room for any door to open fully.
- Leave a walkway of 30 to 36 inches between the divider and the nearest furniture. A narrower gap works for a side path, not for the main route.
- Use painter’s tape on the floor to mark the line for a few days. Walk it, carry laundry through it and check whether the bed still has bedside space.
If the studio is long and narrow, divide across the short dimension and keep the longest sight line open to the window. If it is nearly square, a partial divider that covers only a third to half of the width often works better than a full wall because it keeps air and light moving.
Five families of DIY dividers
1. Curtain dividers
A curtain is the lightest, most flexible divider, and it is often the friendliest to a renter’s lease.
Tension rod and track options
A spring tension rod fits inside a doorway or an alcove with no holes, but it only holds light fabric and must span a short gap, typically under about 4 feet unless the rod is rated for more. For a wider span, a ceiling track or ceiling-hung cable gives a stronger line. These need fixings into the ceiling, so check the lease first. Some tenants use adhesive hooks rated for the fabric weight, though ceilings can be a poor surface for adhesives, so treat them as a temporary experiment and never trust them for heavy fabric.
Fabric choices
- Sheer or linen blends: keep light moving and soften edges. Little privacy by day, more by night with a lamp behind.
- Midweight cotton or canvas: a good balance. It hides the bed without turning the room into a cave.
- Heavy velvet or lined drapes: best for sound and for blocking a sleeping area from lamplight. They need a stronger mounting and more floor to hang.
- Shower curtain liners and plain sheets: a budget workaround for a first trial while you decide on a final look.
Build notes
1. Measure the ceiling height and subtract 1 to 2 inches so the fabric clears the floor or just kisses it.
2. Allow the width to be 1.5 to 2 times the track length for a gathered look.
3. Hem or use clip rings so you can adjust the length without sewing.
4. Wash and iron the fabric before hanging so shrinking does not leave it short.
5. Keep the fabric at least a couple of feet from any heater, stovetop or open flame, and choose flame-retardant-labeled or naturally slow-burning fabrics near cooking zones where possible.
2. Shelf dividers
A low open shelf splits the room while giving you somewhere to put things. It is the best choice if your studio is short on storage.
Choosing the shelf
Look for an open-back unit, ideally 10 to 16 inches deep and no taller than about 5 feet, so the room still reads as one space. Cube units, ladder shelves and tall bookcases all work. A secondhand bookcase is often the cheapest route, and the extra weight helps stability. See our guide to the best narrow bookshelves for the features to look for, and renter-friendly shelving for ways to avoid wall damage.
Making it stable
- Anchor tall units to a wall stud with the supplied bracket or a strap, but only if your lease allows a small hole. If drilling is not allowed, use a low unit (under about 4 feet), put the heaviest items on the bottom shelves and consider a freestanding pair back to back so they brace one another.
- Never use a tall, narrow shelf that stands alone as a divider if children or pets move through the studio.
- Check the floor for slope. A wobble can often be fixed with felt shims under one foot.
- Keep the heaviest items low, and avoid stacking large objects above shoulder height.
Making it work as a divider
Add a fabric back, a wooden slat back or a few baskets facing the bed side so it feels private. Leave the top shelf for lightweight plants or baskets so you can still see across the room.
3. Folding screens
A folding screen is the classic, and it is easy to build from scratch.
Basic build
1. Buy or salvage three or four door-sized panels, or build frames from lumber, such as 1 by 2 inch strips, glued and screwed at the corners.
2. Cover the frames with fabric, canvas, thin plywood or a woven material such as rattan or cane webbing.
3. Join the panels with hinges that let the screen fold both ways (a zigzag shape stands more steadily than a straight line).
4. Sand every cut edge, and finish wood with a low-VOC water-based sealer or paint if you are working indoors.
Stability rules
- A zigzag or a three-sided shape is stable because its footprint is wider than a single flat panel.
- Add small rubber feet to protect floors and reduce sliding.
- Do not make a screen taller than about 6 feet unless the base is wide. A tall, thin screen will tip if bumped.
- Keep screens away from doors that swing, as a gust can push the panels over.
Light
Choose open weave, semi-translucent or louvered panels where daylight matters, and solid ones only around a bed.
4. Plant dividers
A plant wall adds life and softens the line between zones, and it filters light in a pleasing way.
Options
- A tall plant shelf or etagere: a freestanding rack with pots at different heights. Lightweight and renter-safe.
- Hanging planters from a ceiling hook or track: a strong visual divider, but they need a ceiling fixing, so confirm permission first.
- Large floor plants in a row: a few big pots on a low bench or on a rolling plant stand can form a living screen.
- A trellis with climbers: a freestanding trellis in a trough, trained with lightweight climbers, gives a green panel with a natural gap for light.
Practical notes
- Match plants to the light the divider position gets. A divider that blocks the window can starve the plants behind it.
- Use saucers and a waterproof tray under every pot to protect floors.
- Water-heavy hanging pots add weight. Choose lighter pots and potting mix and check the fixing’s load rating.
- Some common houseplants can be harmful if chewed by pets or children, so check the plant list before buying if you share the space with either.
- Keep leaves away from heaters and lamps with hot bulbs.
5. Slatted and lattice dividers
A slatted frame gives the feel of a wall without blocking light, and it is a strong DIY project because the parts are simple.
Build notes
1. Plan a frame of 2 by 2 or 1 by 3 inch lumber, with a base feet design that is at least as wide as the panel is tall divided by three.
2. Cut slats to the same length and space them evenly, with gaps between about 1 and 3 inches, depending on how open you want the view. A spacer block makes this quick.
3. Glue and screw, or use pocket-hole joints, to fix the slats to the frame.
4. Sand, then finish with low-VOC paint or sealer. Work near an open window or outdoors, wear a mask for sanding, and let the finish cure fully before bringing the piece in.
5. Add an L-shaped foot or a wide base, and consider a pair of panels forming an L to brace one another.
Where it fits best
Slatted dividers suit entry areas and desk zones, where you want a sense of separation but still need sightlines and daylight. They also hold a few hooks for bags or a mirror.
Comparison table
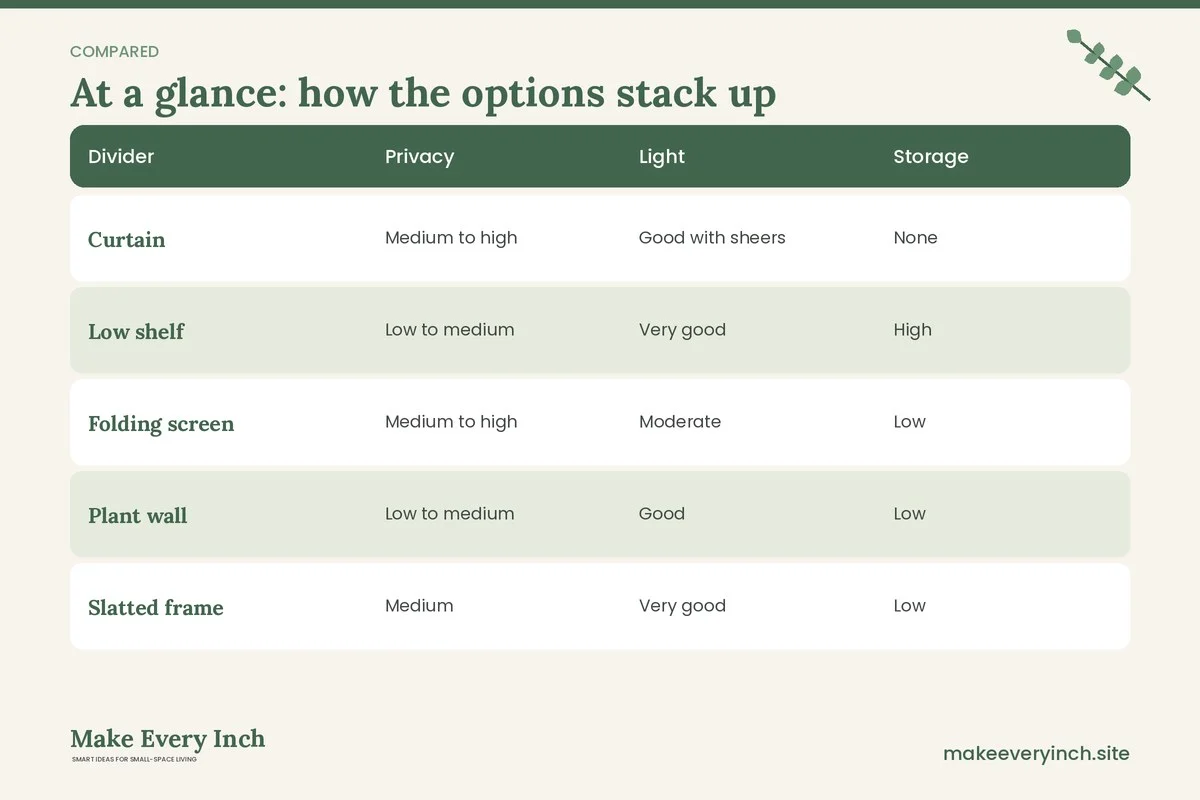
| Divider | Privacy | Light | Storage | Stability need | Renter fit | Effort and cost level |
|---|---|---|---|---|---|---|
| Curtain | Medium to high | Good with sheers | None | Low, depends on mount | High with tension rod, medium with ceiling track | Low effort, low cost |
| Low shelf | Low to medium | Very good | High | Medium to high (anchoring for tall) | High if freestanding and low | Low to medium effort, low to moderate cost |
| Folding screen | Medium to high | Moderate | Low | Medium (zigzag footprint) | Very high | Medium effort, low to moderate cost |
| Plant wall | Low to medium | Good | Low | Low to medium | High if freestanding | Low effort, ongoing care |
| Slatted frame | Medium | Very good | Low | Medium (wide base) | Very high | Medium to high effort, moderate cost |
Use the table as a starting point. In many studios a hybrid wins, such as a low shelf with a curtain on a ceiling cable, or a slatted panel with a few plants in front.
Safety first: fire, egress and stability
A divider changes how air, people and smoke move through a small room. A few rules keep it safe.
- Never block an exit. Keep a clear, straight path from the bed to the main door, and keep the window and any fire exit unobstructed. Do not place a divider where you cannot reach the door in the dark in a few steps.
- Keep fabric away from heat. Hold curtains at least a couple of feet from stoves, space heaters, radiators and candles. Do not use a divider as a drying rack above a heater.
- Check smoke and carbon monoxide alarms. A divider that blocks a detector can delay a warning. Keep dividers clear of ceilings where alarms are mounted, and confirm alarms are working. If a divider creates a sleeping zone far from the alarm, consider asking your landlord about an additional one.
- Respect the sprinkler zone. If your building has ceiling sprinklers, never hang anything from or near them, and keep fabric below the clearance recommended in your building’s rules.
- Anchor tall pieces. Wall-anchor any bookcase over about 4 feet, using a stud and the hardware supplied, but only with the landlord’s written consent where holes are involved.
- Ask before drilling. Ceiling and wall fixings, including track mounts and hooks, may breach a lease or damage a fire-rated surface. Check the lease and ask in writing. If the answer is no, choose tension rods, freestanding frames and furniture.
- Use tools safely. Wear eye protection when sawing, drilling or sanding, clamp workpieces, cut on a stable surface and keep blades sharp. If you are not comfortable with a power tool, use hand tools or ask a handy friend.
- Ventilate when finishing. Use low-VOC water-based paints and sealers, open windows and run a fan for the drying period. Stay out of the room while the finish cures if the smell is strong.
- Check electrical clearances. Never cover outlets, power strips or lamp cords with fabric. If you add a lamp to a divider, use LED bulbs, which stay cooler, and keep cords out of the walkway.
Three example studios
Example 1: The 400 square foot rectangle
A long, narrow studio with a window at one end. The sleeper wants privacy without losing daylight. The plan: a midweight cotton curtain on a ceiling cable one-third of the way from the window, a low shelf unit on the floor at the foot of the bed for books and shoes, and a floor lamp on the living side. The curtain pulls back by day to let daylight run the full length. The tall bookcase stays on the window wall, anchored with the landlord’s approval. A path of 34 inches runs from the bed to the front door, with no part of the curtain crossing it when drawn open. Effort is low, cost is low to moderate, and everything can be taken apart in an afternoon.
Example 2: The near-square renter with no drilling allowed
The lease bans holes. The plan: a folding screen built from three framed canvas panels in a zigzag around the bed, a tension-rod curtain across the closet alcove for a changing corner and a rolling plant stand on the side facing the sofa. The screen stands 5.5 feet tall so it does not feel like a wall. Rubber feet protect the floor, and the screen folds flat behind the wardrobe when guests arrive. For more no-hole ideas, see our guide to no-drill storage ideas for renters and the security deposit safe apartment upgrades post.
Example 3: The work-from-home studio
The desk shares a room with the bed and needs a visual break at the end of the workday. The plan: a slatted frame between desk and bed, around 5 feet tall with 2 inch gaps so light passes, a pair of hooks for headphones and a bag, and a trailing plant on a stand in front. After work, the desk gets a fabric cover or a rolling cart tucks it away. For desk choices, see the best desks for small apartments. The result keeps the sense of a bedroom without making the studio dark.
Light and layout tricks
Dividers can darken a studio if they sit between the window and the rest of the room. These habits keep the space bright.
- Pick divider heights that stop below the top of the window so the light spills over.
- Use pale colors on the side facing the window and darker ones on the sleeping side.
- Add a mirror on the wall opposite the window to carry daylight toward the bed zone, with a secure hanging method that your lease allows.
- Put a small lamp inside the divider zone so the area behind it does not feel gloomy in the evening. For lighting that avoids hardwiring, see renter friendly lighting ideas.
- If your studio is already dim, read our tips on dark apartment ideas before choosing a heavy fabric.
Sound and privacy
A divider does not make a wall, but it can help. Thick fabric, books, cork panels and rugs absorb echo. A rug under the divider zone and a heavy curtain on the sleeping side can make the room feel quieter. If you share your studio with a partner or roommate, agree on a signal for closed curtains, such as a pulled-closed curtain meaning quiet time.
Working with what you already own
Many studio dividers are made from things already in the home.
- A tall bookcase turned sideways.
- A wardrobe or dresser placed perpendicular to the wall. See the best small dressers for sizes that suit a divider role.
- A sturdy clothing rack with a curtain or sheet over it. Make sure it is stable and not overloaded.
- A ladder with a few hanging baskets, if it is leaned safely and the base is wide.
- A pair of garden trellis panels hinged together.
- Stacked crates, screwed or strapped together, if you have the skills and a secure surface.
Combine one of these with a rug and a lamp, and the zone is defined. Use hidden storage ideas to turn the back of a divider into a stash for bedding, bags or off-season items.
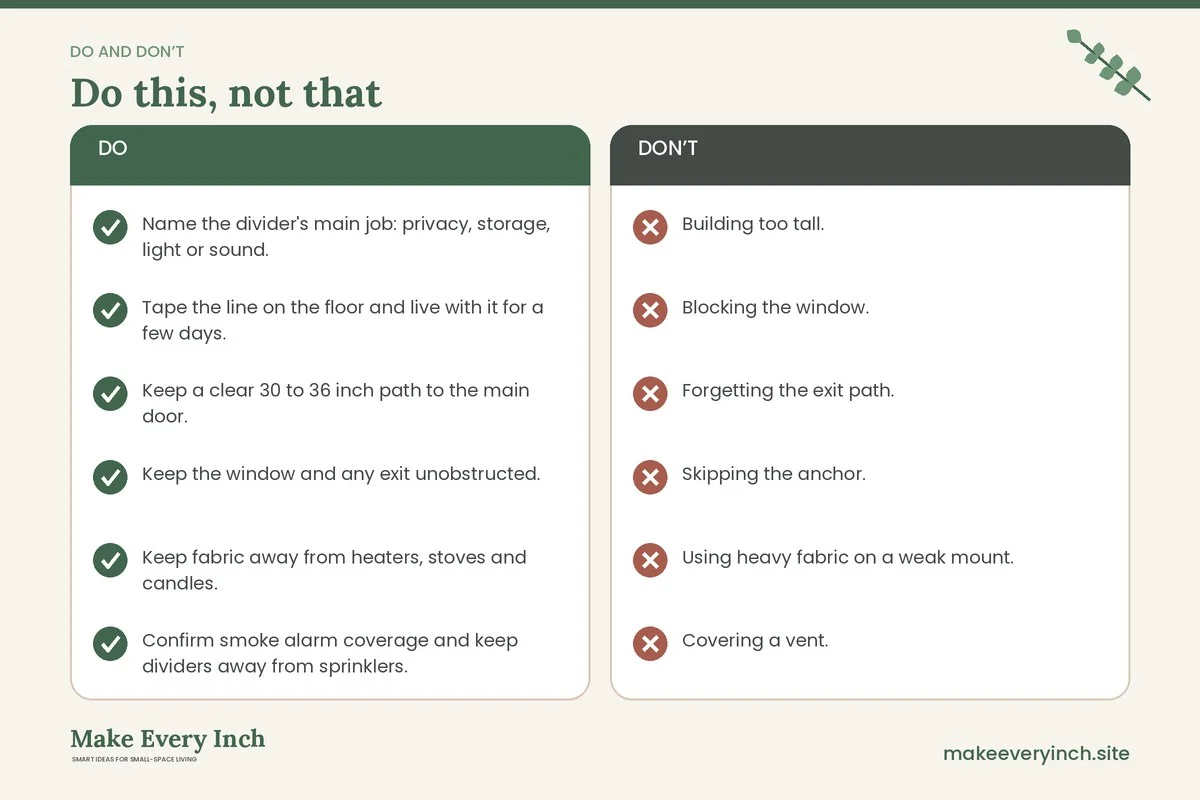
Mistakes to avoid
- Building too tall. A divider over about 6 feet can make the room feel boxed in and may block smoke alarm coverage.
- Blocking the window. Place dividers across the room, not in front of the glass.
- Forgetting the exit path. Walk the route in the dark before you commit.
- Skipping the anchor. An unsecured tall shelf is a tipping hazard.
- Using heavy fabric on a weak mount. A tension rod or adhesive hook can fail with a thick curtain. Match fabric weight to the fixing.
- Covering a vent. Blocking a heating or cooling vent makes the area stuffy.
- Ignoring finishes. Fresh paint and sealer need ventilation and curing time before they go in a bedroom.
- Buying before measuring. Tape out the footprint and test the path before you cut anything.
Weekend DIY plan
If you want to build a divider in a weekend, this sequence keeps the work manageable.
1. Friday evening: measure the room, tape the line on the floor, decide the job (privacy, storage, light, sound) and pick one family of divider.
2. Saturday morning: gather materials, check the lease for any fixings and list the tools. Choose low-VOC paint or sealer and plan a ventilated place to work.
3. Saturday afternoon: cut, sand and assemble. Wear eye protection and a dust mask.
4. Saturday evening: apply finish and leave it to cure in a ventilated area.
5. Sunday: place the divider, check stability by pushing gently at the top, walk the exit path, test the light and adjust.
If any step needs a ceiling fixing, wait until you have written permission. A freestanding option is always an acceptable fallback.
Checklist
- Name the divider’s main job: privacy, storage, light or sound.
- Tape the line on the floor and live with it for a few days.
- Keep a clear 30 to 36 inch path to the main door.
- Keep the window and any exit unobstructed.
- Keep fabric away from heaters, stoves and candles.
- Confirm smoke alarm coverage and keep dividers away from sprinklers.
- Anchor any tall unit, with permission for holes.
- Choose low-VOC finishes and ventilate while they dry.
- Wear eye protection and use a stable workspace.
- Check weight limits on rods, hooks and tracks.
- Keep cords and outlets clear of fabric.
- Test the divider’s stability with a gentle push before relying on it.
FAQ
What is the cheapest DIY room divider for a studio?
A tension-rod curtain or a thrifted folding screen is usually the lowest-cost route. A secondhand bookcase can also be low-cost and adds storage, so compare local listings before buying new.
Can I add a divider without drilling?
Yes. Freestanding screens, low shelves, plant stands, tension rods and rolling racks all work without holes. Ceiling tracks and hooks usually need fixings, so ask your landlord first.
How tall should a studio divider be?
For privacy, aim for roughly 5 to 6 feet. For storage and a lighter look, stay around 3 to 4 feet. Dividers close to the ceiling can block light and alarm coverage.
Is it safe to put a divider near the bed?
Yes, if the exit path stays clear, fabric stays away from heat, and tall items are anchored or low enough to be stable. Walk the route in low light before you commit.
Will a divider make my studio feel smaller?
A solid, tall divider can. Open shelves, slatted panels, sheer curtains and partial dividers keep light and sightlines, which helps the room feel bigger.
What finish should I use on a DIY divider?
Choose low-VOC water-based paint or sealer, work with the windows open and let the finish cure before bringing the piece into a sleeping area.
Keep going: Keep going with our guide to diy apartment upgrades, the roundup of small apartment living room ideas for studios and the post on thrifted furniture ideas for small homes.
Save this guide for later
Pin the ideas you like to Pinterest so you can come back to them when you plan your space.