Small Entryway Before and After Ideas: 12 Makeover Plans
Quick answer: A small entryway before after makeover works best when you fix problems in order: clear the floor, give every daily item one hook or shelf at the right height, add a light and a mirror, then style last. Keep 30 to 36 inches of clear path, anchor anything tall, and ask before drilling in a rental.
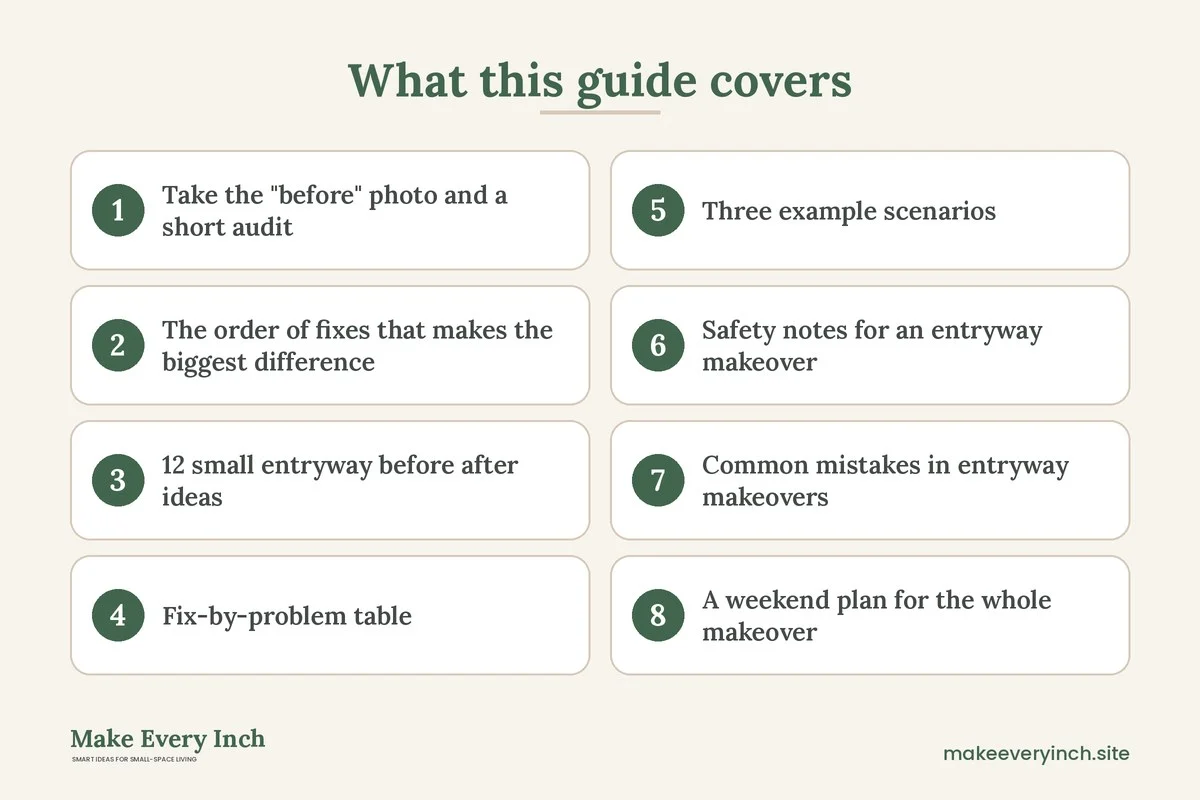
A small entryway before after makeover is easier to plan when you can picture the starting point and the finish side by side. Most tiny entries begin the same way: a door that opens into a pile of shoes, a coat hanging from a doorknob, mail on the nearest flat surface and one dim bulb overhead. The finished version rarely needs more space. It needs a clear floor, a smarter use of the wall and a few habits. This guide walks through how to document your own starting point, the order of fixes that gives the biggest change, 12 makeover ideas, three example scenarios written as before and after plans, a fix-by-problem table, safety notes and a checklist. For the wider topic, read our main guide to small entryway ideas, the practical post on small entryway organization and the clutter-focused guide to small entryway ideas that keep clutter under control.
Take the “before” photo and a short audit
A makeover is easier to judge when you can compare it with a record. Stand in the doorway with the door closed and take one wide photo of the entry. Take a second photo from inside the home looking toward the door. Photograph the floor, the wall beside the door and the ceiling light too. These pictures matter for three reasons. They show you problems you have stopped noticing, they help you see progress and, in a rental, they document the original condition of walls and floors.
Next, run a five-minute audit with a notepad. Write down:
- What lands here every day. Common items are shoes, coats, bags, keys, mail, an umbrella, a pet leash, a helmet or a stroller. Count pairs of shoes and coats in daily use, not the total you own.
- What does not belong. Delivery boxes, recycling, a tool bag or a vacuum often live in the entry by default. Mark each one for a new home elsewhere.
- Where the traffic goes. Open and close the door, then walk in with your arms full. Notice where you step, where you drop the bag and where you stop to take off shoes.
- What the door does. Note whether the door opens in or out, how far it swings and whether it hits furniture. A swing of 30 to 36 inches clear in front of the door is a common target.
- What is on the walls and ceiling. Note whether there is a switch, an outlet, a thermostat or a panel that must stay reachable.
Finish the audit by measuring. Record the width and depth of the entry, the wall length beside the door and the distance from the floor to the lowest ceiling feature. These four numbers decide what can fit, so write them next to your photos.
The order of fixes that makes the biggest difference
Many people start with decoration and wonder why the entry still feels messy. A better order is below. Each step makes the next one easier, so resist the urge to skip ahead to the mirror.
Step 1: Clear the floor
Remove everything that is not shoes in daily use. Pull out boxes, bags and seasonal items. A floor you can see makes the entry feel larger within minutes, and it shows you how much real storage you need. Keep at most one pair of shoes per person on the floor, and move the rest to a closet or a shelf.
Step 2: Give each daily item one home
Assign every item on your audit list a specific hook, tray, basket or shelf. If two things share a home, one of them will be left on the floor. Keys get one hook or bowl, the bag gets one hook, the coat gets one hook and the shoes get one shelf slot. The goal is that dropping an item takes one motion.
Step 3: Use the wall before the floor
In a small entry the wall above the knee is the most valuable surface. A row of hooks, a slim shelf and a mirror all live there without using any floor area. Plan the wall as three zones: hooks at about 60 to 66 inches for adult coats, a shelf or ledge at about 40 to 44 inches for keys and mail and a low zone below 18 inches for shoes. Add a second, lower hook row at 36 to 42 inches if children live with you.
Step 4: Fix the light
A dim entry feels smaller than it is. Replace a harsh or weak bulb with a warm one at a comfortable level, or add a plug-in sconce or a small lamp on a shelf. Light that reaches the corners makes the walls recede. Keep electrical safety in mind and see the notes below.
Step 5: Add reflection and color
Only now add a mirror, a paint touch or a rug. A mirror across from the door or beside it bounces light and gives you a last-look check before leaving. A light, warm color on the walls makes the narrow space calmer. Our guide to small room mirror placement ideas covers where to hang one so it reflects light instead of clutter.
Step 6: Style the last 10 percent
A single plant, a small tray, one piece of art and a doormat finish the entry. Style the surfaces only after the working parts are in place. Otherwise the decor becomes a place to dump things.
12 small entryway before after ideas
Fixes for the floor
1. Before: shoes in a heap. After: a shallow rack or tray
A heap of shoes by the door becomes a short rack, a boot tray or a shelf with slots. Limit it to the pairs you actually wear this season. A shallow shoe cabinet is useful when the entry is only 8 to 12 inches deep along one wall. See our list of the best narrow shoe cabinets for what to look for in a slim design.
2. Before: a doormat that slides. After: a low pile mat that sits flat
A thick, curled mat catches the door and trips people. Choose a low pile mat in a size that fits the space inside the door, and use a grip pad underneath so it does not shift. A mat that is 24 by 36 inches suits a narrow entry, and it should be thin enough that the door clears it.
3. Before: a bare, scuffed floor. After: a runner or a washable mat
A narrow runner that fits the hall width, with 2 to 4 inches of floor visible on each side, defines the zone. It also protects the floor from wet shoes. Choose a flat weave and use a non-slip pad rated for your floor type.
Fixes for the wall
4. Before: coats on the doorknob. After: a row of hooks
A rail with three to five hooks at 60 to 66 inches holds the coats of a household. In a rental, choose adhesive hooks within their weight rating, or use an over-the-door rack. Check the lease before drilling, and never drill without permission. Our post on no-drill storage ideas for renters lists options that leave the wall unmarked.
5. Before: mail on the nearest surface. After: a slim shelf with a catch tray
A 4 to 6 inch deep shelf at about 40 inches holds keys, sunglasses and a small tray. Add a vertical file or a narrow letter holder so mail has a slot, not a pile. Sort mail at the door and recycle on the spot.
6. Before: a blank wall. After: a mirror and one piece of art
One mirror about 24 by 36 inches, hung or leaned, doubles the light and gives you a last check. Keep the art to one frame, since a gallery in a tiny entry reads as clutter. For layouts, see small entryway wall decor ideas.
Fixes for the light
7. Before: one harsh ceiling bulb. After: warm light at two levels
A warm bulb overhead and a small lamp or plug-in sconce at shelf height make the entry glow. Aim for light that falls on faces and the mirror rather than straight down. For more on this, read our guide to renter-friendly lighting ideas.
8. Before: a dark corner. After: a battery or plug-in light
Where there is no outlet, a battery-powered light or a stick-on lamp brightens a shelf. Choose a unit with a switch you can reach and keep any cord clear of the door swing.
Fixes for seating and storage
9. Before: standing on one foot to put on shoes. After: a narrow bench or stool
A bench 12 to 14 inches deep and 36 to 42 inches wide gives a place to sit and a shelf beneath. If the entry is smaller, a stool that tucks under a shelf does the job. See small entryway bench ideas for sizes.
10. Before: bags on the floor. After: a basket or a bag hook
A lidded basket or a large hook holds bags and totes. A basket on a low shelf also catches gloves and scarves in winter. Choose a stable basket that cannot tip onto a child or a pet.
11. Before: no closet. After: a freestanding hall tree or a slim cabinet
A freestanding rack with hooks and a shoe shelf stands where a closet should be. It must be anchored to the wall with the right hardware if it is tall, which means getting permission in a rental. See small entryway ideas with no closet for more options.
12. Before: a cluttered surface. After: a drop zone with limits
A tray or a bowl for keys, a charging spot and a mail slot make the surface useful. Fix a rule that anything that does not fit the tray is put away. The limit is the real makeover, since the tray keeps the entry tidy on busy days.
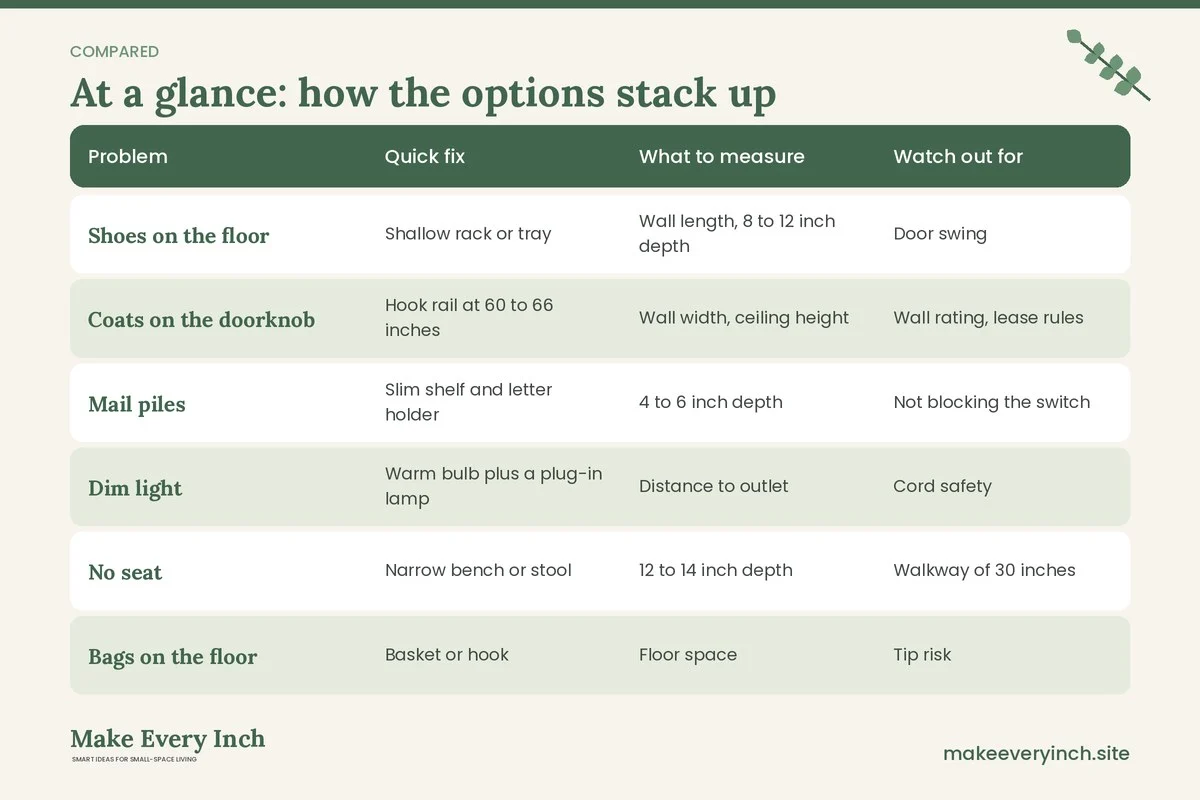
Fix-by-problem table
Use this table to pick the fix that matches your entry’s biggest problem. Start with the one at the top of your audit list.
| Problem | Quick fix | What to measure | Watch out for |
|---|---|---|---|
| Shoes on the floor | Shallow rack or tray | Wall length, 8 to 12 inch depth | Door swing |
| Coats on the doorknob | Hook rail at 60 to 66 inches | Wall width, ceiling height | Wall rating, lease rules |
| Mail piles | Slim shelf and letter holder | 4 to 6 inch depth | Not blocking the switch |
| Dim light | Warm bulb plus a plug-in lamp | Distance to outlet | Cord safety |
| No seat | Narrow bench or stool | 12 to 14 inch depth | Walkway of 30 inches |
| Bags on the floor | Basket or hook | Floor space | Tip risk |
| No closet | Slim cabinet or hall tree | Height, depth, width | Anchor tall items |
| Cramped feel | Mirror opposite light | Wall height | Glare and weight |
Three example scenarios: before and after
The three plans below are written as example scenarios to show how to apply the order of fixes. They use typical room sizes, so adjust the numbers to your own entry.
Scenario 1: The door opens straight into the living room
Before. A rental apartment has a front door that opens into the living room, with no foyer. Shoes sit on the carpet beside the sofa, coats hang on a dining chair and keys land on the TV console. The path from the door to the sofa is 24 inches wide.
Plan. Mark a 3 by 4 foot rectangle beside the door with painter’s tape, and decide that this is the entry. Place a narrow shoe cabinet, 10 inches deep, against the wall. Hang a set of adhesive hooks on the wall above, at 62 inches for coats and 40 inches for bags. Put a tray on top of the cabinet for keys, with a small plug-in lamp. Add a runner that is 24 by 48 inches in front of the door to mark the zone.
After. The entry reads as a defined space, even though no walls were added. The path to the sofa is 36 inches wide because the chair is gone, and every daily item has a home. For a closely related set of ideas, read small home entryway ideas when there is no foyer.
Scenario 2: A narrow hallway entry with one closet
Before. An entry that is 40 inches wide and 6 feet long has a closet on one side and a bare wall on the other. The closet is full of seasonal gear, so coats pile on the floor. The ceiling bulb is bright and cold.
Plan. Clear the closet of anything that is not a coat or a shoe, and move the seasonal items to under-bed boxes. Add a second rod at 40 inches inside the closet for kids’ coats or bags. On the bare wall, hang a shallow ledge shelf at 42 inches, 5 inches deep, with a mirror above. Swap the bulb for a warm one and add a runner that leaves 2 inches of floor on each side.
After. The closet holds the coats, the wall holds the keys and the mirror, and the floor is open. The walkway stays at 30 to 34 inches after the shelf is added. For the same hallway with a different focus, read the guide to narrow entryway ideas for better flow.
Scenario 3: A family entry with shoes and school bags
Before. A small entry serves four people. There are eight pairs of shoes, four backpacks and a stroller wheel poking into the walkway. Hooks hold three coats, and the rest are on the floor.
Plan. Choose a bench with cubbies, 14 inches deep, on the longest wall. Allocate one cubby per person and a basket per cubby for gloves. Add a double row of hooks, one at 60 inches for adults and one at 40 inches for children. Fold the stroller and store it in a closet or a corner with a cover. Anchor the bench and any tall piece to the wall with the proper hardware, with permission in a rental. For more family ideas, read small entryway organization for families.
After. Each person has a hook and a cubby with their name or color on it. The floor is clear, and the morning routine is quick, since everything has an obvious place.
Safety notes for an entryway makeover
A tidy entry should also be a safe entry. Keep these points in mind.
- Anchor tall furniture. Any cabinet, hall tree, tall shoe unit or bookcase that is taller than it is deep should be anchored to a wall stud with the correct hardware. This matters most in homes with children or pets. If you rent, ask for permission before drilling, and choose a freestanding piece with a low center of gravity if the answer is no.
- Never drill without permission. Check the lease first. Adhesive hooks and leaning pieces are common alternatives. If you do get permission, check for hidden wires and pipes before drilling.
- Respect weight limits. Adhesive hooks and shelves list a weight limit. Heavy coats and wet bags weigh more than you think, so stay well under the limit and spread the load.
- Keep the exit clear. The path to the door must stay open at all times. Do not put furniture where it blocks the door’s swing or the way out in an emergency.
- Watch the electrical load. Use only one device per outlet, avoid daisy-chaining power strips and keep cords away from the door swing and from foot traffic. Do not run a cord under a rug.
- Use safe floor mats. A mat should lie flat and have a non-slip backing, since wet shoes make entries slippery.
- Protect children and pets. Keep small items, such as coins or pins, out of reach. Choose lidded baskets, secure heavy mirrors with proper fixings and keep leashes and cords away from toddlers.
- Choose low-VOC paint. If you repaint the walls, pick a low-VOC paint, ventilate the space and allow the paint to dry before you put items back. Check the lease before painting.
Common mistakes in entryway makeovers
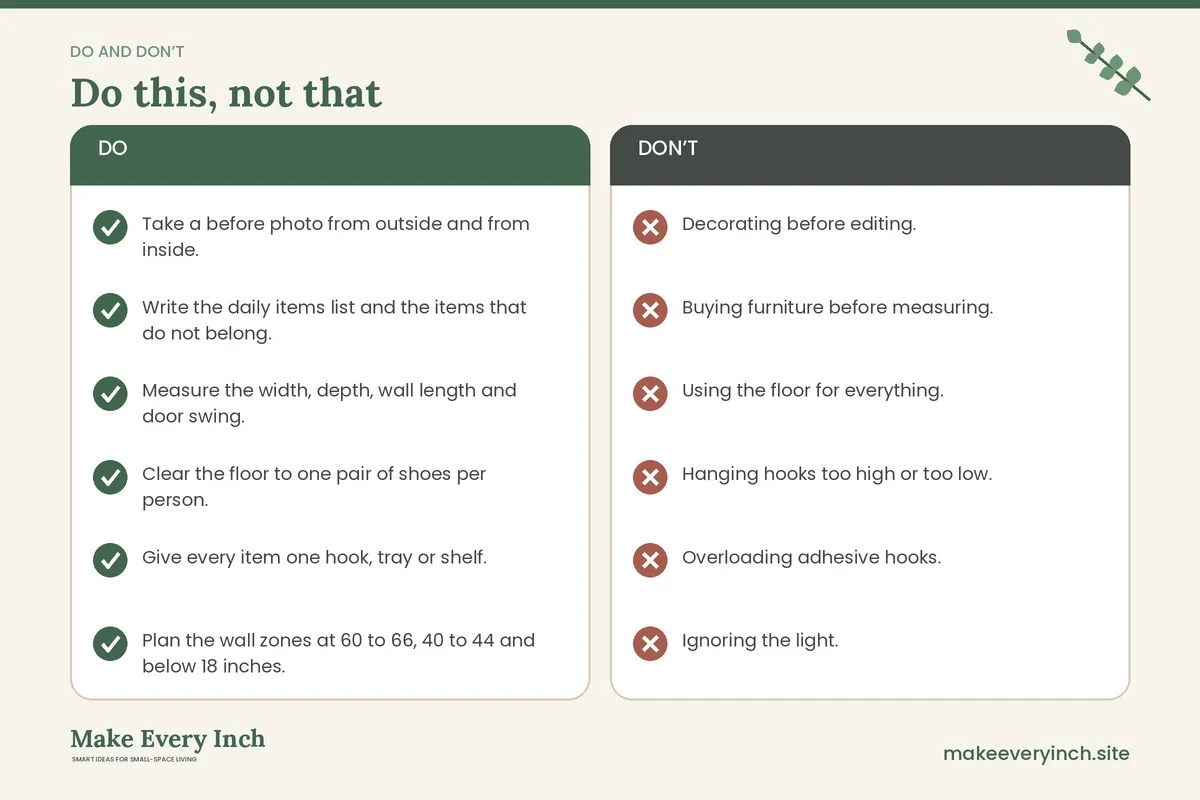
- Decorating before editing. A new mirror and a rug do not help if the floor is still full of shoes.
- Buying furniture before measuring. A cabinet that fits on paper can block the door swing. Tape its footprint on the floor first.
- Using the floor for everything. The wall is your best asset in a tiny entry, so go vertical.
- Hanging hooks too high or too low. Hooks at the wrong height mean the coat ends up on the floor. Test the height by holding a coat against the wall.
- Overloading adhesive hooks. A wet coat and a bag can exceed the rating. Spread them across more hooks.
- Ignoring the light. A dark entry feels cramped, and good lighting fixes this quickly.
- No limit on the drop zone. A tray without a rule turns into a pile. Decide what is allowed and clear it weekly.
A weekend plan for the whole makeover
A small entry can be rebuilt in a weekend if you split the work into short blocks.
- Saturday morning: take the photos, run the audit and measure. Clear the floor and move the extras to other rooms.
- Saturday afternoon: decide on the storage and buy or gather it. Tape the footprints on the floor and check the door swing.
- Sunday morning: install the hooks, the shelf and the lighting, with permission where needed. Set up the shoe storage and the tray.
- Sunday afternoon: add the mirror, the mat and one decor piece. Take the “after” photos from the same spots as the “before” photos.
If time is short, do only steps 1 to 3 from the order of fixes. These give most of the visible change.
Keeping the “after” looking like the “after”
A makeover lasts only if the habits do. Use a short weekly routine. Spend two minutes on the same day each week to return shoes to the rack, empty the tray and sort the mail. Rotate the seasonal items every few months. If something has no home after a month, either find it one or let it go. Our guide to small home organization that actually lasts explains how to design systems that survive busy weeks.
Checklist
- Take a before photo from outside and from inside.
- Write the daily items list and the items that do not belong.
- Measure the width, depth, wall length and door swing.
- Clear the floor to one pair of shoes per person.
- Give every item one hook, tray or shelf.
- Plan the wall zones at 60 to 66, 40 to 44 and below 18 inches.
- Keep a path of 30 to 36 inches.
- Fix the light with a warm bulb or a plug-in lamp.
- Add a mirror that reflects light.
- Anchor tall pieces and check the lease before drilling.
- Take the after photo from the same spot.
FAQ
What is the first thing to change in a small entryway?
Clear the floor. Removing extra shoes, bags and boxes shows how much space you really have, and it makes every later step easier.
How do I make a small entryway look bigger?
Keep the floor clear, add a mirror, use warm light and choose a light, calm wall color. Using the wall for storage instead of the floor also helps.
How much space do I need for an entryway?
A usable entry can be as small as 3 by 4 feet, as long as there is a clear path of 30 to 36 inches and room to open the door. Smaller entries rely on wall storage.
Can I do an entryway makeover in a rental?
Yes. Use adhesive hooks within their weight ratings, freestanding furniture, leaning mirrors and plug-in lights. Ask in writing before drilling or painting.
What if I have no closet or foyer?
Define an entry zone with a mat or runner, add a slim cabinet and a hook rail, and treat that corner as the entry. Our guide to apartment entryway decorating shows how to do this in an open plan.
How do I keep the entry tidy after the makeover?
Give every item a home, limit the tray and spend two minutes a week returning things. A small routine matters more than any piece of furniture.
Keep going: Ready to start your own makeover? Read small entryway ideas, plan your storage with small entryway storage and add comfort with small entryway bench ideas.
Save this guide for later
Pin the ideas you like to Pinterest so you can come back to them when you plan your space.