How to Organize a Small Kitchen
Quick answer: To organize a small kitchen, work in six steps over a weekend: empty one area at a time, sort every item into keep, relocate, donate or discard, assign zones by task, contain items in bins and risers, label what needs it, and set a short weekly routine to maintain the result. Put daily items between knee and shoulder height, and store seldom-used items high or low.
Knowing how to organize a small kitchen is less about buying containers and more about following the right order. Most people start by shopping for bins, then discover that the kitchen holds twice as much as the bins can carry. The process below fixes that by putting the decisions first and the products last. It runs from an empty counter to a kitchen that stays tidy, and it fits into a single weekend. You will find a timeline, a sorting guide, a zone table, container advice, three example kitchens, a maintenance routine, mistakes to avoid and a checklist. For the wider topic, see our main guide to small kitchen ideas, the pillar on small kitchen storage ideas and the companion how-to on adding counter space to a small kitchen. If you want a shorter list of ideas instead of a process, our post on small kitchen organization ideas covers that.
The weekend plan at a glance
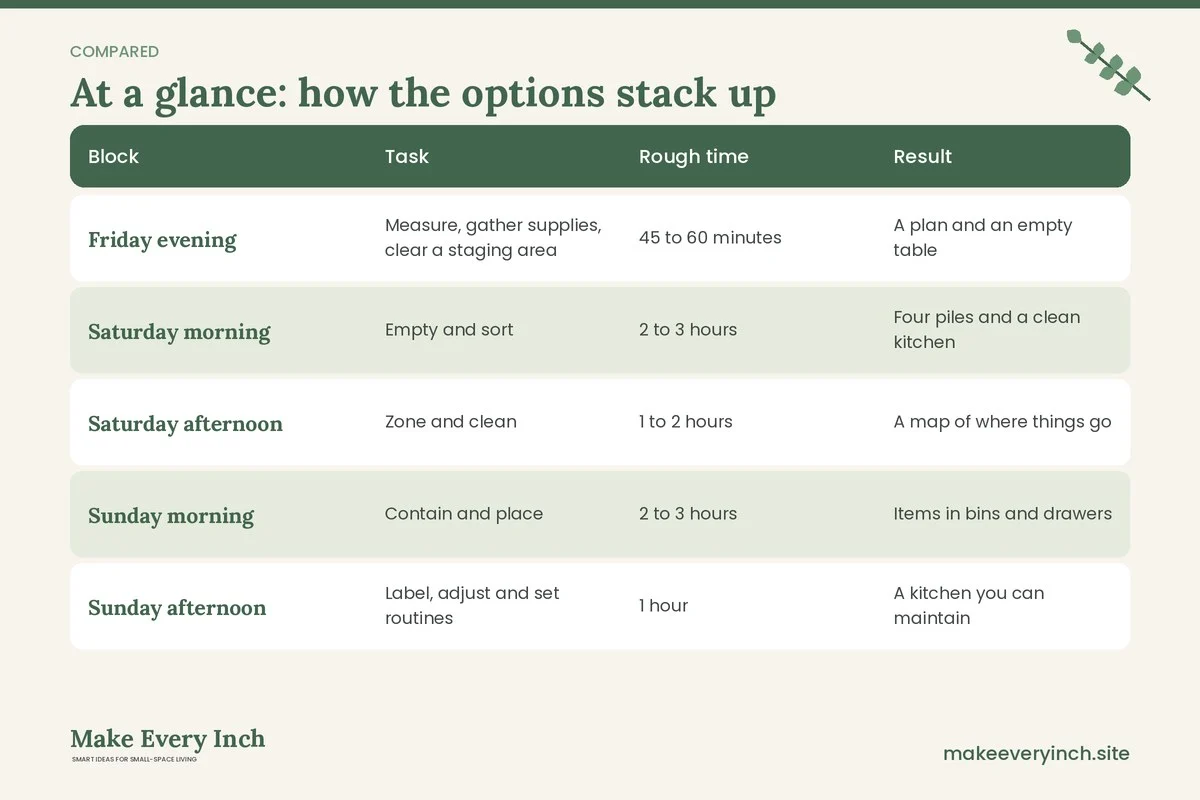
A kitchen has many small items, so it is easy to lose momentum. Splitting the work into timed blocks keeps it manageable. These times are rough and depend on how much you own.
| Block | Task | Rough time | Result |
|---|---|---|---|
| Friday evening | Measure, gather supplies, clear a staging area | 45 to 60 minutes | A plan and an empty table |
| Saturday morning | Empty and sort | 2 to 3 hours | Four piles and a clean kitchen |
| Saturday afternoon | Zone and clean | 1 to 2 hours | A map of where things go |
| Sunday morning | Contain and place | 2 to 3 hours | Items in bins and drawers |
| Sunday afternoon | Label, adjust and set routines | 1 hour | A kitchen you can maintain |
If you have more time, do one cabinet per evening for a week. The order stays the same.
Step 0: Prepare before you empty anything
Choose a clear surface for staging. A dining table, a bed covered with a sheet or the living room floor works. Gather trash bags, a donation box, a box for items that belong in other rooms, cleaning spray, cloths, a marker, painter’s tape and a notebook. Take photos of each cabinet and drawer, which helps you remember where things were and shows the progress.
Measure the inside of your cabinets, drawers and shelves in width, depth and height, and write the numbers in the notebook. These measurements will stop you from buying a bin that does not fit. Note the door swings and any shelves that can be raised or lowered. Check that shelf supports are secure before loading them.
Step 1: Empty
Empty one zone at a time, not the whole kitchen. A zone might be the cabinet next to the stove or the drawers under the counter. Emptying everything at once creates a mess that is hard to recover from, especially if you cook daily.
Start with the counters, because they show what you really use. Move everything onto the staging area. Then take out the contents of one cabinet or drawer at a time. As you pull things out, wipe the empty shelf, check for expired food, and look for pests or leaks. Dry the surface before you replace anything.
Do not reload anything yet. The point of this step is to see everything you own, because clutter hides when it lives at the back of a cabinet.
Step 2: Sort
Sort each item into one of four piles.
- Keep in the kitchen. You use it and it belongs here.
- Relocate. It is useful but does not belong in the kitchen, such as a vase, a box of batteries or a craft item.
- Donate or sell. It works but you do not use it.
- Discard or recycle. It is broken, expired, stained or missing parts.
Questions that make sorting easier
- Have I used this in the last year? Seasonal items like a turkey roaster can stay if you use them yearly.
- Do I own two or more of the same tool? Keep the best one and move the rest on.
- Does this item have a lid, a partner or a part that I can no longer find?
- Does it duplicate what another gadget does? A garlic press, a knife and a flat blade all crush garlic, so you probably need one.
- Would I buy it again today?
- Does it only exist because someone gave it to me?
Food and pantry items
Check dates on spices, oils, baking supplies and canned goods. Ground spices lose flavor over time, and old oils turn rancid. Follow food-safety guidance and discard anything that smells wrong or shows signs of spoilage. Group like items together, such as baking, breakfast, snacks, pasta and tins. If your kitchen has no dedicated pantry, read our guide to small kitchen ideas with no pantry and our tips for a small kitchen pantry.
Limits that keep you honest
Set a limit for categories that tend to grow. For example, allow yourself six mugs per person, one set of everyday plates, three mixing bowls and one baking sheet per oven rack. These are examples, not rules. Choose numbers that fit your household, and write them down. A number removes the debate when you consider a new purchase.
For more help deciding what to let go, see our post on small apartment decluttering ideas.
Step 3: Zone
A zone is a place for a task. Storing items where you use them saves steps and cuts clutter. In a small kitchen, zones may overlap, so plan them on paper first.
Common kitchen zones
- Prep zone: knives, cutting boards, mixing bowls and measuring tools, near the main counter and the sink.
- Cooking zone: pots, pans, spatulas, oils and spices, near the stove.
- Cleaning zone: sponges, dish soap, trash and recycling, near the sink.
- Serving zone: plates, bowls, glasses and cutlery, near the dishwasher or the table.
- Food storage zone: containers, wraps and bags, near the fridge.
- Coffee or tea zone: mugs, filters and kettle, near the water and an outlet.
- Baking zone: sheets, cake tins and flour, together on one shelf.
Zone table
| Zone | Where it lives | Heights | Example contents |
|---|---|---|---|
| Cooking | Beside the stove | Waist to shoulder | Pans, spoons, oils, spices |
| Prep | Near the main counter | Waist | Knives, boards, bowls |
| Cleaning | Under the sink | Floor to waist | Soap, sponges, bags |
| Serving | By the dishwasher | Waist to chest | Plates, glasses, cutlery |
| Food storage | By the fridge | Waist | Containers, foil, bags |
| Coffee | Near the kettle | Waist to chest | Mugs, tea, filters |
| Rarely used | Top shelf or low shelf | Above shoulder or floor | Roaster, party platters |
Place daily items between knee and shoulder height, roughly 20 to 60 inches from the floor. Reserve the top shelf for rarely used items, and keep heavy items low so you do not lift them overhead. If you have little cabinet space, bring in vertical options from our guide to vertical storage ideas. For workflow thinking, see small kitchen layout ideas for better workflow.
Clean as you go
While the shelves are empty, wipe them with a mild cleaner and let them dry. If you add shelf liner, choose a non-adhesive one in a rental. If you repaint inside a cabinet, use low-VOC paint, open windows and let it cure before refilling.
Step 4: Contain
Containers come after zoning, not before. Now you know what you have, how much of it there is and where it lives, so you can buy only what you need. Use the measurements you took earlier.
Cabinets
- Shelf risers: double the height of a shelf where there is dead air above plates or mugs.
- Turntables: make corner and under-sink spaces reachable.
- Bins with handles: group small items, such as packets or snacks, and pull out as a unit.
- Door-mounted racks: hold wraps, bags or cleaning supplies, but check clearance so the door still closes.
- Pull-out organizers: useful where you can install them, though many renters will prefer freestanding versions.
More ideas are in our guide to small kitchen cabinet organization ideas.
Drawers
Divide drawers with trays or dividers so items do not shift. Put the most-used cutlery in the top drawer, and use shallow trays for tools. Our post on small kitchen drawer organization ideas offers detailed layouts.
Counters
Keep only what you use daily on the counter, such as a kettle, a cutting board and a knife block. Use a tray to group oils and salt, which looks tidy and lets you wipe underneath. See small kitchen counter organization for more.
Walls and rails
A rail with hooks keeps utensils and pots off the shelves. If you cannot drill, use adhesive-free options such as tension rods or over-the-door hooks, and read our tips in no-drill storage ideas for renters. If you do have permission to drill, locate studs and use anchors suited to the wall.
Pantry containers
Decant dry goods into clear, airtight containers only if it saves space and you will refill them. Otherwise keep items in their original packaging and use bins to group them. Keep a note of expiry dates, since decanting removes the original label.
Choose containers wisely
- Prefer containers with a square or rectangular footprint, which use space better than round ones.
- Buy one set in a single style so the cabinet looks calm.
- Stay within the measurements you wrote down.
- Avoid bins that are too deep to reach into.
- Buy a small number first, then add more as needed.
Step 5: Label
Labels turn a tidy kitchen into a shared one. If you live with a partner, children or roommates, a label shows where things go without a conversation. Use a label maker, a marker on masking tape or a chalk-style label that wipes clean. Label bins, shelves, jars and the front of drawers. In a rental, choose labels that peel off without leaving a mark.
Keep labels short and specific, such as “baking,” “snacks,” “bags” and “foil.” Add an expiry date label on opened items like flour or nuts so you know what to use first. If you want a fresh look, use a consistent font and color across the kitchen.
Step 6: Maintain
An organized kitchen is not a finished project, it is a routine. These small habits keep the order you built.
Daily
- Wash or load dishes before bed.
- Return items to their zone after use.
- Wipe counters and clear the surface of mail and bags.
Weekly
- Check the fridge and toss old food before shopping.
- Empty the recycling and wipe the shelves under the sink.
- Take two minutes to put away anything that has drifted.
Monthly
- Check the pantry for expiring items.
- Review the counter and decide if anything can move to a cabinet.
- Wipe cabinet fronts and handles.
Seasonal
- Swap seasonal items, such as a slow cooker in winter or a pitcher in summer.
- Review the rarely used shelf and donate what you did not touch.
The one-in, one-out rule
When you bring in a new gadget, dish or appliance, remove an old one. This rule keeps the space steady without a major clean-out. It also makes you think before you buy.
Three example kitchens
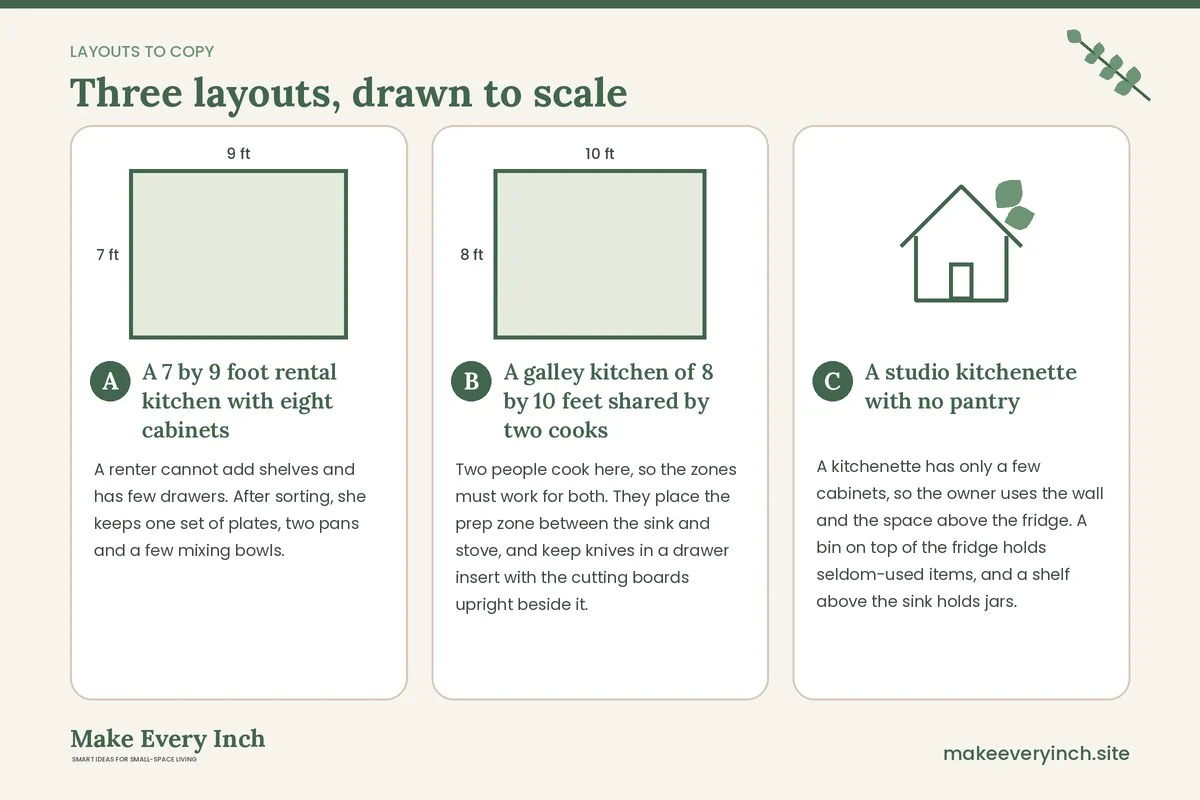
A 7 by 9 foot rental kitchen with eight cabinets
A renter cannot add shelves and has few drawers. After sorting, she keeps one set of plates, two pans and a few mixing bowls. She puts daily plates and mugs in the cabinet next to the dishwasher on a shelf riser, and keeps pans in a lower cabinet with a pull-out bin. Spices go on a tray inside a cabinet near the stove, and cleaning supplies sit in a turntable under the sink. A tension rod under the sink holds spray bottles. This approach needs no drilling and takes a weekend. See renter-friendly kitchen upgrades for related ideas.
A galley kitchen of 8 by 10 feet shared by two cooks
Two people cook here, so the zones must work for both. They place the prep zone between the sink and stove, and keep knives in a drawer insert with the cutting boards upright beside it. A rail on the end wall holds utensils, and a narrow cart parks at the end for baking supplies. Each person has one shelf for personal items, labeled with their initials. Because the aisle is narrow, they keep floor storage to a minimum and keep the bins on the shelves instead. For other layout ideas, see galley kitchen ideas.
A studio kitchenette with no pantry
A kitchenette has only a few cabinets, so the owner uses the wall and the space above the fridge. A bin on top of the fridge holds seldom-used items, and a shelf above the sink holds jars. Dry goods live in labeled bins on a rolling cart that doubles as extra counter. She keeps only a few pots and pans, and places them on a rail. At the end of every week she wipes everything down and checks the dates. For a wider plan, read small apartment kitchen ideas.
Common mistakes to avoid
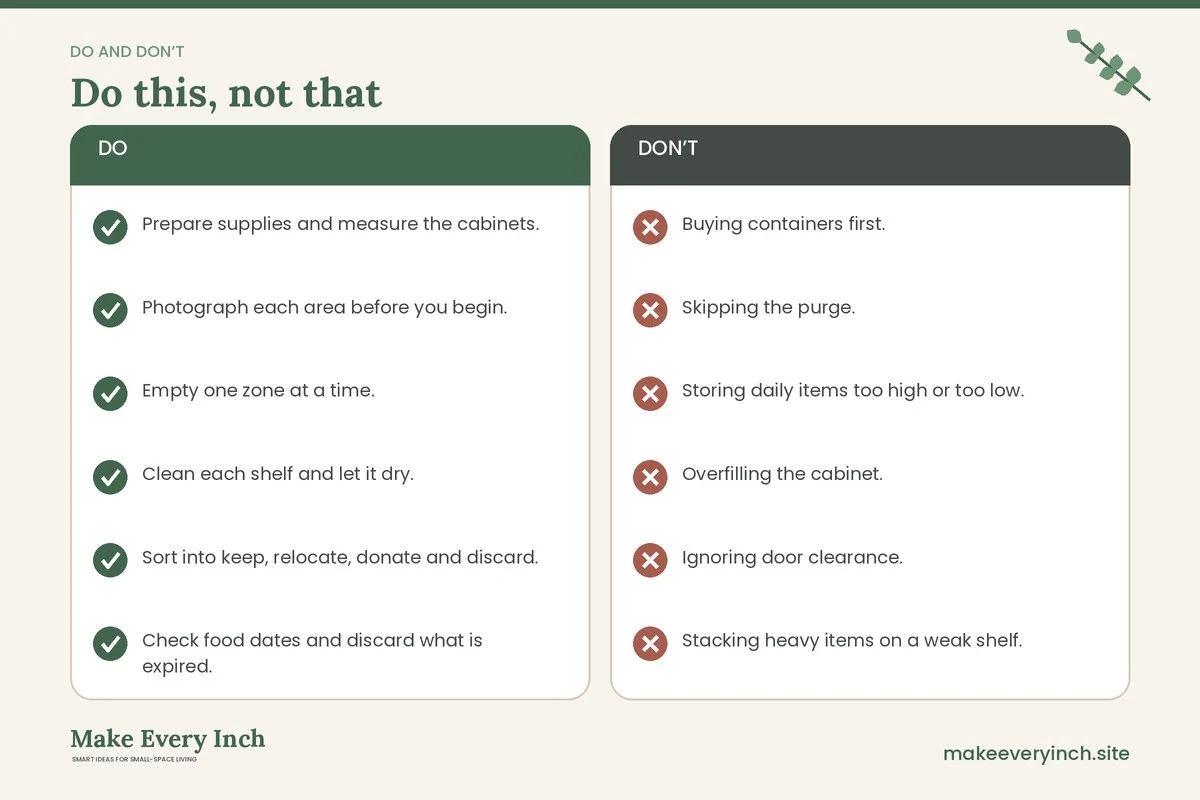
- Buying containers first. You may end up with the wrong size and a pile of returns.
- Skipping the purge. Organizing clutter only hides it.
- Storing daily items too high or too low. If you do not use it easily, it ends up on the counter.
- Overfilling the cabinet. A shelf at 100 percent capacity cannot be maintained. Aim for about 80 percent.
- Ignoring door clearance. A rack that stops the cabinet door closing is no help.
- Stacking heavy items on a weak shelf. Check the shelf support and spread the weight.
- Forgetting the routine. The system fails without a short weekly reset.
- Using unlabeled decanted jars. Without the original packaging, you may forget what an item is or when it expires.
Safety notes
- Do not drill into cabinets, walls or tiles without permission from the owner or landlord.
- Anchor tall shelving units to the wall where permitted, or choose low and wide pieces.
- Store heavy items low and keep sharp knives in a block, a sheath or a drawer insert.
- Store cleaning products away from food, out of reach of children and never mix them.
- Keep flammable items such as paper towels and oven mitts away from the stove.
- Keep cords tidy and appliances away from the sink.
- Ventilate when you clean or paint, and choose low-VOC products.
The start-to-finish checklist
- Prepare supplies and measure the cabinets.
- Photograph each area before you begin.
- Empty one zone at a time.
- Clean each shelf and let it dry.
- Sort into keep, relocate, donate and discard.
- Check food dates and discard what is expired.
- Set a limit for mugs, plates and gadgets.
- Draw your zones on paper.
- Place daily items between knee and shoulder height.
- Buy containers only after measuring.
- Label bins, shelves and jars.
- Set a daily reset and a weekly check.
- Adopt a one-in, one-out rule.
- Review after two weeks and adjust.
FAQ
How long does it take to organize a small kitchen?
Most small kitchens take a weekend, or a few evenings if you work one area at a time. The sorting step takes the longest.
Where should I start when organizing a small kitchen?
Start with the counters, then the cabinet or drawer you use most. Early wins keep you motivated.
Should I buy organizers before I start?
No. Sort and zone first, then measure and buy only what you need. This avoids wasted money and clutter.
How do I organize a small kitchen with no pantry?
Use a cabinet shelf or a cart for dry goods, group items in bins and use vertical space above the fridge and on walls. See our post on small kitchen ideas with no pantry.
How do I organize a small kitchen in a rental?
Choose freestanding solutions such as shelf risers, turntables, bins and tension rods. Ask before drilling or using adhesive that could mark surfaces.
How do I keep a small kitchen organized?
Give every item a home, keep a short daily reset, do a weekly check and follow a one-in, one-out rule.
How full should a cabinet be?
Aim to fill a cabinet to about 80 percent so you can reach items and put them back without a struggle.
Keep going: Keep going with our guide to small kitchen drawer organization ideas, the walkthrough on how to add counter space to a small kitchen and our ideas for a small kitchen pantry.
Save this guide for later
Pin the ideas you like to Pinterest so you can come back to them when you plan your space.