Small Living Room Makeover Ideas Minimalist: A 7-Step Plan
Quick answer: The best small living room makeover ideas minimalist style follow one order: remove first, then fix the layout, then paint, then furniture, lighting, textiles and styling. Aim to keep roughly 30 to 40 percent of the floor visible, hold to three main colors, give every item a home and finish with one or two styled spots instead of many. Do the subtracting before any shopping, because it often solves half the problem for free.
Small living room makeover ideas minimalist in spirit usually fail for one reason: people start by shopping. They buy a new rug, a new shelf and a set of storage boxes, and the room ends up fuller than before. A minimalist makeover works the other way around. You begin by taking things away, you learn what the room really needs, and only then do you add the few pieces that earn their place. This guide gives you a seven-step order of operations, the measurements that keep a small room calm, a table that sorts every item into keep, move or go, three example rooms, a four-week schedule, a checklist and an FAQ. For the wider overview of makeover approaches, read our main guide to small living room makeover ideas, and for the bigger picture of decorating this kind of room see small living room ideas.
Why a minimalist makeover is different
Most makeover advice is additive. It tells you to layer, to add pattern, to fill a corner. Minimalism treats a small room as a limited resource and spends it carefully. The goal is not an empty room, and it is not a showroom either. The goal is a room where every object is there on purpose, the floor is open enough to move without thinking and the eye has somewhere to rest.
That is why the order of the steps matters so much. If you paint before you declutter, you will repaint around furniture you later remove. If you buy storage before you decide what to keep, you will buy the wrong size. If you style before the lighting is right, you will restyle twice. The seven steps below are arranged so that each one makes the next one easier and cheaper. If you only have a little budget, the first three steps cost almost nothing and still change the room more than any purchase. If budget is the main limit, our guide to a small living room makeover under 500 shows how to spread spending across the same stages.
Before you start, take three photos of the room from the doorway, from the sofa and from the window. Look at them on a screen rather than in person. Photos remove the familiarity that hides clutter, and they give you a true before picture to compare later.
Step 1: Declutter by category, not by room
Start by pulling out everything that is not furniture. Do not tidy it. Pile it on a sheet or in the next room and sort it by category: books, papers, cables, decor, blankets, media, hobby items and anything that does not belong in this room. Seeing forty objects of one kind in one place is what makes decisions easy.
Use a simple three-pile rule. Keep means you use it weekly or love it enough to display it. Move means it is useful but belongs in a bedroom, closet or entry. Go means donate, recycle or discard. Be strict about the Move pile, because a living room that doubles as a dumping ground will never feel minimal.
A few limits help in a small room:
- Books: keep one shelf or one section, and let the rest rotate in from another room.
- Throws and cushions: two cushions and one throw per seat is a generous maximum.
- Decor: keep what fits on one surface plus one wall, and store the remainder.
- Cables and remotes: group them in one box or one drawer, and remove any that belong to devices you no longer own.
- Papers: the living room should hold none long term, so file or recycle them.
Do not rush to buy containers at this stage. Place the Keep pile on the floor and look at how much there is. That number tells you what storage you truly need. For a deeper approach to this stage, see our guide on small apartment decluttering ideas.
Step 2: Fix the layout before anything else
Once the room is nearly empty, you can see its bones. Measure the room, mark windows, doors and radiators, and note the main path from the door to the window or the next room. A minimalist layout is one that makes the path obvious.
Use these working numbers as a starting guide. Rooms and furniture vary, so treat them as ranges rather than rules.
- Main walkway: 30 to 36 inches wide, with a side path of at least 24 inches.
- Sofa to TV or media wall: roughly 6 to 9 feet in a small room, depending on screen size.
- Sofa to coffee table or ottoman: around 14 to 18 inches.
- Rug size: often 5 by 8 feet in a small room, with the front legs of the sofa resting on it.
- Clear floor: try for about a third of the visible floor with no furniture on it.
Float nothing unless you must. Pushing the largest piece, usually the sofa, against the longest wall tends to open the center, while angling pieces creates dead corners that attract clutter. If you have a doorway in a corner, keep that corner clear so the entrance feels open. For a full discussion of arrangements, read our small living room layout ideas minimalist post.
Tape the new layout on the floor with painter’s tape before moving heavy items. Live with the tape for a day. If you keep stepping over it, the layout is wrong.
Step 3: Choose a three-color palette and paint
Minimalist rooms lean on a tight palette. Pick one main wall color, one secondary tone for textiles and one accent that you repeat in two or three places. White, warm gray, greige and soft off-whites are common choices, but a deep muted color on a single wall can be just as minimal if the rest stays quiet. Paint the walls and the ceiling in related tones so the corners blur and the room feels taller.
Test two or three paint samples on large pieces of board and look at them morning and evening. Light changes color a lot, and a north-facing room tends to make cool shades look flatter.
Paint safety matters in a small room because there is little air to dilute fumes. Open windows during and after painting, run a fan that moves air out of the room and take breaks outside. Choose a low-VOC product where one is available, follow the label for drying and recoat times and keep pets and children out until the room is aired. If you rent, check the lease first and see our removable wallpaper ideas for non-paint options. Sanding old paint can release dust, and older homes can contain lead paint, so test and take proper precautions before sanding anything built long ago.
Step 4: Edit and choose the furniture
With layout and paint settled, choose furniture. Start with what you own. Many minimalist rooms are made by removing a piece, not buying one. Ask of each item: does it get used weekly, does it fit the layout and does it store something that otherwise has no home?
Prefer pieces that show their legs, because visible floor under furniture makes a room read as larger. Look for clean lines, simple shapes and a single dominant material. A sofa with slim arms and a back that is not much taller than the seat saves visual weight. A coffee table with a lower shelf or a nesting pair gives surface and storage without bulk. If you are shopping for the main seat, our guide to the best sofas for small apartments lists features worth checking, and the broader small living room furniture ideas minimalist post covers more options.
A note on safety for tall furniture. Bookcases, shelving units, tall cabinets and media units can tip, especially when children or pets climb them. Anchor every tall piece to a wall stud with the hardware that suits your wall, and keep heavier items on lower shelves. In a rental, ask the landlord about anchoring, or choose lower pieces and use tip-resistant fixings that are allowed under your lease. Check the weight limits of shelves and place a TV only on furniture rated for it.
Step 5: Layer the lighting
Lighting is the step most often skipped, and it changes how a minimalist room feels more than any decoration. Plan three layers. Ambient light is the general glow, usually a ceiling fixture or a floor lamp that bounces light off the ceiling. Task light is for reading, such as a lamp beside the sofa. Accent light is soft and low, such as a small lamp on a shelf or a strip behind the TV.
Keep bulbs in a consistent warm range, often around 2700 to 3000 kelvin, so the whole room has one temperature. Use fewer, better-placed lamps rather than many small ones. A single arc floor lamp over the sofa can replace a table lamp and a side table. Our guide to the best floor lamps for small rooms and the post on small living room lighting ideas minimalist go into detail.
Some electrical care goes a long way. Do not overload a power strip or chain extension cords, and check that each lamp uses a bulb type and wattage within its rating. Keep cords out of walkways, and where cables must cross the floor, use a cord cover rather than a loose run. Leave any wiring change, such as swapping a ceiling fixture, to a qualified electrician, and in a rental, ask first. Plug-in wall lights and lamps with clip-on shades are tidy ways to add light without wiring. For more removable options, see renter friendly lighting ideas.
Step 6: Add textiles with restraint
Textiles are how a minimalist room avoids feeling cold. Choose natural or soft-feeling fabrics in your palette and vary the texture rather than the color. A linen curtain, a wool throw and a cotton cushion in the same family of tones feel rich without being busy.
Hang curtains high and wide, ideally a few inches above the window frame and extending past it on each side, so that the window looks bigger and the wall is softer. Let the fabric just touch the floor or sit a fraction above it. Pick sheer or light-filtering fabrics in a small room, since heavy drapes can make it feel closed in.
For the rug, choose a flat weave or a low pile that is easy to clean and does not catch on furniture. A single rug in a plain tone or a subtle pattern anchors the seating group. Use a non-slip pad underneath so that the rug stays flat and does not become a trip hazard. Limit cushions to two or three, and let the throw drape instead of folding it in a pile.
Step 7: Style with one or two focal moments
Styling is the last step, and it should be the smallest. Choose one wall and one surface. On the wall, hang a single large piece of art or a mirror rather than a gallery of small frames. A mirror placed opposite a window bounces daylight across the room. On the surface, such as a console or a shelf, try the rule of three: one tall item, one low item and one natural element such as a plant or a branch.
Leave empty space on purpose. Negative space is what makes the focal items look intentional. If you feel the urge to add something, wait a week and see if the room still needs it. Keep a box for items that you rotate, and swap one object each season rather than adding more.
What to keep, move or remove: a decision table
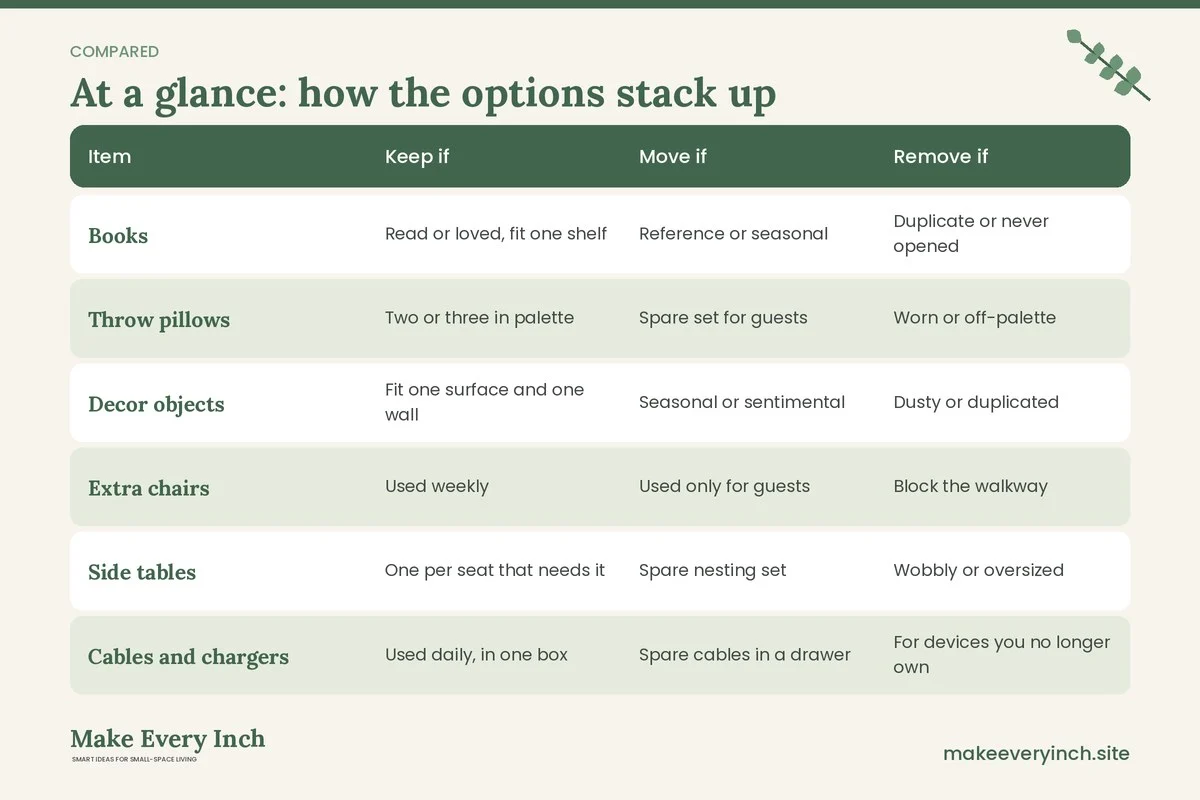
This table sorts common living room items so that decisions in Step 1 go faster.
| Item | Keep if | Move if | Remove if |
|---|---|---|---|
| Books | Read or loved, fit one shelf | Reference or seasonal | Duplicate or never opened |
| Throw pillows | Two or three in palette | Spare set for guests | Worn or off-palette |
| Decor objects | Fit one surface and one wall | Seasonal or sentimental | Dusty or duplicated |
| Extra chairs | Used weekly | Used only for guests | Block the walkway |
| Side tables | One per seat that needs it | Spare nesting set | Wobbly or oversized |
| Cables and chargers | Used daily, in one box | Spare cables in a drawer | For devices you no longer own |
| Media discs and games | Played monthly | Collections rarely used | Duplicates and broken cases |
| Plants | Healthy, fit the light | Needs more light elsewhere | Dying or oversized |
Three example rooms
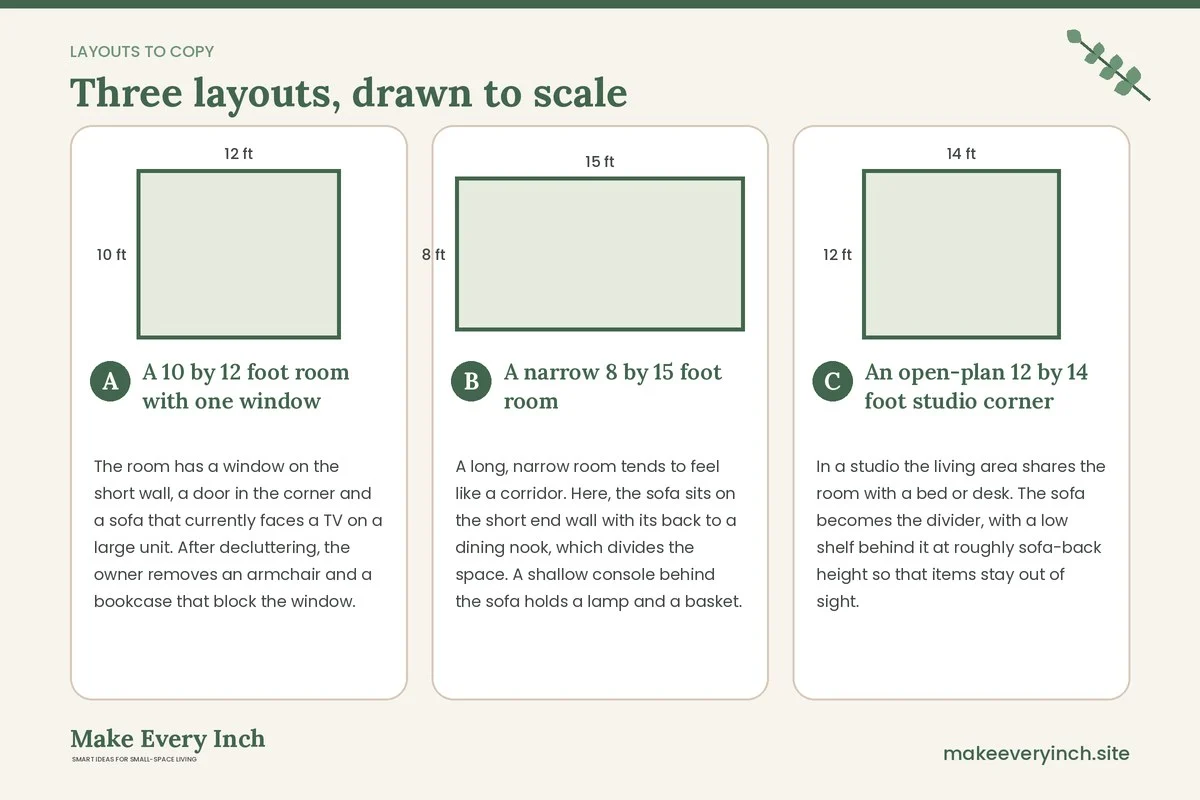
A 10 by 12 foot room with one window
The room has a window on the short wall, a door in the corner and a sofa that currently faces a TV on a large unit. After decluttering, the owner removes an armchair and a bookcase that block the window. The sofa, about 78 inches wide, moves against the long wall, the TV goes on a slim wall-mounted bracket and a 5 by 8 foot rug anchors the seating. Walls and ceiling stay in a warm off-white, with a single gray-green cushion pair as the accent. One arc floor lamp and a small table lamp replace three older fixtures. The result is a 34-inch walkway from door to window and a room that feels larger without gaining a square inch.
A narrow 8 by 15 foot room
A long, narrow room tends to feel like a corridor. Here, the sofa sits on the short end wall with its back to a dining nook, which divides the space. A shallow console behind the sofa holds a lamp and a basket. The walls are painted in a pale tone, with the end wall a shade deeper to pull the eye inward. A runner-style rug about 5 by 8 feet sits under the sofa legs. The owner keeps only one side table, and a wall shelf holds the books that used to fill a freestanding bookcase. Tall storage is anchored to the wall and kept to one end so the long side stays open.
An open-plan 12 by 14 foot studio corner
In a studio the living area shares the room with a bed or desk. The sofa becomes the divider, with a low shelf behind it at roughly sofa-back height so that items stay out of sight. The palette is limited to three colors so that the sleeping zone and living zone blend. A mirror on the far wall extends the sense of depth, and one pendant or floor lamp defines the living zone. Anything that belongs to the work or sleep side leaves the sofa area entirely, which keeps the minimalist feel when guests visit.
A four-week minimalist makeover plan
Splitting the work into weeks keeps it manageable and stops decision fatigue. Adjust the pace to your schedule.
Week 1: Subtract
Take the before photos. Empty the room by category and sort into keep, move and remove. Donate or recycle the Go pile within the week so that it does not sit in the hallway. Clean the empty room thoroughly, including baseboards, windows and the corners behind furniture.
Week 2: Layout and paint
Measure and tape the new layout. Move the furniture into place and live with it for a few days. Choose paint samples, check them in daylight and evening light and paint once you are sure. Ventilate well, and let the room air before you move things back.
Week 3: Furniture and lighting
Decide whether any piece needs replacing, repairing or relocating. Anchor tall furniture. Set up the lighting layers and check the cables. Add a cord cover or clip where a cable crosses a path.
Week 4: Textiles and styling
Hang the curtains, lay the rug with a pad and arrange cushions and the throw. Style one wall and one surface. Take the after photos from the same three spots and compare them with the before set. Make a short note of what still bothers you and wait before adding anything.
Common mistakes in minimalist makeovers
- Shopping first. Buying storage or decor before editing often adds clutter.
- Going too empty. A room with nothing soft, warm or personal feels cold rather than calm.
- Ignoring the lighting. One harsh overhead light flattens the room, so layer it.
- Too many palettes. More than three main colors breaks the sense of order.
- Tiny rugs. A rug that floats in the middle makes the room look smaller, so let the front furniture legs rest on it.
- Unanchored tall pieces. Tall shelves look light but can be a hazard if they are not fixed to the wall.
- Painting in a closed room. Fumes build up quickly in a small space, so ventilate.
- Forgetting upkeep. A minimalist room stays that way only if you keep a home for each item.

Budget thinking without prices
You do not need exact figures to plan spending. Divide the makeover into three bands. The free band is decluttering, rearranging and cleaning, and it gives the biggest visual change. The low band is paint, bulbs, a lamp, a plant and perhaps a curtain rod, which together alter the feel of the room. The larger band is a sofa, a rug or built-in storage, which can wait until you are sure of the layout. Spending in that order means you never buy a big item for a layout you later abandon. Second-hand shops, local marketplaces and borrowed items work well here, because minimalist pieces are simple and tend to age well. Our minimalist apartment ideas guide has more on keeping things simple through the whole home.
Keep it minimal after the makeover
A makeover lasts only if you hold the line. Set a one-in, one-out rule for decor and cushions. Give the entry a hook and a tray so that coats and mail never reach the sofa. Once a week, spend five minutes returning stray items to their homes. Review the room each season and remove one thing that you no longer use. For storage that hides what remains, take a look at our small living room storage ideas minimalist post, and for a cozier take that keeps the calm, see cozy small living room ideas minimalist.
Makeover checklist
- Take three before photos from the doorway, sofa and window.
- Sort every non-furniture item into keep, move and remove.
- Clear the Go pile out of the home within the week.
- Measure the room, and mark windows, doors and radiators.
- Tape the new layout and live with it for a day.
- Keep a 30 to 36 inch main walkway.
- Choose a three-color palette and test paint samples.
- Ventilate during and after painting, and use a low-VOC product where available.
- Anchor every tall bookcase, cabinet and media unit.
- Set up ambient, task and accent light in one warm range.
- Check that outlets and power strips are not overloaded.
- Hang curtains high and wide, and lay the rug with a non-slip pad.
- Limit cushions and throws to a small set per seat.
- Style one wall and one surface only.
- Take after photos and compare them with the before set.
FAQ
Where do I start a minimalist makeover in a small living room?
Start by removing items, not buying them. Sort everything that is not furniture into keep, move and remove piles. This usually shows what the room needs and what it does not.
How many colors should a minimalist living room have?
Three main colors is a good working limit: a base for walls, a secondary tone for large textiles and an accent repeated a few times. Vary texture to keep interest.
Do I need to paint for a minimalist makeover?
Not always. If the existing color is neutral and in good shape, you can skip it. If you do paint, ventilate well, use a low-VOC product where possible and let the room air before you move back in.
How much empty floor should I keep?
A rough target is 30 to 40 percent of the visible floor free of furniture, with a main walkway about 30 to 36 inches wide. Adjust for your room and how you use it.
How do I make a minimalist room feel warm?
Use warm light bulbs, natural textures such as linen, wool and wood, and one or two personal items. Warmth comes from material and light, not from adding more objects.
Is it safe to put tall shelves in a small living room?
Yes, if they are anchored. Fix tall bookcases and cabinets to the wall with suitable hardware, place heavy items low and follow your lease if you rent.
How long does a minimalist makeover take?
A focused version can take a few weekends, and a relaxed one fits in four weeks. The subtracting stage takes the most thought, and the styling takes the least.
Keep going: Keep going with our small living room storage ideas, small living room lighting ideas and small living room tv wall ideas minimalist.
Save this guide for later
Pin the ideas you like to Pinterest so you can come back to them when you plan your space.