Small Home Organization Before and After: 3 Plans and a Photo Method
Quick answer: A useful small home organization before after starts with honest photos and a short list of the problems you want to solve, then moves in order: remove, group, assign a home, contain, label, and reset weekly. Take the same photo from the same spot at each stage, measure what changed, and judge the result by how easily things go back, not by how it looks on day one.
A small home organization before after is only worth doing if the after still looks good in a month. Many makeovers look dramatic on the day and fall apart within weeks, because the plan was built around the photo instead of the way people live. This guide takes a different angle from a gallery of finished rooms. It teaches a repeatable method to document your own starting point, work through the steps in the right order and compare the results honestly. It includes a photo method, a stage-by-stage plan, three example scenarios with measurements, a comparison table, a one-weekend schedule, safety notes and a checklist. For the wider topic, see our pillar on small space organization ideas, and for the multi-person angle read the sibling post on small home storage for shared spaces.
The scenarios below are illustrative plans based on common small-home layouts. They are not records of specific homes, and the numbers are typical ranges you can adapt.
Why the before matters more than the after
The after photo gets all the attention, but the before is the useful one. It shows what you really do in a space. A counter that is always covered in mail is telling you that mail has no home. A chair that is always piled with clothes is telling you that the closet is too hard to use. Treat the clutter as data rather than as a failing. Each pile is a place where a system is missing.
A good before record has three parts: photos, a measurement list and a short written note. The note is the most useful part. Write two sentences about what annoys you in the room, for example, “I cannot find the scissors” or “the entry is a mess by Wednesday.” Those sentences become the brief for the project. At the end, you will judge the result against them, not against a magazine photo.
The photo method
Photos show change that memory forgets, and they make a plan easier to fix halfway. Follow a few simple rules so the pictures can be compared.
- Same spot, same angle. Stand in the doorway or mark the floor with tape. Hold the camera or phone at chest height.
- Three shots per room. Take one wide shot, one of the worst corner and one of the storage with the doors open.
- Daylight and lights on. Take pictures at the same time of day, so shadows do not mislead you.
- Do not tidy first. Take the picture as the room is on an ordinary day. A staged before makes the after look less impressive and the plan less honest.
- Date and label. Name each file with the room and the stage, such as “kitchen-1-before” and “kitchen-4-labelled.”
- Check the frame for privacy. Keep documents, addresses and faces out of any photo you plan to share.
Take a second set of photos at two weeks and at two months. The two-month photo is the real after. If the space still holds, you built a system. If it has slipped, the photo shows exactly where.
Measure the change, not just the look
An organized space can be described in numbers, and numbers keep you honest. Pick three or four measures for each room and record them before you start.
- Clear surface: the portion of the counter, table or desk that is free of items. Estimate as a fraction, for example, one third clear before and two thirds clear after.
- Search time: how long it takes to find a common item, such as keys or a pan lid. Time it once before and once after.
- Return steps: how many movements it takes to put an item away. Two steps or fewer is a good target for daily things.
- Shelf fill: how full a shelf is. A shelf that is 80 percent full leaves room to put things back, and one at 100 percent does not.
- Floor visible: the part of the floor you can see in the room, since clear floor makes a small room feel larger.
These measures are your own records, not published results. Their purpose is to show you whether the changes helped, so use the same method each time.
The six stages every good makeover follows
The order matters. Most failed makeovers buy containers first. The sequence below puts buying last.
1. Remove
Start by taking out what does not belong in the space. This includes trash, duplicates, broken items, expired products and things that belong in another room. Work category by category rather than shelf by shelf. Use the tests of use, duplicates and condition. Our guide on decluttering rules for small homes gives clear questions to ask, and small apartment decluttering ideas suggests an order for the whole home.
2. Group
Put like with like. Gather all the batteries, all the cleaning cloths and all the paper into piles. Grouping shows how much you really have, and it tells you what size of container each group needs. Do not buy containers until this step is done.
3. Assign a home
Give each group a permanent spot, based on how often you use it. Daily items go between knee and shoulder height, weekly items go higher or lower, and rare items go in deep storage. Put items where you use them, not where it looks neat. A pan belongs near the stove and a leash belongs near the door.
4. Contain
Now buy or reuse containers. Measure the space first, and then pick bins, trays or baskets to fit. Choose open containers for daily items and closed ones for visual calm. For ideas that need no purchases, read small home organization without buying bins.
5. Label
Labels turn a system into a habit for everyone in the home. Label by content, and choose a format that is easy to change. Keep a spare label on the bin lid for the next change.
6. Reset
Schedule a weekly five-minute reset and a monthly review. A system survives because of the reset, not because of the day it was built.
Three before and after plans
Plan 1: a kitchen with a cluttered counter
Before. A compact kitchen has about 6 feet of counter, and almost all of it is covered. Mail, a fruit bowl, a dish rack, a coffee setup and a pile of appliances compete for space. The cabinets hold three similar pans, a stack of mismatched lids and a lower shelf that is too deep to reach. The cook has to move two items to prepare food.
Steps. First, remove the duplicates and the broken items, which in a typical case frees one cabinet shelf. Second, group items into cooking, baking, serving and food storage. Third, assign homes. The pans and lids go next to the stove, the coffee setup moves to one corner, and the mail moves to a hook or tray by the door. Fourth, contain. A lid rack on a cabinet door, a turntable for the deep corner and a pull-out bin or a tray for the lower shelf make everything reachable. Fifth, label the pantry bins. Sixth, a Sunday check of the counter.
After. The counter has about 4 feet of clear surface, and the cook can prepare a meal without moving anything. The search time for a lid drops, because every lid has a place. See our post on small kitchen before and after ideas for more kitchen examples, and our guide to small kitchen counter organization for ongoing habits.
Plan 2: an entryway that is a daily pile
Before. A small entry, about 3 feet wide, has a door, a wall and a patch of floor. Shoes cover the floor, coats lie on a chair, and keys and mail pile on a shelf. Wet umbrellas are propped in the corner. People trip on shoes in the morning and cannot find keys.
Steps. First, remove the shoes that belong in the closet, since only the pairs in current use should stay by the door. Second, group by person and by type: shoes, bags, coats, keys, mail. Third, assign homes. Each person gets one hook at a comfortable height and one cubby or tray space for shoes. Keys go in a bowl or on a hook right by the door. Mail goes to a sorter that is cleared weekly. Fourth, contain. A narrow shoe rack holds about 4 to 6 pairs and a wall shelf or a tray gives the keys a place. A rubber tray under the shoes catches water. Fifth, label the hooks. Sixth, a Friday reset.
After. The floor is clear, apart from the shoes on the tray, and the walk from door to room is free. If the lease does not allow drilling, use over-the-door hooks and freestanding racks, and read renter-friendly entryway organization ideas for options. For a wider view, see our guide on small entryway organization.
Plan 3: a bedroom closet that does not work
Before. A reach-in closet about 5 feet wide has a single rod and a shelf above it. It is full, and clothes are crushed. The floor has shoes and bags. The top shelf has boxes that nobody has opened in a year. The owner wears the same dozen items and avoids the closet.
Steps. First, remove by trying on and by season. Pull everything out, keep what fits and what you wear, and bag the rest for donation or deep storage. Second, group by type: tops, bottoms, dresses, outerwear. Third, assign homes. Everyday clothes sit at eye level, off-season items go on the top shelf and shoes get a rack. Fourth, contain. Use slim, matching hangers, a stacking shelf for sweaters and a door organizer for small items. Fifth, label the high boxes with the season. Sixth, a quarterly swap.
After. The closet holds the same clothes with room to spare, and every item can be seen. Getting dressed takes less time, and nothing is crushed. Our guide on small closet organization ideas and the post on capsule wardrobe storage for small closets give next steps. Any heavy shelf on the top needs to be fixed to the wall or the closet frame with the right hardware, with only light items placed high.
Before and after comparison table
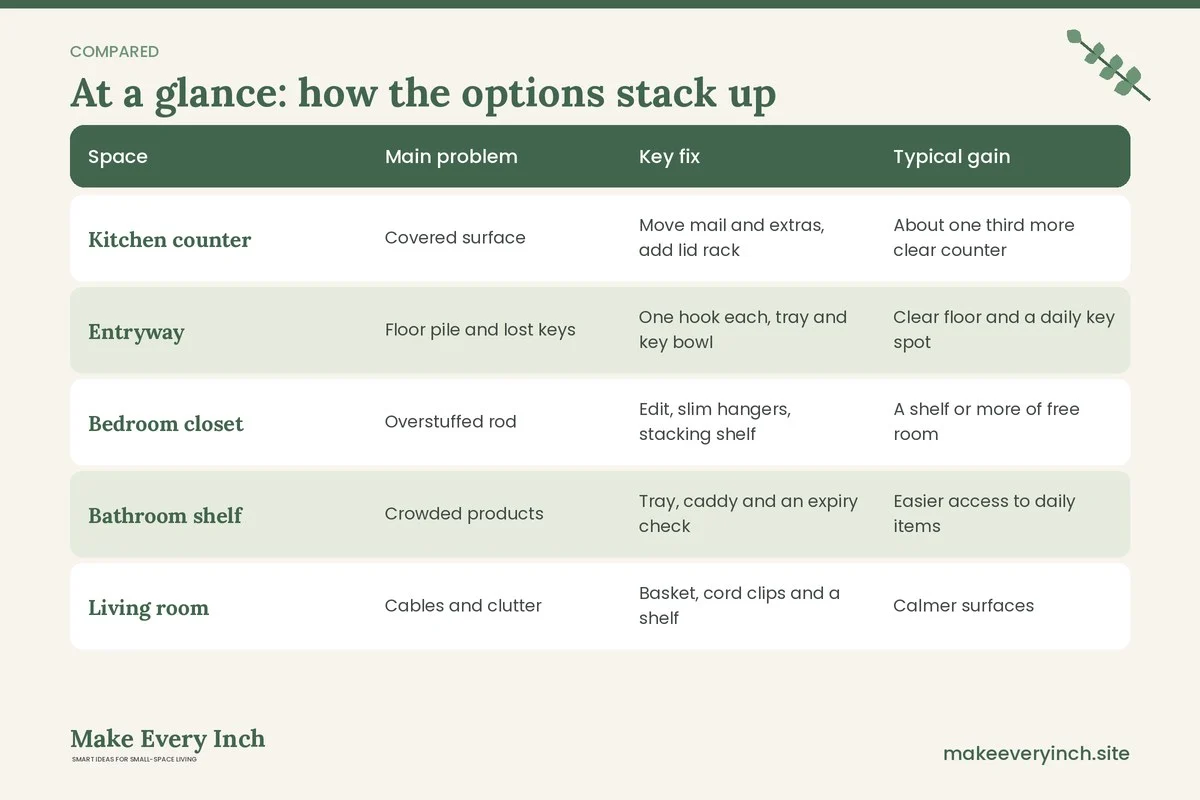
The table below summarizes the three plans. The figures are typical ranges for planning, not measurements of a real home.
| Space | Main problem | Key fix | Typical gain | Reset habit |
|---|---|---|---|---|
| Kitchen counter | Covered surface | Move mail and extras, add lid rack | About one third more clear counter | Sunday counter clear |
| Entryway | Floor pile and lost keys | One hook each, tray and key bowl | Clear floor and a daily key spot | Friday reset |
| Bedroom closet | Overstuffed rod | Edit, slim hangers, stacking shelf | A shelf or more of free room | Quarterly swap |
| Bathroom shelf | Crowded products | Tray, caddy and an expiry check | Easier access to daily items | Monthly expiry check |
| Living room | Cables and clutter | Basket, cord clips and a shelf | Calmer surfaces | Evening two-minute reset |
A one-weekend schedule for one room
You do not need a week off work to see a change. A single weekend suffices for one room if you break it into short blocks.
Saturday morning: take the before photos and measurements, write the two-sentence brief and gather boxes for donation, trash and relocation. Spend an hour removing items.
Saturday afternoon: group the remaining items and decide where each group will live. Make a list and a sketch with measurements. Do not buy yet.
Sunday morning: shop from your list or reuse what you have, then place the containers. Put things away by category.
Sunday afternoon: label, take the after photos and write down the new measures. Set a reminder for the first weekly reset.
Two weeks later, take the follow-up photos, and two months later take the final set. If you want a longer view, our post on small home organization ideas that actually last covers habits for the long term.
What a good after looks like
A good after has some features that photos do not capture. The first is ease of return: you can put an item away in two steps or fewer. The second is breathing room: shelves are roughly 80 percent full, so one new item does not break the system. The third is visibility: you can see what you have without moving other things. The fourth is flexibility: the plan survives a bad week. If a room looks perfect but takes ten minutes to reset, it is a display, not a system.
A bad after often has matching containers and nothing else. The bins are beautiful and unlabelled, and they hold unsorted heaps. Within a month the heaps spill over. Avoid this outcome by working in order and by using the list of small home organization mistakes to avoid.
Safety and rental notes
A makeover can add risk if it is done in a hurry. Run through this list before you start.
- Anchor tall furniture. Bookcases, tall shelves and wardrobes need wall anchors, especially in homes with children or pets. If you cannot drill, choose lower units.
- Never drill without permission. Check the lease and ask the landlord in writing. Use freestanding, adhesive-free or tension-based options first.
- Respect weight limits. Look up the rated load for shelves, hooks and over-door organizers, and place heavy items low.
- Electrical safety. Do not cover power strips with fabric, do not chain extension leads and do not place cords under rugs. Keep chargers and cables away from water.
- Wet areas. In the kitchen and bathroom, use outlets protected by a ground fault circuit interrupter, keep devices away from sinks and use waterproof containers.
- Ventilation. Do not pack closets and cabinets so tightly that air cannot circulate. Damp towels and shoes need airflow to avoid mildew.
- Low-VOC paint. If you repaint shelves or cabinet interiors, choose low-VOC paint, open windows and allow it to cure fully before loading.
- Chemicals and small objects. Keep cleaners, medicines, batteries and coins high and closed, away from children and pets.
- Lifting. Do not carry heavy boxes alone or climb on unstable chairs. Use a proper step stool.
Common mistakes when comparing before and after
People often misjudge their own results, so watch for these traps.
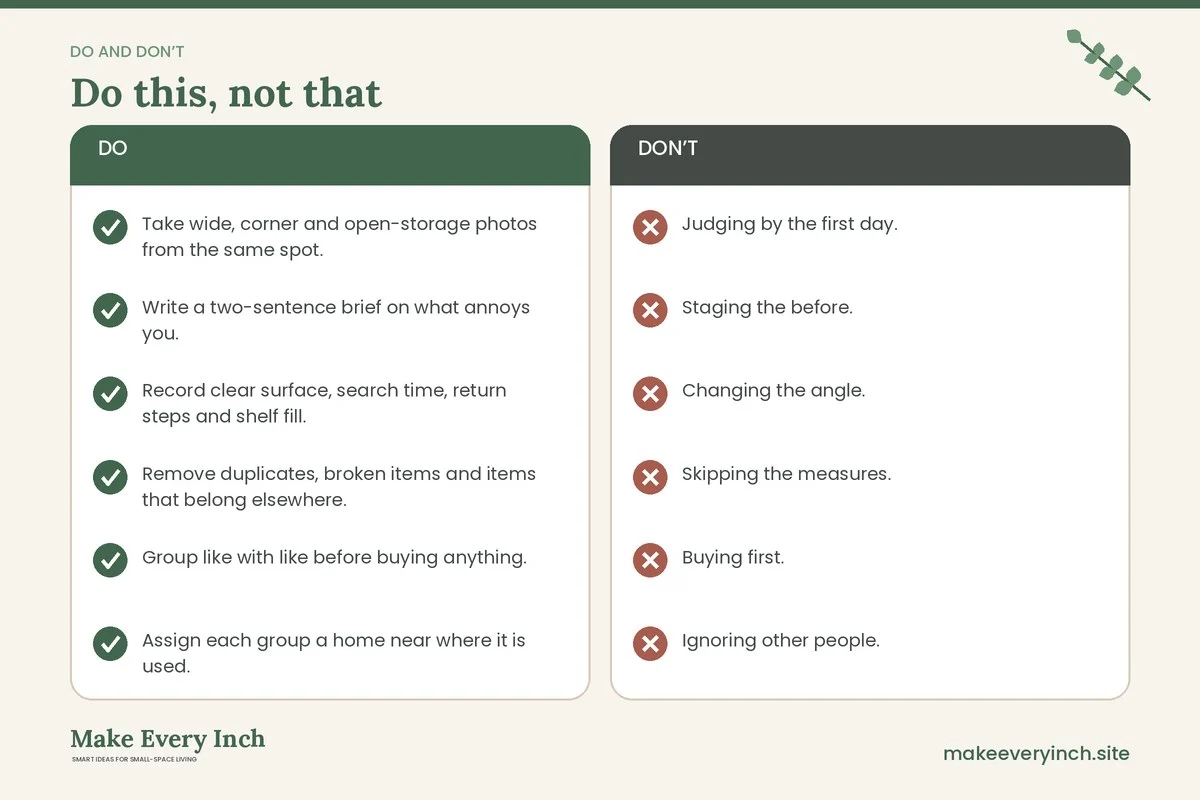
- Judging by the first day. The true after is the two-month photo.
- Staging the before. A neat before hides the problem.
- Changing the angle. A different camera spot makes comparisons meaningless.
- Skipping the measures. Without numbers you only have a feeling.
- Buying first. Containers bought before sorting rarely fit what you have.
- Ignoring other people. If the system does not suit everyone in the home, it will fail.
- Perfectionism. A good system has a little slack. Leave room for the week you cannot keep up.
Keeping the after alive
The most important habit is a short, regular reset. Pick one time each week, such as Sunday evening, and walk through the room with a basket. Return items to their homes, empty the overflow bin and wipe the surfaces. Every month, check the labels and the measures. Every season, repeat the first stage for one category. Treat the system as something you tune, not something you finish.
When life changes, such as a new baby, a new job or a roommate, run the photo method again. A fresh before will show which parts of the system no longer fit. If more people are involved, read about the split in small home storage for shared spaces so the plan stays fair. For room-specific guidance, our guide on how to organize a small home room by room gives a starting order.
Before and after checklist
- Take wide, corner and open-storage photos from the same spot.
- Write a two-sentence brief on what annoys you.
- Record clear surface, search time, return steps and shelf fill.
- Remove duplicates, broken items and items that belong elsewhere.
- Group like with like before buying anything.
- Assign each group a home near where it is used.
- Measure, then contain with bins, trays or racks.
- Label by content.
- Anchor tall furniture and check weight limits.
- Ask permission before drilling.
- Take after photos the same day, at two weeks and at two months.
- Set a weekly five-minute reset.
FAQ
How do I take a good before photo?
Stand in the same spot, hold the camera at chest height and take a wide shot, a corner shot and a shot of open storage. Do not tidy first, and use the same light each time.
How long should a small home makeover take?
One room can often be done in a weekend, with the follow-up reset spread over the following weeks. Large rooms or very full homes take longer, so go room by room.
Should I buy containers before decluttering?
No. Remove and group first, so you know what size of container you need. Reuse boxes and jars where you can.
What if the after slips back into a mess?
Check the photo for the spot where the system broke. It is usually a missing home, a container that is too hard to use or a reset that never happened. Fix that one point.
Can I do this in a rental?
Yes. Use freestanding shelves, over-door hooks and tension rods, and ask for written permission before drilling. Keep everything removable.
How do I compare my results fairly?
Use the same photos, the same time of day and the same measures. Judge by the two-month photo and by how easily things go back, not by the first day.
Keep going: Keep going with our guides on small kitchen organization ideas, small bedroom organization ideas and small laundry room ideas before and after.
Save this guide for later
Pin the ideas you like to Pinterest so you can come back to them when you plan your space.