Renter-Friendly Before and After Small Space Ideas for 3 Rooms
Quick answer: A good renter friendly before after small space makeover starts with a written list of what is wrong, swaps one problem at a time for a removable fix, and keeps a record so everything can be undone at move-out. Photograph each room first, check the lease, fix layout and light before décor, and keep every change reversible.
A renter friendly before after small space makeover is different from a normal renovation, because the rule is that the room must be able to go back to how you found it. That limit is useful. It forces you to solve the real problems of a small room with furniture, light, fabric and layout instead of with paint and drills, and it makes each change easy to test, easy to reverse and easy to take with you. This guide walks through three example rooms with a clear “before” problem, the removable steps that fix it and the “after” result you can aim for. It also covers the photo record you need, the order of operations, a table that ranks changes by how reversible they are, the undo steps at move-out and a checklist. For the wider approach, read our hub guide on renter-friendly apartment decorating ideas.
Why a before and after plan works in a rental
Most rental makeovers go wrong in one of two ways. Either the renter changes nothing and the room stays awkward, or they change too much at once, spend money on things that do not suit the layout and then worry about the deposit. A before and after plan sits between those two. You describe the room as it is, choose a small number of fixes, and judge each one against the original list.
The method also protects you. A set of dated photos taken before you start is the strongest record of the original condition of the walls, floors and fixtures. A written list of what you changed and how you will undo it makes the move-out conversation short. If you are unsure about anything, ask the landlord in writing before you begin, and keep the reply.
The other benefit is focus. Small rooms suffer from three repeating problems: not enough usable surface, poor light and a layout that fights the doorway. If your “before” list says which of the three you have, the “after” is mostly a matter of matching the fix to the problem.
Step one: document the room before you touch it
Spend twenty minutes on this before buying anything. It is the part most people skip, and it is the part that makes the rest safe.
- Photograph every wall, floor corner, window and door from two angles, with the lights on and with natural light only. Include the ceiling and the switch plates.
- Note existing marks: nail holes, scuffs, a cracked tile, a worn spot on the floor. Mention them in an email to the landlord or manager so they are on record.
- Measure the room at floor level and at 36 inches high, because skirting boards and radiators make the wall narrower than it looks. Record door widths, window sill heights and the position of sockets.
- Mark the light: write down where the sun lands at 9 a.m., noon and 6 p.m. and where the room is dark.
- Write the problem list: three to five sentences in plain words, such as “The bed blocks the window” or “Nothing has a home near the door.”
Keep these in a folder on your phone. When you finish, take matching “after” photos from the same angles so you can compare them side by side.
Step two: read the lease and sort changes by reversibility
Check what the lease says about nails, adhesive, paint, wallpaper, curtain rods, light fittings and appliances. Some leases allow small nail holes. Others ban everything that touches the wall. Ask in writing when the wording is unclear. Never drill, cut, rewire or remove a fixture without written permission, and do not alter electrical wiring or plumbing in a rental at all.
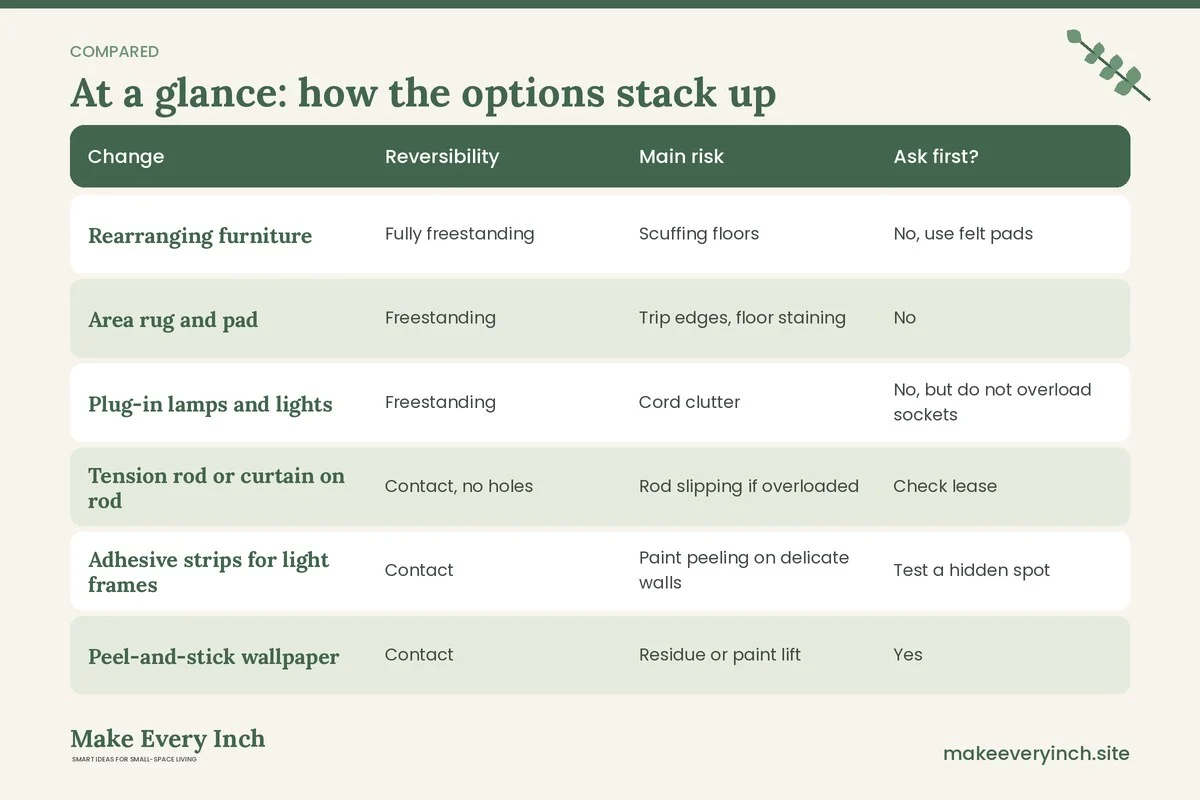
Sort every idea into one of three groups. “Freestanding” means it touches nothing. “Contact” means it touches a surface but can be removed, such as adhesive strips, tension rods or a rug. “Permanent” means it changes the unit, and those ideas wait for written approval.
| Change | Reversibility | Main risk | Ask first? |
|---|---|---|---|
| Rearranging furniture | Fully freestanding | Scuffing floors | No, use felt pads |
| Area rug and pad | Freestanding | Trip edges, floor staining | No |
| Plug-in lamps and lights | Freestanding | Cord clutter | No, but do not overload sockets |
| Tension rod or curtain on rod | Contact, no holes | Rod slipping if overloaded | Check lease |
| Adhesive strips for light frames | Contact | Paint peeling on delicate walls | Test a hidden spot |
| Peel-and-stick wallpaper | Contact | Residue or paint lift | Yes |
| Painting walls | Permanent unless allowed | Deposit loss | Yes, in writing |
| Replacing a light fixture | Permanent | Electrical safety | Yes, use a licensed electrician |
The table is a guide, not a promise. Surfaces, adhesives and conditions vary, so always test a small hidden area first.
Room one: the studio that has no entry and no bedroom
Before: what the room looks like
A studio of roughly 350 to 450 square feet where the bed is visible from the door, the sofa pushes against the foot of the bed, and keys, shoes and mail pile on the kitchen counter because nothing has a home near the entrance. There is one overhead light with a harsh bulb. The room reads as one big box with no zones.
The removable fixes
1. Make an entry with furniture. Place a narrow bench or a low shelf 10 to 14 inches deep against the wall nearest the door. Add a freestanding coat stand or an over-the-door hook rail that hangs without screws. The goal is a landing spot for keys, shoes and a bag, which takes the clutter off the counter. See small entryway ideas with no closet for more options.
2. Divide with a bookcase. Pull the bed 24 to 30 inches off the wall and put a low open bookcase at its foot, no taller than the top of the headboard so light still passes. Anchor tall furniture with a wall strap only if the lease allows holes. If it does not, choose a low piece under 36 inches or keep the heavy items on the bottom shelves. Read renter-friendly ways to divide a studio apartment for a longer list.
3. Layer the light. Swap a single harsh bulb for a warmer one in the same socket, which is a reversible change, and add two plug-in lamps at different heights. A floor lamp by the sofa and a small lamp beside the bed create two pools of light, which makes the studio read as two rooms at night. Our guide to renter-friendly lighting ideas covers the options.
4. Use a rug to define the living side. A rug that is large enough for the front legs of the sofa and the coffee table to sit on tells the eye where the living zone ends. See how to choose rug size for a small living room.
After: the result to aim for
From the door you see a bench, a coat stand and a wall of closed storage, not the bed. The bookcase breaks the sightline. The living side has a rug and a lamp, the sleeping side has a softer light and a headboard wall with a fabric panel or a leaned mirror. Nothing has been drilled, painted or rewired.
Room two: the one-bedroom living room with a blank wall and a bare window
Before: what the room looks like
A living room of about 11 by 13 feet with white walls, a sofa pushed flat against one wall, a small TV on a stand, a single window with thin builder blinds and a ceiling light with no shade. The room feels cold and flat, nothing is at eye level, and the doorway opens right onto the sofa back.
The removable fixes
1. Float the sofa a little. Pulling the sofa 6 to 10 inches off the wall gives space for a lamp cord and a floor lamp behind it, and makes the room feel layered. Keep a main walkway 30 to 36 inches wide from the door.
2. Add height with curtains. Hang curtains on a tension rod or a rod that sits in the existing brackets, placed 4 to 6 inches above the window frame and wide enough to clear the glass. Use curtains that touch the floor. This adds height and softens the window without touching the wall, if your window recess is deep enough for a tension rod. See renter-friendly window treatment ideas.
3. Fill the blank wall without nails. Lean one large piece of art on a console or shelf, or hang light frames on adhesive strips rated for their weight, after a test on a hidden spot. Aim for the center of the art at about 57 inches from the floor, and keep the group about two thirds the width of the sofa. Our post on renter-friendly wall decor ideas has 23 removable options.
4. Add storage that looks like furniture. A storage ottoman, a lidded basket or a closed cabinet keeps blankets and remotes out of sight. See best ottomans with storage for small homes.
5. Bring in a plant. One or two plants at different heights soften the corners. Place them away from the edge of a table, and keep pet-toxic species out of reach if you share the room with a cat or dog. See small-space plants and planters ideas.
After: the result to aim for
The room has three levels of interest: a floor lamp at 60 inches, a leaned mirror or large print at eye level and curtains drawing the eye up. The sofa has a back-of-sofa console or a slim shelf for a lamp. The TV stays, but the wall behind it now has one large framed piece and a plug-in light so the screen is not the only glow. Everything folds up, rolls out or leans.
Room three: the small bedroom where the bed fills the floor
Before: what the room looks like
A bedroom of roughly 9 by 10 feet where a double or queen bed leaves a 20 inch gap on each side, the closet is shallow, clothes pile on a chair, and the bed blocks half of the window. The wall behind the bed is bare, and the only light is a ceiling fixture.
The removable fixes
1. Decide which side the bed sits on. Push the bed into the corner farthest from the door, leaving at least 24 inches on the open side and 30 inches at the foot where possible. A corner bed frees a continuous strip of floor.
2. Use under-bed storage, with limits. Under-bed boxes with lids on casters or low bins hold off-season clothes and extra bedding. Raise the frame on risers only if the frame manufacturer allows it, and keep the load within the frame’s weight limit. See best storage beds for small bedrooms.
3. Add a closet extender. A tension-based or hanging closet rod doubles hanging space without drilling. Read how to double hanging space in a closet.
4. Swap nightstands. A wall-hung nightstand needs drilling, so choose a narrow stool, a small cart or a bedside caddy that tucks under the mattress edge. A plug-in wall sconce with a cord cover and an adhesive cable channel frees the nightstand top.
5. Make the headboard wall. A large fabric panel, a folded quilt on a tension rod or a leaned oversize mirror creates the focal point. Mirrors and framed pieces that lean against a wall must be on stable, low furniture and kept away from pets and young children. See small bedroom ideas for renters for more.
After: the result to aim for
The bed sits in the corner. There is a clear 30 inch path from the door to the window. Under-bed boxes hold seasonal items, the closet rod doubles, and the chair is gone or becomes a bedside seat with a basket. The overhead light has a warmer bulb, and a plug-in light does the evening work. The wall behind the bed has a fabric piece instead of a blank white patch.
Safety notes for every rental makeover
- Anchor tall furniture. Bookcases, dressers and tall shelves can tip. If the lease allows small holes, anchor them to a stud with the supplied strap. If not, choose lower pieces, load the heaviest items on the bottom and keep children away from climbing on them.
- Respect weight limits. Adhesive strips and tension rods have labeled limits. Stay well under them, and remember that damp air and heavy objects reduce their holding power.
- Plan electrical use. Do not daisy-chain extension cords, cover cords with rugs or overload a socket. Use cord covers that stick to the baseboard and are removable. Do not modify wiring or fixtures in a rental.
- Ventilate if you paint or glue. If the landlord allows paint, pick low-VOC products, open the window and let the room air out. Check that wallpaper or adhesives are rated for indoor use.
- Keep wet areas safe. In bathrooms and kitchens, keep cords and plug-in items away from water, and use a GFCI-protected outlet where the building provides one.
- Think about children and pets. Cords, small decor, dangling curtain cords and low shelves with fragile items are hazards.
The order that gets the best before and after
If you do these in a different order, you may buy things twice. This order saves money and time.
1. Declutter and clear. Remove what you do not use. See decluttering rules for small homes.
2. Fix the layout. Move furniture first, with painter’s tape on the floor to test.
3. Fix the light. Warm bulbs and plug-in lamps change a room more than art does.
4. Add storage that hides. Closed or lidded storage keeps the room calm.
5. Add the soft layer: rug, curtains, cushions, throws.
6. Add the wall layer: leaned art, light frames, fabric.
7. Finish with plants and small details.
Take your “after” photos only after the final step, in the same light and angles as the “before” set.
What to do at move-out
The point of a removable makeover is that the last day takes an hour, not a weekend.
1. Peel adhesive strips slowly, pulling the tab straight along the wall, not away from it. If the strip resists, warm it gently with a hair dryer on a low setting and keep going slowly.
2. Remove tension rods, curtains and rugs, and wipe any marks with a damp cloth.
3. Check floors for furniture dents. Felt pads and rug pads reduce them.
4. Restore any bulbs or fixtures you swapped, and keep the originals in a labeled bag.
5. Take matching photos and compare them with your before set. Send them to the landlord with the key return.
6. Fill any approved nail holes only if the lease asks you to, using a small amount of spackle, and let it dry fully.
Mistakes that spoil a renter makeover
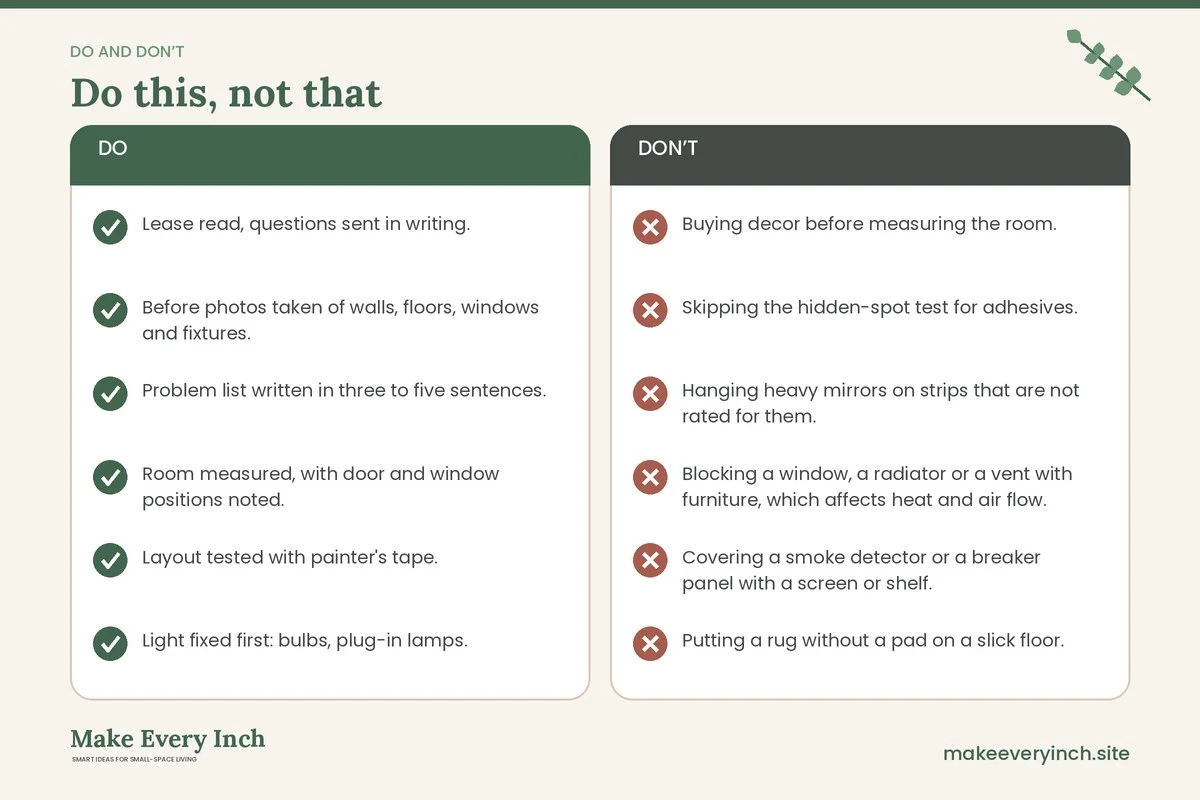
- Buying decor before measuring the room.
- Skipping the hidden-spot test for adhesives.
- Hanging heavy mirrors on strips that are not rated for them.
- Blocking a window, a radiator or a vent with furniture, which affects heat and air flow.
- Covering a smoke detector or a breaker panel with a screen or shelf.
- Putting a rug without a pad on a slick floor.
- Using more than two or three patterns in a very small room.
- Forgetting to keep the paperwork.
A simple checklist
- Lease read, questions sent in writing.
- Before photos taken of walls, floors, windows and fixtures.
- Problem list written in three to five sentences.
- Room measured, with door and window positions noted.
- Layout tested with painter’s tape.
- Light fixed first: bulbs, plug-in lamps.
- Storage chosen with lids or doors.
- Adhesives tested in a hidden spot.
- Weight limits checked for every strip, hook and rod.
- Tall furniture anchored or kept low.
- After photos taken from the same angles.
- Undo plan written down.
Frequently asked questions
Can I really transform a rental without painting?
Yes, for most small rooms. Layout, light, textiles and furniture usually matter more than wall color. If you want color, use large fabric pieces, leaned art and a rug. Ask the landlord before painting, and use low-VOC paint if permission is given.
How long should a renter friendly before after small space project take?
A single room can often be done over two or three weekends if you move in the order above. The documentation step takes an evening, and the layout and light changes can be done in an afternoon. Hold off on buying until you have lived with the new layout for a few days.
What if the landlord says no to everything?
Then use freestanding and contact-free ideas: furniture layout, rugs, plug-in lamps, leaned art, tension rods only if they are allowed and storage furniture. A strict lease still leaves a lot of room to improve the look and function of a space.
How do I keep the cost reasonable?
Prioritize the change that fixes your biggest problem, and choose items you can reuse in the next home. Rugs, lamps, curtains and furniture travel well. Wall coverings and custom pieces do not.
Is it worth taking before and after photos if I am not selling anything?
Yes. They protect your deposit, they show you how far the room has come and they help you decide what to keep when you move.
Keep going: Keep going with renter-friendly small space upgrades that make a difference, see how a full room can change in our small living room makeover ideas for renters and plan your storage with no-drill storage ideas for renters.
Save this guide for later
Pin the ideas you like to Pinterest so you can come back to them when you plan your space.