Small Kitchen Before and After Ideas
Quick answer: Small kitchen before and after ideas work best when you start with a clear problem, such as no counter space, blocked doors or a cramped walkway, and make a short list of changes aimed at it. Measure first, change the cheapest things first, and compare photos and numbers at the end. The scenarios below are illustrative composites, not real client results.
Small kitchen before and after ideas are popular because a good transformation proves that size is not the whole story. A cramped kitchen can often be made calmer and more useful with changes to layout, storage, lighting and habits, and the improvement is easy to see when you compare a photo from before with one from after. This guide takes a practical approach. Instead of showing glossy results, it describes illustrative composite scenarios, built from common situations, so you can see how problems, changes and outcomes connect for different kitchen types. It also covers what to measure before you begin, how to plan your own project, a table of changes with typical effects, safety notes and a checklist. For the wider topic, read our main guide to small kitchen ideas, and pair it with our guides to small kitchen storage ideas and small kitchen organization ideas.
A note on honesty first. Every scenario here is hypothetical. None of them describes a real client, a real home or a measured result, and the ranges are hedged because every kitchen differs. Use them as thinking tools, not as promises.
What makes a before and after worth doing
A useful transformation has three parts: a named problem, a limited set of changes, and a way to tell whether it worked. Many kitchen projects fail because they skip the first part. People buy a new rack or paint the cabinets without deciding what they are trying to fix, and the kitchen looks different but works the same.
Pick one main problem and one or two secondary ones. Common main problems in small kitchens include:
- Not enough counter space to prep a meal
- Storage that is full but disorganized
- Poor light that makes the room feel smaller
- A layout that forces you to cross the room to do simple tasks
- A rental with finishes you cannot change
Each of these suggests a different set of changes. If you try to fix everything at once, you spend more, make more mess and lose the ability to tell what helped. Our guide to small kitchen makeover ideas covers larger refreshes, and this post focuses on small, well-aimed changes that you can compare.
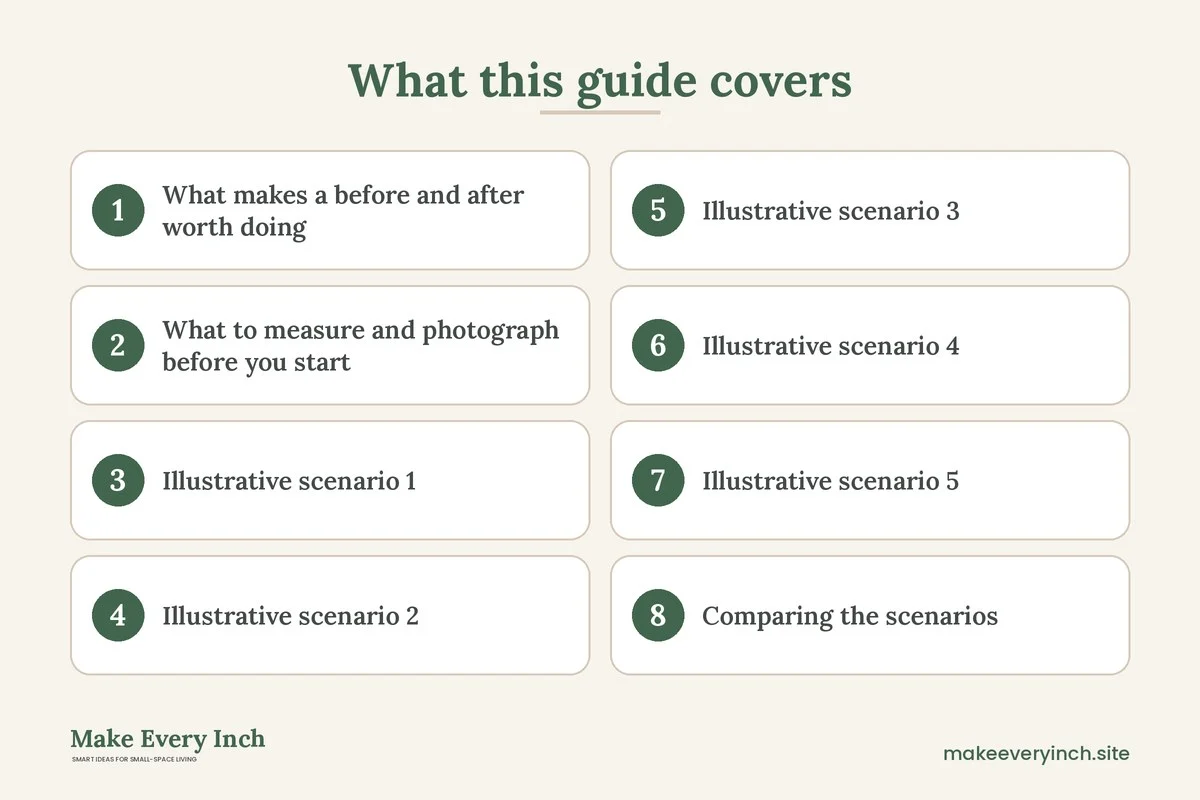
What to measure and photograph before you start
The before is only useful if you record it. Spend an hour on this step. It is the most valuable hour of the project, and it is the one most people skip.
Measurements
- Room dimensions: Length, width and ceiling height. Note the position of windows, doors, outlets and vents.
- Counter run: Total linear feet of counter, and the length of the longest clear stretch. Many cooks find about 24 inches of clear space beside the stove and 30 to 36 inches near the sink comfortable.
- Walkway width: The clear floor between facing counters or between a counter and an island. Around 36 to 42 inches suits one cook, and 48 inches or more suits two.
- Door and drawer clearance: How far the fridge, dishwasher and oven doors open, and whether they hit anything.
- Storage inventory: The number of cabinets and drawers, and the width, depth and height of each shelf.
- Upper shelf height: The distance from the floor to the lowest and highest shelf you use.
Photos
Photograph the room from each corner, and take close-ups of the counters, the inside of each cabinet and the area under the sink. Use the same spot and time of day for the after photos. Natural light changes the look of a kitchen, so shoot in similar conditions.
Simple scores
Numbers are easy to compare. Try three scores, each from 1 to 5, written in the notepad before you begin:
- Reach score: How often do you stretch, bend or move things to get what you need?
- Clutter score: How much is on the counter that does not need to be?
- Light score: How bright and pleasant is the room at the times you cook?
Repeat the scores after the changes. Even a rough change from a 2 to a 4 is a clear sign that something worked.
Illustrative scenario 1: the galley kitchen with no counter
The before
Picture a galley kitchen about 5 feet wide and 9 feet long, with cabinets on both sides. The stove sits in the middle of one wall, a sink on the other, and the longest clear stretch of counter is perhaps 14 inches. A toaster, a coffee maker, a knife block and a dish rack fill what remains. The cook chops vegetables on a cutting board balanced over the sink. The walkway is about 34 inches, and a trash can sits at the end of the run.
The changes
- Move the toaster and coffee maker onto a narrow rolling cart parked at the end of the room, taking them off the counter. See our guide to small kitchen cart ideas for options.
- Replace the dish rack with a compact folding version that stows away, or a roll-up rack over the sink.
- Add a cutting board that fits over the sink to create a temporary prep surface.
- Mount a magnetic strip for knives, if allowed, and free the block from the counter.
- Move the trash can inside a base cabinet.
- Add under-cabinet lights so the counter is evenly lit.
The results, described
The clear counter stretch could grow from around 14 inches to something closer to 30 or 36, and the walkway opens to 36 inches or more. The cook gets a defined prep spot, the room looks less cluttered and the lighting helps the surfaces read as larger. In a scenario like this, the reach score might move from 2 to 4 and the clutter score from 1 to 4. Exact results depend on the room. For related ideas, see our guide to galley kitchen ideas.
Illustrative scenario 2: the studio kitchenette with no pantry
The before
Imagine a studio apartment with a single wall of kitchen, around 8 feet wide. There are two upper cabinets, two base cabinets and a small fridge. Dry goods are stored in the original packaging, in a pile at the back of a deep cabinet. A few canisters and a bag of onions sit on the counter, and the cook cannot find anything quickly.
The changes
- Decant dry goods into square, stackable containers that fit the cabinet depth.
- Add a freestanding shelf or a slim tower beside the fridge for overflow, anchored if tall and permitted.
- Use a tiered shelf inside the base cabinet to bring back items hidden at the rear.
- Hang a rail with a few hooks for mugs and tools, within the rated load.
- Keep a short list of staples and stop bulk buying without a place to put it.
The results, described
Everything becomes visible at a glance. A shelf that held a pile of bags now holds a tidy block of containers, and the counter is clear apart from a kettle and a cutting board. The cook can see what is running low, so waste goes down and fewer duplicates are bought. In this hypothetical, the clutter score might climb from 2 to 4. Our post on small kitchen ideas with no pantry and the guide to small kitchen pantry ideas describe more ways to handle the same problem.
Illustrative scenario 3: the dark rental kitchen
The before
Consider a rental kitchen with one small window, a single ceiling fixture and dated finishes the tenant cannot change. The cabinets are dark, the counter is a busy pattern, and the room feels like a cave. The lease allows no drilling and no painting.
The changes
- Replace a bulb in the ceiling fixture with a brighter, warmer-looking one that fits the fixture rating, and check the maximum wattage on the socket.
- Add plug-in or battery-powered under-cabinet lights stuck on with adhesive that comes off cleanly. See small kitchen lighting ideas for options.
- Cover a busy counter with a large cutting board or a solid-color mat on the prep area.
- Add peel-and-stick tiles in a small area, only if the lease allows, or use a washable removable panel.
- Hang a light curtain or leave the window clear to let in all the daylight possible.
- Use renter-friendly changes from our guide to renter-friendly kitchen upgrades.
The results, described
The kitchen reads as brighter, and the work surfaces are lit from below, so the cook no longer works in their own shadow. The busy pattern recedes behind a calm surface. All the changes are removable, so the tenant can restore the room on moving out. In this scenario, the light score might rise from 1 or 2 to 4. For more, see our guide on renter-friendly lighting ideas.
Illustrative scenario 4: the open-plan kitchen with an island
The before
Imagine an open kitchen with a small island about 24 inches deep. Stools sit under the overhang, but the island is a dumping ground for mail, keys and school bags. The walkway on the working side is about 36 inches, and a second cook gets in the way. The cabinets along the wall are crowded, so the island holds the overflow.
The changes
- Define zones, with a basket for mail and keys by the entrance, so the island is for food.
- Move seldom used appliances into upper cabinets, and move heavy ones low.
- Add hooks near the door for bags.
- Use a narrow trolley that tucks under the island instead of more stools.
- Check that the walkway stays at 36 to 42 inches.
The results, described
The island becomes a prep surface again. With bags and mail rerouted, the room feels larger and the cooks stop colliding. The clutter score might move from 1 to 4. Our guide to small kitchen ideas with an island discusses sizing and traffic in more detail.
Illustrative scenario 5: the cramped family kitchen on a budget
The before
Picture a small family kitchen with a limited budget. Cabinets overflow with plastic containers without lids, the fridge door is covered in paper, and the drawer by the stove jams because a ladle hangs over the edge. Meal prep takes longer than it should.
The changes
- Match every container with its lid, and recycle those that do not pair.
- Edit the utensil drawer, keeping what is used weekly.
- Add one drawer divider and one shelf riser, both measured first.
- Clear the fridge door except for a few items.
- Make a weekly reset habit of ten minutes on Sunday.
The results, described
Almost no money goes to the project, and the change is mostly subtraction. The drawer slides freely, a container is found in seconds, and the cook feels less rushed. For more low-cost ideas, read small kitchen ideas on a budget and budget small kitchen makeover.
Comparing the scenarios
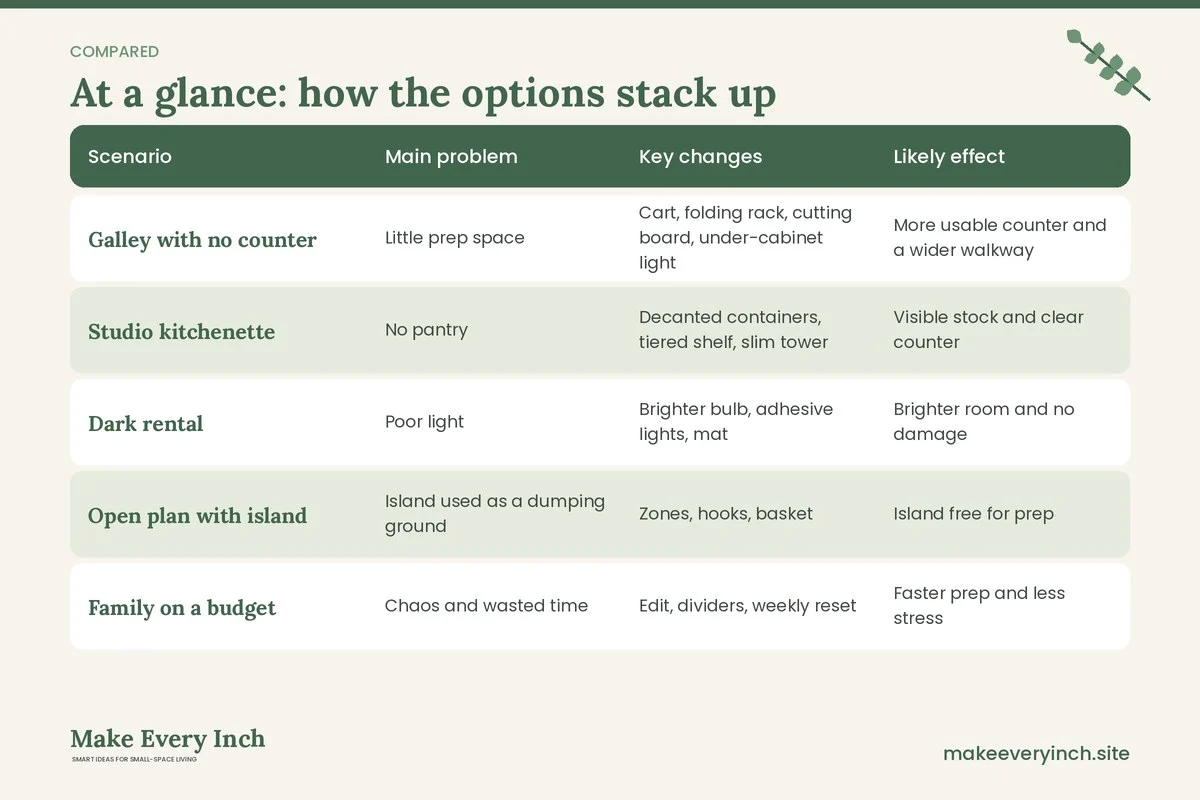
This table summarizes the five illustrative scenarios. The effects are hedged, and your kitchen will differ.
| Scenario | Main problem | Key changes | Likely effect |
|---|---|---|---|
| Galley with no counter | Little prep space | Cart, folding rack, cutting board, under-cabinet light | More usable counter and a wider walkway |
| Studio kitchenette | No pantry | Decanted containers, tiered shelf, slim tower | Visible stock and clear counter |
| Dark rental | Poor light | Brighter bulb, adhesive lights, mat | Brighter room and no damage |
| Open plan with island | Island used as a dumping ground | Zones, hooks, basket | Island free for prep |
| Family on a budget | Chaos and wasted time | Edit, dividers, weekly reset | Faster prep and less stress |
Notice what the scenarios share. None of them depends on a big remodel. Each one begins by naming a problem, changes the cheapest things first, and uses a measurement to judge the result.
How to plan your own small kitchen transformation
Follow these steps in order. Most projects can be done over a few weekends.
Step 1: Record the before
Take the measurements, photos and three scores described above. Write them in one place.
Step 2: Name the main problem
Choose a single sentence, such as “I cannot prep because there is no clear counter.” Everything you do should serve that sentence.
Step 3: Edit before you buy
Empty the cabinets and drawers one at a time. Remove anything you do not use, anything broken and anything duplicated. Then clean the empty space. This step is free and often solves half the problem.
Step 4: Fix the free things first
Rearrange what is left. Put daily items at easy height, heavy items low and rare items out of the way. Clear the counters and decide which items earn their place.
Step 5: Add light
Light has an outsized effect on how big a room feels. A brighter, evenly lit counter often changes the experience more than a new organizer.
Step 6: Buy only measured solutions
Use your measurements to choose organizers, carts or shelves. Subtract about half an inch from each dimension for clearance. Remember that anything you add also takes space.
Step 7: Photograph and score the after
Return to the same spots, at the same time of day, and repeat the scores. Compare. If one problem remains, repeat the process for that one.
Typical changes and how they tend to compare
Different changes have different strengths. Use this guide to decide where to put your effort.
| Change | Typical effort | Best for | Watch out for |
|---|---|---|---|
| Editing contents | Low | Overfull storage | Letting go of items |
| Rearranging by use | Low | Wasted reach | Keeping the new order |
| Under-cabinet light | Low to medium | Dark counters | Cord safety, adhesive limits |
| Cart or trolley | Low | Extra surface | Blocking walkways |
| Shelf risers and bins | Low | Deep cabinets | Measuring first |
| Open shelves | Medium | Display and access | Grease and dust |
| Peel-and-stick finishes | Medium | Dated surfaces | Heat near a stove and lease rules |
| Painted cabinets | High | Dated color | Ventilation, low-VOC paint, permission |
Safety and rental notes
- Never drill without permission. In a rental, ask first and get it in writing. Many of the changes above use adhesive, tension or freestanding products instead.
- Anchor tall furniture. If you add a tall shelf or cart, secure it to the wall where allowed.
- Respect electrical limits. Check the wattage rating on light fixtures and do not overload power strips. Keep cords away from water, heat and walkways. If you want hardwired lights, hire a qualified electrician.
- Ventilate and choose low-VOC products. If you paint or use adhesives, open a window and follow the label.
- Keep heat away. Adhesive products and fabrics can soften or catch fire near burners.
- Check weight ratings. For rails, hooks and shelves, stay well below the limit.
- Keep a path. Whatever you add, make sure you can still open the fridge, oven and dishwasher fully.
Photographing a fair before and after
If you want to share your result or just see it clearly, take photos with care. A tidier room photographed in better light can look like a bigger change than it is, which is fine for fun but misleading for planning.
- Use the same position and height for both shots.
- Shoot at the same time of day, with the same lights on.
- Take a wide shot and several close-ups.
- Keep the camera level so vertical lines stay straight.
- Include one photo of the inside of each cabinet.
The aim is to see what changed, so the comparison should be honest.
Common questions
What is the cheapest small kitchen change with the biggest effect?
Editing and rearranging cost nothing and often have the biggest effect. After that, better light tends to help the most for the least money.
How long does a small kitchen transformation take?
A light refresh can be done in a weekend, and a more thorough one may take three or four weekends. Spreading the work out lets you judge each change before moving to the next.
Do I need to measure if I am only decluttering?
A tape measure is not essential for decluttering, but the before photos and scores still help. You will need measurements before buying any container or furniture.
Are these scenarios real?
No. They are illustrative composites, written to show how problems and changes connect. They are not real clients, real homes or measured results.
Can I do these changes in a rental?
Most of them, yes. Choose adhesive, freestanding and tension-based options, and ask your landlord before drilling, painting or replacing fixtures.
What if the kitchen still feels small afterward?
Look again at light, clutter and traffic. These three affect how large a room feels more than its square footage. If a layout problem remains, our guide to small kitchen layout ideas for better workflow can help.
A final checklist
- Record room and counter measurements
- Photograph each corner and each cabinet
- Score reach, clutter and light from 1 to 5
- Name one main problem in a sentence
- Edit contents before buying anything
- Rearrange by how often you use things
- Improve light before buying furniture
- Measure every space before buying a product
- Check safety, rental rules and load limits
- Repeat photos and scores at the end
- Keep a ten minute weekly reset
A good before and after is not about spending more or owning better things. It is about noticing what bothers you, making the smallest change that fixes it, and checking that it worked. Do that a few times and a small kitchen starts to feel like the right size.
Keep going: Start your own transformation with the main guide to small kitchen ideas, then work through small kitchen storage ideas and small kitchen organization ideas. Before you buy anything, read small kitchen storage mistakes to avoid.
Save this guide for later
Pin the ideas you like to Pinterest so you can come back to them when you plan your space.